Leather sewing machine project.

Derf, I wish I could do a double like for your post! Very nice well thought out and executed project! You did tool and die work right?
 
Maybe other Hobby Machinists will join in and order a machine. That would be pretty neat because there is so much
ingenuity on this site just waiting to sprout.

I've already talked to my wife, and think we may get one too. She isn't into machining but is very mechanical so it could be kind of a fun together project improving it. Really glad you brought it up. In all the looking for sewing machines one of these never came up.
 
So talking with my wife, I'm going to get one of these for her or Christmas. I'm going to keep it in my shop as incentive to get her room cleared out. ;)

Looking at these on ebay it is like shopping for a Chinese mini-lathe, they look to be mostly the same with only minor differences but there is about a $40 spread in price. Any features to look for, or is this like many such things of simply finding a seller with good feedback and a price that makes me happy?
 
I got mine from amazon, about $115.00. While I was at it, I ordered some spare needles and thread, and it was $130.00 to my door.
 
After a few hours of cleaning and several modifications, I find this machine quite usable. Several things were found to be
in need of change. The presser foot handle was very difficult to operate from the back side so I made a new handle oriented towards
the top. That was easy to do and very handy now. Pushing the handle towards the crank end actuates the presser
and towards the needle end drops it. The bobbin winder was removed and another made of brass, a couple scraps of 4130
steel and a rubber donut that was the push rod seal from an old O-470 Continental engine. Also I made a bracket and a little
base to hold the thread at a better angle to feed the thread. P1020574.JPG
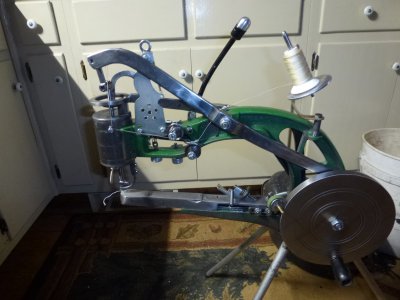
Here you can see my presser foot modification and thread base. P1020575.JPG
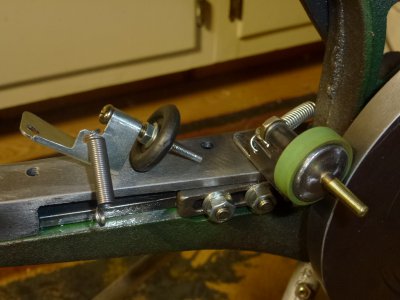
This is a photo of the original bobbin winding device on the left and my new one on the right. I silver soldered a small cylinder
of 4130 to the bent flat steel to fabricate the shape needed. Then I machined a little flywheel that was threaded internally to hold the
tapered brass rod. The new bobbin device has brass on steel for a bearing. The old one had threads and a rolled piece of tin for
a bearing. It's not a big thing but winding some thread on the bobbin puts a smile on my face now.:)

I did some grinding and polishing on the rod that actuates the needle and I must admit it looks better now. I find it interesting
that there are many so called brands of this machine but they all use the same basic casting in the manufacture. For the
moment, it is good enough and I can move on to building a better support and automate the machine. The machine was $92.00
on E-Bay (plus tax) so I have $100 invested now. I have to say it was money well spent and a fun project indoors to do during a
long Minnesota winter. Tomorrow I will experiment with the gear reduction motor with a variable speed DC power supply to
get the feel of how that would work. If it looks promising, that will be my next project along with some sort of ergonomically
convenient support table.

Tomorrow we see the shortest amount of daylight so from then on the days will be getting longer. I see the sun in the southeast
now in the morning and it comes up sort of, not really getting overhead and sets in my southwest. That's something to look forward to,
longer days....:chunky:

MERRY CHRISTMAS from Catwerks!
 
Good idea on the tilted spool holder. I know mine would become entangled once in while by somehow getting the thread below thew spool. Yea... the presser foot lever seems to be in an awkward place. I made linkage to mine that put it at the left side of the needle, like a standard sewing machine.
The bobbin winders are flimsy at best, I had to build a heavier version like yours.
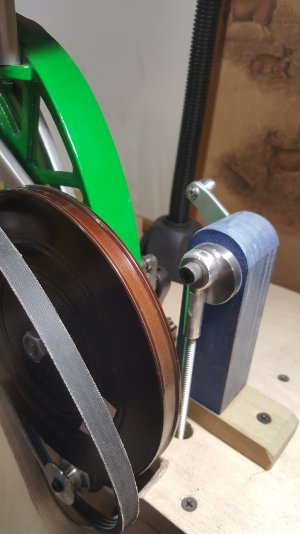
You'll find that the cam troughs on the inside of the flywheel get pretty close to the outside, so a belt groove has to be shallow. I used a J4 poly Vee belt, which is more flexible than a standard v belt with 20% less drag.
20191218_185419.jpg
Another thing you'll want to do is balance the flywheel. The combination of the heavy side of the wheel, and the torque let-off when the presser foot drops back down, it wants to jump some at top end under power. I found the heavy side and milled and drilled till it was close.
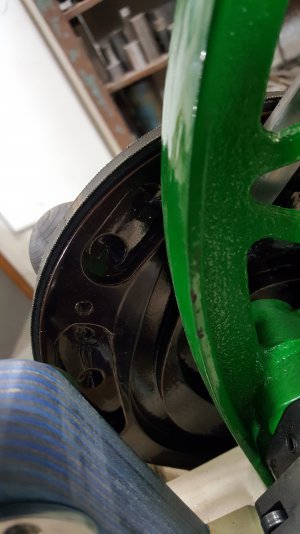
20191220_194149.jpg
Another thing you might have noticed, I powder coated the flywheel on both sides. One reason is for rust prevention, the biggest reason was to soften some of the shock of the metal on metal in the cam troughs. It sure did take a lot of the "clack, clack, clack" out of it.
 
If you look up a serger sewing machine, and take a look at how they feed the thread off the spools. They have a wire, with a loop above the spool, so the thread gets pulled off the spool upwards. something like that may keep the thread from falling down on the spool.

Somewhere in my travels, I saw a battery powered bobbin winder, something like that may be simpler to use. Does the machine use standard bobbins?

I showed the wife this thread, and now she wants one, But we have to wait until we get these Vet bills paid down. Do not take your dogs health for granted.
 
The bobbins are smaller than a standard sewing machine bobbin, they look to be about 5/8 inch in diameter. I have been doing some reading and
wondering if the bobbin thread has to be of the same weight as the needle thread. Then there is needle size and thread size. This is all quite
confusing . My machine came with a pack of 19/120 needles which is fairly large. So far I havn't broken a needle. It might be fun to make
a few bobbins on the lathe but they are pretty small and also thin so would be an interesting challenge.
 
THANK YOU for posting this!!! I have been wanting a letaher sewing machine for years but all the other types mare way too expensive. I was not familiar with this type and it's knockoffs until your post. I did leather carving back in the 70's and 80's and even some tack repair, but all sewing was by hand.
I will probably duplicate your stand as it looks well made and suited to the purpose. I am going through my motror collection to power it up.

I saved this page & the other one in the link above and this will be my spring project.

THANKS!!!!! Charles
 
Just thought of this. Is there any adjustment to size of stitch? A smaller/closer one for a wallet vs a longer one for a holster?
Charles
 
Back
Top