Looking for Sanford MG-612 Surface Grinder owners

Interesting problem(s):

Doing some test setup today in preparation for a possible table grind. I set up an indication on the spindle to see what the table looks like before grinding. Measuring from left to right, I got a deflection of about 0.001 (one thou). Measuring from back to front, with the back set to zero, I got an indicator rise of 0.010 (ten thou). Those seem like awfully big numbers for a surface grinder.

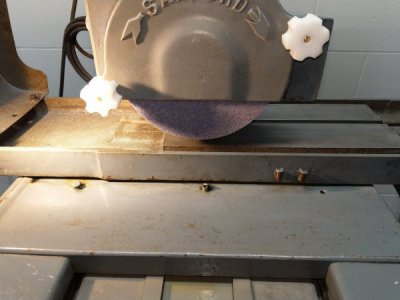
Then, I installed a new 7" wheel. But with the spindle lowered as far as it will go, the wheel is still about 3/4" above the table! Not going to do much table grinding with that. (see picture)

So - what do the experts advise?
  1. Remove the guard and install an oversize wheel just to grind the table?
  2. Leave well enough alone and just grind in the magnet?
  3. Other?
Scratching my head here - am I missing something?

sanford-mg-table-grind.jpg
 
On my grinder, my mag chuck is much thicker than yours. Is it possible that your is missing the lower part of a 2-part chuck?

In any event I would build a nominal 1" riser, surface grind it to parallel and use longer bolts to bolt the chuck through to the table.
 
Are you sure the ways and mating surfaces on the table are free of debris and burrs? In one of their publications Sanford recommends removing the table and cleaning the ways on a weekly basis to prevent wear. I haven't followed that recommendation to the letter, but over the years I have removed the table a few times for cleaning. Occasionally I did find grinding debris that had to be wiped out.

With the table removed I would check to see whether the ways and/or table are worn. If they are it may be time to rescrape or replace the ways. Also in one of their publications Sanford stated on some machines the ways are replaceable. I don't know when that started or what models it applies to. If your ways are replaceable it might be time to talk to a local grinding shop to see if some new ones can be made.

I would think it's also possible to have the table and or ways reground. The previous owner of my Sheldon lathe had the bed and cross slide reground. I have the paper work from the company that did the job. They certify that both surfaces are within .0002". On their website they advertise closer tolerances if necessary.

If you find the ways and table's to be in good condition I would shim the chuck as close to .0000" as possible then dust grind it insitu. If you are removing .0005" or less per pass you should be able to do it dry. There is a video from Suburban tools where the owner dry dusts a chuck on a Reid grinder.
 
Last edited:
I've done a bit more investigating on my table grind issue. I did inspect the ways before I put the table on, but it was just a visual inspection - I don't have the right tools to do any useful measurement. My Sanford MG is 50+ years old, so naturally there is going to be wear pretty much everywhere, but I don't see the ways wearing 10 thou on just one end.

My magnetic chuck is approximately 3.1" high (note to Dabbler - lower part is definitely there). However, with the mag chuck removed, the top of the table is about 3/4" lower than the grinding wheel at it's lowest point. I measured the thickness of the mag chuck with a micrometer at the front and back edges, and found the back is about 10 thou thicker than the front. The table is 10 thou lower at the back, so it's pretty clear that the mag chuck was simply put on the table and ground flat relative to the wheel.

I wouldn't rule out the possibility that the table has been this way since the machine left the factory, because I don't think 10 thou of wear on the table is probable, especially when covered with a mag chuck. My conclusion is that while there must be wear on the ways after 50 years, that is not the reason for the 10 thou "slope" in the top of the table. If I ground the top of the table flat at this point, I would have to grind off 10 thou in some areas, and then when I put the mag chuck back on, I would have to grind off a compensating 10 thou there too. This does not seem like a good idea to me.

I have concluded that the best course of action is to replace the mag chuck on the table as is, and then grind in the top of the chuck. I may also check to make sure there is good surface contact between the bottom of the mag chuck and table, as shown in this video :
(Shadon HKW checks for contact with Dykem, mating the surfaces to see how they contact; then he scrapes/polishes to get good contact).
 
-- My mistake.,, I can't see well on my laptop and inferred you couldn't grind the *magnetic chuck* very sorry. I'm pretty sure they don't grind the table base, My Browne and Sharpe still has milling marks on the table, and mine reads around .003 end to end - but it doesn't matter at all. Only the final grind really matters...

I checked with my Tool and Die maker friend, and he isn't surprised by your ten thou, but confimed it won't matter...
 
Dabbler - Thanks for the update. That gives me some confidence that I am moving in the right direction. I just did the Dykem contact test - not horrible, but also not great, so I have a bit of work to do there.
 
I doubt the machine left the factory with the table .010" high in one corner. Keep in mind at the price of this machine in the 1950's it would have been sold to a professional shop. No grinding shop would accept a machine that far out of tolerance. As a point of reference the spec sheet that came with my Sheldon lathe certified that the from the factory the bed ways would be less that .0003" out, That's on a machine that 's expected to produce parts in the +/- .001 range, not the +/- .0001" range.

If you look at the 1953 brochure you'll see Sanford advertises in large bold letters that the machines are inspected before leaving the factory. In the right hand column the list the specs for the table as less than .0001" in the transverse and longitudinal directions. They also list the spindle as being less than .0002" out of parallel with the table.

It is possible somewhere along the line someone has changed out parts. My machine has different gearing on the spindle down feed, and I would also bet the spindle cover is not original. Fortunately my machine came from a working shop. It had been used in a professional situation until I purchased it. I was able to run it and test the results. I knew when I purchased it everything was within tolerance. When I disassembled my machine to move it I removed the spindle column from the machine. It took quite a while to reinstall it and get the parallelism correct. It's possible at sometime in its life your machine was also disassembled for transport and the owner wasn't very careful when reassembling it. Rather than spend hours trying to correct the problem they may have just decided to grind the chuck to match.

If you truly want the machine to operate as it was designed I would investigate either loosening or removing the column for inspection. It's not the easiest job in the world and can be frustrating to have to do it multiple times to get things back to spec. In the long run I think you'll be a happier camper if you find and correct the problem rather than take the same route as the previous owner.
 
projectnut -

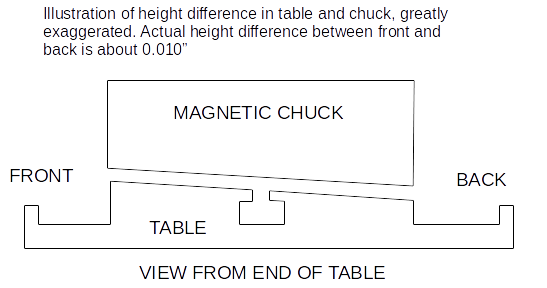
Just to clarify, it looks to me like the entire table surface is tilted down about 10 thou at the back. I made a quick drawing (below) to show what I mean. You may well be right about some previous owner of my machine. It must have an interesting history since it was made in 1956; who knows how many owners it has had in the last 62 years, and what they did to it. The only owner I know about is the one I bought it from - he didn't use it much at all, and was not all that interested in precision grinding as far as I could tell.

I've watched a couple of videos on surface grinder re-builds - scraping the ways, re-aligning, etc. I've no doubt my machine would greatly benefit from a similar treatment, but it's way above my skill level, even if I had the necessary tools. I think this leaves me with my current plan: Re-mount the magnetic chuck and re-grind the chuck surface to get it flat and in plane with the wheel. My goals with this machine are to learn the basics of surface grinding, develop some skills in that area, and do some useful work in my shop. I don't expect to be grinding parts to tenth thou precision with this machine, so hopefully it will meet my modest requirements.


grinder-table-tilt.png
 
projectnut -

Just to clarify, it looks to me like the entire table surface is tilted down about 10 thou at the back. I made a quick drawing (below) to show what I mean. You may well be right about some previous owner of my machine. It must have an interesting history since it was made in 1956; who knows how many owners it has had in the last 62 years, and what they did to it. The only owner I know about is the one I bought it from - he didn't use it much at all, and was not all that interested in precision grinding as far as I could tell.

I've watched a couple of videos on surface grinder re-builds - scraping the ways, re-aligning, etc. I've no doubt my machine would greatly benefit from a similar treatment, but it's way above my skill level, even if I had the necessary tools. I think this leaves me with my current plan: Re-mount the magnetic chuck and re-grind the chuck surface to get it flat and in plane with the wheel. My goals with this machine are to learn the basics of surface grinding, develop some skills in that area, and do some useful work in my shop. I don't expect to be grinding parts to tenth thou precision with this machine, so hopefully it will meet my modest requirements.


View attachment 270471
I would do a LOT more measuring of the geometry of all the major parts of the machine to see what is really going on with it. Sure, you can grind the chuck in flat and that will work until you again need to remove the chuck. When you put it back on, any small amount of skew to the mounting will make the geometry horrible again. A lot of material will need to be removed when what is ordinarily required is just a light dusting. This is a really good time to learn about the sequences of how to map the machine as it is, followed by corrections in a specific order, using the reference plane of the grinder to qualify all the machine parts in the proper succession. Not doing so is probably how it got to where it is now, if that is in fact true...
 
I guess I'm in the same camp as Bob Korves. Then again I spent some 40 odd years resolving problems and making design changes on existing machinery as well as designing and building new machinery. I learned early on (fortunately from others) that sometimes taking the shortcut could come back to bite you in the A**. To me the challenge (and fun) would be to find the core reason why the table is at an angle to the spindle, and why it wasn't resolved by a previous owner. Personally I would feel some pride in resolving a problem that had either stumped or eluded others.

I'm sure there is some wear on the ways and table, but I seriously doubt it's .010". I have a Seneca Falls lathe that was used by my wife's grandfather for over 40 years in a prototype shop. The machine was run another 40 years in her fathers wood working shop, and I have had it in my shop for another 20+ years. I wouldn't even venture to guess how many hours are on the machine, but you can bet it's in the many thousands if not hundreds of thousands. The ways on this machine have places where they are worn in the neighborhood of .010". It isn't a linear thing, but rather where a section where the carriage ran for the majority of it's working life. I would expect the same type of wear pattern on the ways of your machine. More like a dip in the ways where most work was positioned, not a continuous linear slope from front to rear

If I were to make a (somewhat educated) guess as to the source of the problem I would look to the spindle column and its mounting to the machine base. I know from experience that if the two were ever separated they can be difficult to reorient to within the original specs. As I mentioned in an earlier post I spent the better part of a couple days cleaning, deburring, and reshimming the column to get it properly positioned.

In my case I didn't realize the column was shimmed until I had the machine disassembled. Once the shims were on the floor it was all but impossible to know exactly where they came from. At least I did have a clue as to how much was required. Then it was a matter of cleaning, assembling and measuring to determine where they should be placed.
 
Back
Top