Looking for why these two pieces might not fit...

WobblyHand

H-M Supporter - Diamond Member
H-M Lifetime Diamond Member
Joined
Dec 18, 2019
Messages
6,447
I'm trying to make a barrel nut for an airgun. It has an M8x1 thread. The threaded section is 10mm long, then there is about a 2mm long gutter. To avoid messing with the barrel, I made a male test piece and threaded it to M8x1, checking the thread pitch diameter with a threading micrometer. I'm right at nominal PD. I drilled the hole using a 1/4" drill then bored it to 7mm. It's not perfect, but it looks ok. I then used an Acme thread tool to (slowly) form the thread gutter between 10-12mm deep in the bore. If I believe what I did, the groove was 0.9mm deep. Finally, I single pointed the M8x1 thread using a left handed tool, with the spindle in reverse, going from the groove towards the tail stock. The compound was at -60 degrees (as opposed to +60 for normal threading).

The male test piece also has about 10mm thread and a 2mm thread gutter. I'm expecting these two pieces to mate (or nearly mate) completely, with practically no gap. But the male piece only threads in 10.2mm. At this point, it's nearly impossible to view what's in the hole. I'd need a bore camera, which I don't have. It could just be a burr at the end of the thread. It looks like the groove is deep enough, if I look through the opposite end. But maybe it isn't. I have no way to get in there to measure it. I have half ball inside measurement tools, which are not useful to measure a thread gutter.

Now maybe I could power the male piece in a little deeper. At the moment, the test male thread is on the end of a shot piece of 3/8" stress proof rod. I can't grip the rod to turn it further, so I thought I could machine a hex at the end. Looks like if I machine off 0.030" per side, I get an 8mm hex. I could use a socket wrench on the male thread to see if I could mash my way through the burr. I don't like doing that, but that's one possibility. It could mess up things though.

I could get an M8x1 tap, (check that it is ok,) then grind off the end a little and make sure the thread fully goes to the groove. I'm always leery of cheap taps though.

Worst case is to section the darn thing and find out what went wrong, which I might end up doing if I damage the thing. Besides the bore and the internal threading I don't have that much machining into this piece. I planned it this way - I didn't want to do a ton of machining only to eff it up at the end with the internal single pointing. So I did the single pointing first.

Can anyone offer a suggestion or observation that might help? The 1" female stock is 12L14, if that helps. In the end, this is what I am trying to make, but I'm a little stuck on these internal threads. It could be something obvious, that I'm missing... Wouldn't be the first time I've missed the forest from the trees!
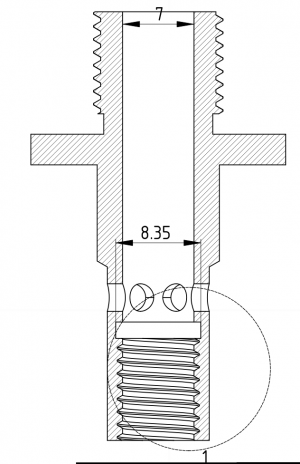
1697826748153.png
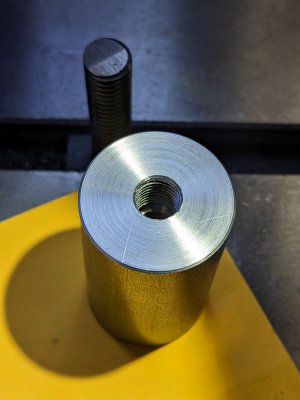
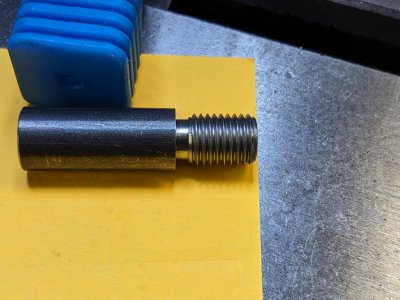
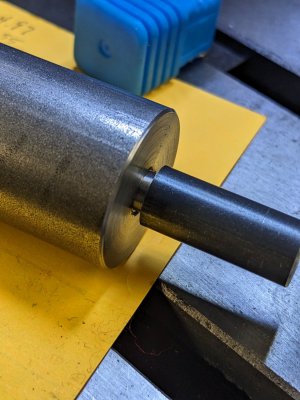
PXL_20231020_182208885.jpgPXL_20231020_182358316.jpgPXL_20231020_182439451.jpg
 
You have a generous thread relief ("gutter", if I'm understanding your post correctly). My best guess is that you should take a few "spring passes", which is to say single point your internal thread some more to compensate for deflection of your (single point) threading tool.

Given that you've broken the setup, a tap might be the right solution (if it can be had inexpensively). A "mock tap" might be made with a hardened steel bolt in which you cut a couple of flutes. It seems like you're terribly close.

I'm a PCP fan myself, and happy to see this sort of work show up here. Thanks for posting!

GsT
 
My first guess is that the "gutter", in the female threaded part, isn't large enough diameter to clear the male thread.
My suggestion is to find or grind a grooving tool that will ensure the relief groove is larger ID than 8mm. Alternatively, make/buy a tool that you can use to measure the thread relief diameter.
 
You have a generous thread relief ("gutter", if I'm understanding your post correctly). My best guess is that you should take a few "spring passes", which is to say single point your internal thread some more to compensate for deflection of your (single point) threading tool.

Given that you've broken the setup, a tap might be the right solution (if it can be had inexpensively). A "mock tap" might be made with a hardened steel bolt in which you cut a couple of flutes. It seems like you're terribly close.

I'm a PCP fan myself, and happy to see this sort of work show up here. Thanks for posting!

GsT
I thought the gutter was deep enough, but it is behaving otherwise. I honestly thought is was too deep when I did it. It's really hard to tell with this small tooling if you really are in contact, just not enough feel to it. It could be that I had deflection as well, and even though I thought I had more than enough depth, I didn't. Playing with these tiny carbide tools is a tough mind game, they only go so far, then they break.

I didn't want to break the threading setup, but I couldn't see how to proceed after a while. Oh well. It's tough doing this blind work, hope it will get easier after a while.

Yeah, PCP's are fun. I only bought this model because I figured I could machine parts and accessories for it. This model is long in the tooth and spare parts don't seem to be available anymore. I could have bought this adapter, but I wanted a larger flange on it, so I'm making it.
 
My first guess is that the "gutter", in the female threaded part, isn't large enough diameter to clear the male thread.
My suggestion is to find or grind a grooving tool that will ensure the relief groove is larger ID than 8mm. Alternatively, make/buy a tool that you can use to measure the thread relief diameter.
Behaviorally, it sure seems the gutter isn't deep enough, or there's some big burr at the end of the threads. Peering into the other end of the bore, it's really hard to tell since the hole is 35mm deep. I can always try a little greater depth. Could of sworn (via my DRO) that I have more than enough depth. It's hard to judge, since I don't want to push the tool too hard for fear of breakage. But maybe my zero wasn't zero, so the depth is too shallow.
 
My first guess is that the "gutter", in the female threaded part, isn't large enough diameter to clear the male thread.
My suggestion is to find or grind a grooving tool that will ensure the relief groove is larger ID than 8mm. Alternatively, make/buy a tool that you can use to measure the thread relief diameter.
This is where I'm at, BTDT even with larger stuff.

Carbide insert or carbide bar with proper thread form?

How did the thread feel up until it stopped? Tight? Loose? perfect? Perfect should have a slight bit of wiggle up until a solid lockup.

Was your tool on center or above to cut the gutter?
 
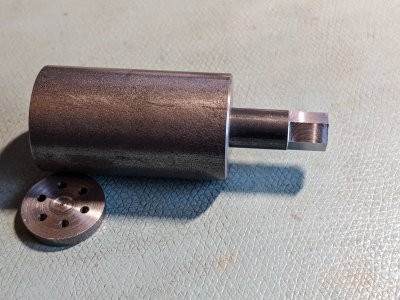
If the gutter isn't deep enough, it isn't off much. But maybe there's a burr. So I machined a hex onto the end of the male test piece. If you take off 0.030" off each side of a 3/8" rod, you get a nice 8mm hex. So I did that. Used a hex socket wrench and it screwed in with not too much effort. It's a little bit snug for the last mm, but not too bad. Removing the male piece doesn't show any deformation. Looking inside the female piece doesn't show any cut threads (that I can see) in the gutter. I'm going to call this "successful enough". Now I can screw it in with my fingers. Hey, maybe I cut 0.001" deep threads in the gutter, but I can't detect it.
PXL_20231020_203343614.jpg
 
This is where I'm at, BTDT even with larger stuff.

Carbide insert or carbide bar with proper thread form?

How did the thread feel up until it stopped? Tight? Loose? perfect? Perfect should have a slight bit of wiggle up until a solid lockup.

Was your tool on center or above to cut the gutter?
Micro100 left handed threading tool for the inside threads. ITL-160750
Micro100 Acme 16TPI RH tool IAT 600-16 (Yeah, I know, not the right tool, but it was the right depth.) for the gutter.
Tools aligned with the flat horizontal.

Beautiful fit on the threads, because I used the male threads to match. Male threads set to nominal pitch diameter.

I don't know, either a burr at the start of the threads, or the acme gutter tool made a burr, or just plain not deep enough, by a hair. Using a wrench to screw in the screw fixed the problem, whatever it was.

Picture above shows the parts now screw together. This was a nail biter. Wasn't sure it was ever going to work. Turns out, it just needed a little bit of friendly pursuation.

 
Your bur is in the gutter....
lol the bur affecting your progress is in the relief.
Put some blue on your male thread, let it dry and screw it in and out and look around.
Thanks for the pics and drawing, it makes the circumstances clearer.
 
Your bur is in the gutter....
lol the bur affecting your progress is in the relief.
Put some blue on your male thread, let it dry and screw it in and out and look around.
Thanks for the pics and drawing, it makes the circumstances clearer.
What made this so difficult is the visibility. If you can't see what's going on, it's tough to know how to fix it. All you know is it doesn't screw in easily, and if done to print, it should have worked.

Tried to get decent pics, kind of hard to get one's that show the problem. Basically can't see the entire gutter due to the geometry (depth of hole relative to the hole diameter). The cross section of the drawing was attached because I figured no one would understand my babbling without pictures of what it should look like!

I'll try bluing. Dykem adequate for this?
 
Back
Top