Making a Steel Base & Stand for Sherline 4410 Lathe

PhilJustLearning

Registered
Registered
Joined
Apr 8, 2023
Messages
23
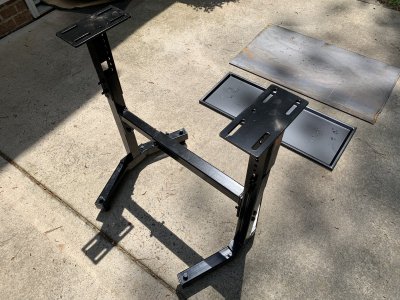
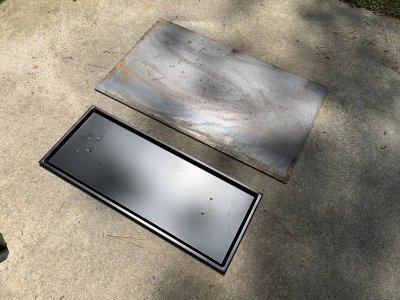
I wanted a hefty base and stand for my Sherline 4410 CNC ready lathe. It may be overkill, but plan to use a 1/4" steel plate I had left over from another project. I also wanted a nice chip tray, so got one off of LittleMachineShop that was intended for 7 X 16 Mini lathe, part number 5506. I may need to make some kind of back splash later to keep my garage drywall oil free.

All the dimensions seem to work. To order anything on-line these days that is heavy costs a lot for shipping, so I found the adjustable Wen 225 lbs capacity (Wood lathe) stand from Home Depot, low cost and free shipping to my door. It is also adjustable so I can fuss with the height since I don't know what is comfortable to use for me yet or what is recommended.

The idea is from the ground up, stand, steel plate, chip tray, Sherline 4410 lathe.

After reviewing some of HM forum's threads, I know others have used wood, plywood, particle board, and aluminum C channel. With some good successes, with Melamine-coated MDF for example, over 20 years, applied to the Sherline lathes. I just wanted to add some mass and stiffness to the base, while keeping my costs low and use what I have on hand (other than the stand; I also didn't want to eat up any of my existing bench space).

I really didn't want to risk using wood for the base. It may be totally fine, but to be honest, I'm just getting started so for me I'd rather eliminate any potential issues up front that I may have to solve later or that could affect the quality of the results I get and not figure out why until years later. I do know larger more powerful machines have some mass to them, this is for good reason, my wife also has an industrial Sailrite sewing machine and it has a lot of heft to it too compared to the normal sewing machine she has.

I'm interested to hear any comments or feedback and suggestions, since this is my first time doing this.

I'm not sure what to use to shim the lathe when leveling things out. I read somewhere that I can rip apart one of those feeler gauge sets and use one or more of those to prop things up. Maybe there are other techniques too. I got a machinists level, so I'm up to the task after I get the stand in its final resting place.

I attached some pictures, sorry - hard to see some of my white layout lines with the sun, but the plate I plan to cut down to about the dimensions of the chip tray. I have a Lotos LTP5000D red plasma cutter to cut the plate to size, but need to wait until new consumables arrive from Amazon since the tip on it now is destroyed.

Thanks, Phil
 

Attachments

  • IMG_1683.JPG
    IMG_1683.JPG
    829.4 KB · Views: 17
  • IMG_1684.JPG
    IMG_1684.JPG
    934.5 KB · Views: 16
  • IMG_1682.JPG
    IMG_1682.JPG
    428.1 KB · Views: 16
You are going the right direction. My lathe is mounted on 5" by 1 1/2", 1/4" thick channel iron on of a rigid bench. My earlier bench was not as rigid. It made a difference in the lathes cutting ability. I would suggest adding an electrical box with an on/off switch with two or more plugins on your bench. You will then have a place to plug in your lathe and lighting for your work. If you add a back splash, you may be able to mount the light to that. I would make the back splash removable, sometimes you need to get behind the lathe Last, you will want some kind of toolbox either part of your bench or on some small roll around to keep all your lathe tooling. You want your tooling together and convenient.
 
You are going the right direction. My lathe is mounted on 5" by 1 1/2", 1/4" thick channel iron on of a rigid bench. My earlier bench was not as rigid. It made a difference in the lathes cutting ability. I would suggest adding an electrical box with an on/off switch with two or more plugins on your bench. You will then have a place to plug in your lathe and lighting for your work. If you add a back splash, you may be able to mount the light to that. I would make the back splash removable, sometimes you need to get behind the lathe Last, you will want some kind of toolbox either part of your bench or on some small roll around to keep all your lathe tooling. You want your tooling together and convenient.
Thank you @silence dogwood
I wonder, did you experience less chatter with your new iron C channel setup?
Gut feel tells me the more rigid and mass there is the resonances generated in the lathe during machining will be lower in amplitude or altogether removed, but I'm not sure if this could be one cause of chatter or not. I'm sure there are other causes related to tool post, cross slide, saddle, tail stock, connections, gravity effects of the moon, etc., so mitigating/minimizing the chattering problem will always require a good setup for each job.

I like the idea of a removable back splash for access and to make it with an adjustable light is fantastic - a quality of life improvement there! Thanks.
I did see the Sherline JBK Lathe Modifications paper where he used the aluminum C channel space for metal junction box electrical connections. I could do a similar thing, just mount it underneath the steel plate in my case. Maybe I can add an emergency Stop Switch too.

I ordered my first machinist toolbox, Gerstner International GI-T24 Red Oak 11-Drawer Top Chest from Amazon pic below, I love the look of that, red oak, I had my eyes on that for a long time now, and I plan to put it on top of an old rolling tool cart heavy built I got from Northern Tool a long time ago. I can't wait. The downside is my wife yelled at me since she looked at the price and tool box size and said What, Really?

This all came about because after I bought the Wen stand I noticed what other HM do with their tools in videos, and some have drawers right below the lathe which is really nice as you mentioned. Unfortunately I didn't think of this before I purchased the stand. So I thought the rolling tool box would be the next best thing, and since I'm also getting a PM-1340GT (you can see I'm serious now) I could move it around in the garage as needed and use it for both lathes. In the first pic above you may notice the midway bar spanning the two legs. This is adjustable. One option too is to cut away this bar holding the stand legs together since the top 1/4" plate I will add will be enough for that I'm sure (I could use 4 bolts for each side into the plate). Then I could put a toolbox underneath which saves space in the garage and you can never have enough tools and toolboxes. That will have to wait until my wife fully recovers from the price shock of this one. :)
Phil
 

Attachments

  • GI-T24.jpg
    GI-T24.jpg
    355.5 KB · Views: 9
Glad to be of service, Phil. The info that I gave you is from lots of research like what you are doing. My lathe is now mounted on its third bench. Well, the first one does not really count. Had to put my new toy on something. Built a second bench and it worked okay, but there were things that bothered me. For the third bench, found the channel iron that happened to be one inch longer that the lathe. This was great since all I had to do was cut of 1/2" with a bandsaw because of a cutting torch burnt ends. The bench table is aged heavy built up 2" thick timbers on a rigid metal frame. On top of the wood is a chip tray, then the channel. then 1 1/4" high risers the same dimensions as the feet of lathe. I wanted extra space under the bed of the lathe for cleaning and finding dropped pieces. Yes, the lathe has less chatter, it even sounds quieter. The combined mass seem to make for a lower resonance. So I think that you are right on that. I have two lights. One that is light a 2 foot long overall and the other is a spotlight on a flexible goose neck. I made my own drawers and mounted them underneath the bench.
I had an old Sears Sherline lathe that I gave to my son. They are nice little machines. I believe that the utube Clickspring uses one and he does beautiful work. I'm curious, what kind of projects would you be doing? Mark
 
Very excited to see progress on your build, Phil.

Silence, do you have any pictures of your bench setup you talked about?
 
Glad to be of service, Phil. The info that I gave you is from lots of research like what you are doing. My lathe is now mounted on its third bench. Well, the first one does not really count. Had to put my new toy on something. Built a second bench and it worked okay, but there were things that bothered me. For the third bench, found the channel iron that happened to be one inch longer that the lathe. This was great since all I had to do was cut of 1/2" with a bandsaw because of a cutting torch burnt ends. The bench table is aged heavy built up 2" thick timbers on a rigid metal frame. On top of the wood is a chip tray, then the channel. then 1 1/4" high risers the same dimensions as the feet of lathe. I wanted extra space under the bed of the lathe for cleaning and finding dropped pieces. Yes, the lathe has less chatter, it even sounds quieter. The combined mass seem to make for a lower resonance. So I think that you are right on that. I have two lights. One that is light a 2 foot long overall and the other is a spotlight on a flexible goose neck. I made my own drawers and mounted them underneath the bench.
I had an old Sears Sherline lathe that I gave to my son. They are nice little machines. I believe that the utube Clickspring uses one and he does beautiful work. I'm curious, what kind of projects would you be doing? Mark
Hi Mark, cool, 2 lights are better than one. I'll copy your design on that then.

I'll checkout utube Clickspring, I don't remember hearing about the Sears Sherline lathe before, interesting, I'll search for that too. The local Sears store closed here about 4 or 5 years ago, I was depressed for months, had to seek help :) (I'm a big Craftsman fan, fan of any good tool really).

What projects you ask -
I'm an Electrical Engineer getting closer to retirement so now accelerating the build up of the long overdue machining part of my lab. I have a full electronics lab, scopes and all the goodies, I make my own electronic projects and printed circuit boards (PCB), hardware & software.

Have CNC Routers too, a small one and larger one, I also have a new CNC 20W diode laser that I just got and "playing" with it.

If I can develop/improve my machining skills I can work on mechatronics projects that have both mechanical and electrical pieces. That is what I like & interested in.

One project - I'm gearing up to build a low cost, hobby scale version, wire EDM (Electronic Discharge Machining). The types of parts this can machine is truly magical, like the snowflake, please check out:

The hobby machinist CNC EDM version needs to work well and be reliably and something folks can make for a lower cost.
It requires a low cost high voltage pulse generator supply (something I need to design, with servo control, not so easy to keep low cost, reliably, & small), a CNC x-y axis table control (easy depending on what precision your asking for), brass wire feed (requires servo control for constant tension and to avoid wire breakage), and finally - flushing de-ionized water (tap water won't work; controller for pumps & pressure regulators, water filters, not too bad just time consuming). And the overall CNC Controller. This is a big project and it may end up that it is too costly for the average HM, I can try.

Some of the parts I will need a lathe I believe, and some plates/flats I hope to make using my CNC Router for now. I do plan to get a mill, but need to build up the bank account again for that unless the CNC Router falls short of the task.
Phil
 
Phil, what you are doing sounds fascinating. I've been in electronics for years mostly repair. Mostly electronic organs which is similar to the cypher machines that I worked on in the military.
Sherline was invented in Australia by an engineer. When Sherline was first marketed in the U.S., it under different names by different companies. Later on, Sherline set up a plant in California with the help of a Mr. Martin. Eventually, the company was able to establish on its own. I understand that Sherline will still support the older models clear back to the 1970s. Now adays that is amazing.
Nubbles, give me a couple of days and I'll put out some pictures. Mark
 
Hi Mark, that is a great background. Today there are so many electronics around us and projects and kits you can build, with lots of help online, to interface to mechanical projects and make things work in the garage.

I'm glad @Nubbles asked for pics, they will be great to see when you have a chance to post.
Thanks, Phil
 
Don't the legs go the other way around? Seems it would be more stable if they were.

stand.png
 
Back
Top