When firing ceramics, it refers to the temperature that you heat the kiln to. In this case 2300°F. The cones are small ceramic "cones" that bend over when the temperature is reached. If you are using a cone setter, a mechanical finger rests on the cone. When the cone deforms enough the finger trips a switch and turns off the kiln. Ceramic kilns usually use a controller that steps the temperature up & down to prevent thermal shocks and breakage. It also ensures the ceramic has had time to reach vitrification all the way through. I think cone 9 fired ceramic is usually thought of as porcelain.What's cone 9?
-
Welcome back Guest! Did you know you can mentor other members here at H-M? If not, please check out our Relaunch of Hobby Machinist Mentoring Program!
You are using an out of date browser. It may not display this or other websites correctly.
You should upgrade or use an alternative browser.
You should upgrade or use an alternative browser.
Melting and casting metals...
- Thread starter MrCrankyface
- Start date
- Joined
- Nov 7, 2019
- Messages
- 434
Somehow even a simple thing like a hinge can get out of hand.
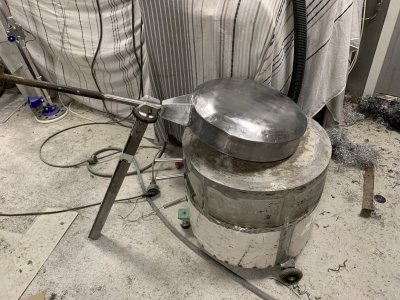
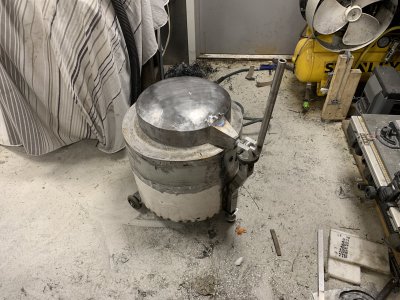
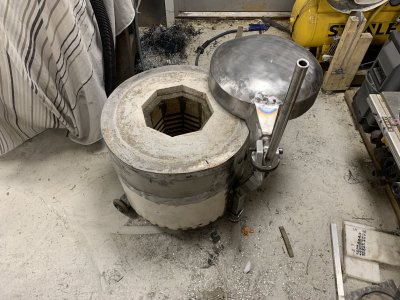
Functionally it can lift the lid and then rotate it out of the way.
Added a little extension to the lid, both for looks and to lessen twisting force on the joint between handle and lid.
Finished welding it and then blending everything, literally hours of work just there.
Quick mockup roughly how it's going to sit.
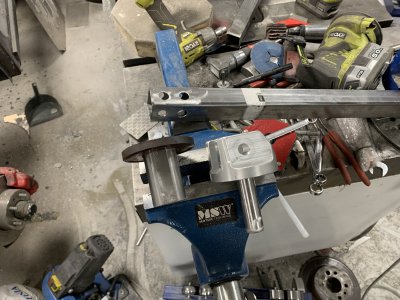
Aaand lots of hours here as well somehow.
Square tube was just drilling some holes, fast.
Bottom left was a 40mm hot rolled bar, milled flats so it'd fit in the square tube, cleaned everything up and bored it out for the shaft on the right.
Also added the little "roofwasher" from some other junkpiece.
Couple of hours getting all that done and the fits right.
Bottom right piece was a 60mm chunk of alu bar and 25mm steel rod. "Lathed" and polished part of the steel rod to fit in the left piece.
Squared up the alu piece, bored it out for a pressfit for the steel rod and then some hours in the mill, making the shape up as I went.
I'm pretty bad at "making things up as I go" so I'm trying to get more practice doing that, instead of spending hours in 3D-CAD.
Functionally it can lift the lid and then rotate it out of the way.
Added a little extension to the lid, both for looks and to lessen twisting force on the joint between handle and lid.
Finished welding it and then blending everything, literally hours of work just there.
Quick mockup roughly how it's going to sit.

Aaand lots of hours here as well somehow.
Square tube was just drilling some holes, fast.
Bottom left was a 40mm hot rolled bar, milled flats so it'd fit in the square tube, cleaned everything up and bored it out for the shaft on the right.
Also added the little "roofwasher" from some other junkpiece.
Couple of hours getting all that done and the fits right.
Bottom right piece was a 60mm chunk of alu bar and 25mm steel rod. "Lathed" and polished part of the steel rod to fit in the left piece.
Squared up the alu piece, bored it out for a pressfit for the steel rod and then some hours in the mill, making the shape up as I went.
I'm pretty bad at "making things up as I go" so I'm trying to get more practice doing that, instead of spending hours in 3D-CAD.

- Joined
- Nov 7, 2019
- Messages
- 434
Back at it again, been crazy warm here lately so mostly been laying still.
Spent 2 hours on the lathe to make this purely decorative piece.
Would've been faster on the mill but I wanted to try some techniques out.
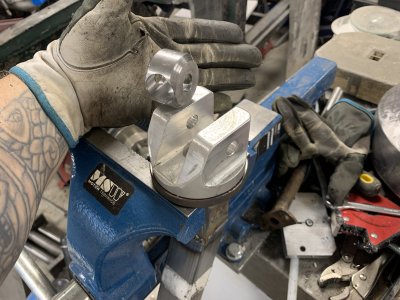
Cut the tube/handle down to length and beveled it off.
Whilst a long straight handle would give more leverage, I find it unneccessary and a trip-hazard.
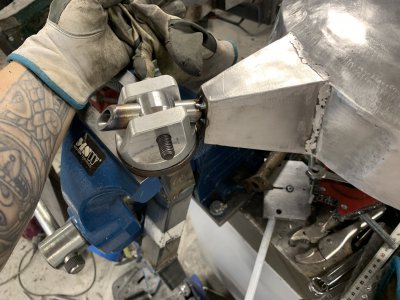
So after some more welding, blending and adjusting.
Lid gets angled up and can then be rotated to the side and let down again.
Will incorporate both "lid open" switch for the coils and physical endstops so the movement is a bit constrained as it can now rotate 360*.
Spent 2 hours on the lathe to make this purely decorative piece.
Would've been faster on the mill but I wanted to try some techniques out.

Cut the tube/handle down to length and beveled it off.
Whilst a long straight handle would give more leverage, I find it unneccessary and a trip-hazard.

So after some more welding, blending and adjusting.
Lid gets angled up and can then be rotated to the side and let down again.
Will incorporate both "lid open" switch for the coils and physical endstops so the movement is a bit constrained as it can now rotate 360*.


- Joined
- Mar 25, 2013
- Messages
- 4,614
This is looking great! Throw some aluminum in there!
Hey, keep in mind that after a few heatings the coil will start to shorten and may move inward or even fallout of a groove. This is unfortunately normal but something to watch for.
Hey, keep in mind that after a few heatings the coil will start to shorten and may move inward or even fallout of a groove. This is unfortunately normal but something to watch for.
- Joined
- Jan 2, 2019
- Messages
- 6,524
I'd like a few of those too.Somehow I ended up with 18 150ml cricibles all packed up in a box . My brother melts silver and gold and said he'll take a few .
- Joined
- Jan 31, 2016
- Messages
- 11,437
I'll get a pic of what these are before they get lost in the shuffle .I'd like a few of those too.
- Joined
- Nov 7, 2019
- Messages
- 434
Thanks! I'm hoping the "outwards lean" of the coil slots will help counter this, but I'll monitor the situation!This is looking great! Throw some aluminum in there!
Hey, keep in mind that after a few heatings the coil will start to shorten and may move inward or even fallout of a groove. This is unfortunately normal but something to watch for.
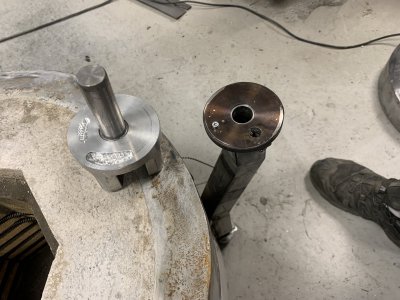
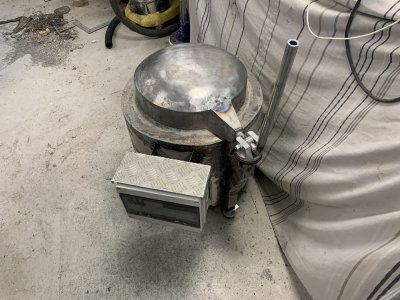
Getting real close to "starting" this thing for real.
Milled out two slots underneath the hinge piece.
One acts against the shiny bolthead as a physical stop and the smaller pocket/slot acts against hole where you can barely see the end of a microswitch sticking up, this will make sure the coils turn off if you open the furnace.
Spent a ridiculous amount of time on this control box.
Bought a "premade" fusebox figuring it'd save me time but ended up having to modify it internally.
Being plastic I also wanted to protect it both from physical damage and from radiating heat, hence the aluminium sheet cover.
Behind that is some folded up steel sheet to distance it from the furnace itself.
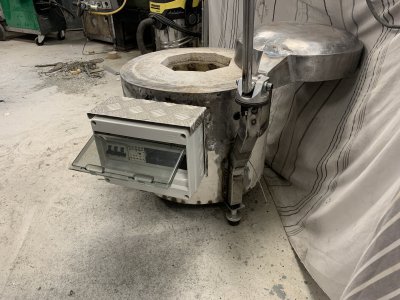
Nothing is wired up yet, waiting for some 3D-prints to hold the PID controller and I also need to source both something insulating to wrap the kanthal wires in, and also ceramic/hightemp connectors so I can connect my silicone wires to the kanthal.
Both of those are seemingly hard to find here..
mmcmdl:
Must be real small and cute! The smallest crucible I have is one of those 1kg graphite ones, I think it's roughly 300ml and I thought that was relatively tiny when I got it.
- Joined
- Jan 31, 2016
- Messages
- 11,437
These are small ! CoorsTek wide form 150 ml cups . Couldn't even make it as coffee cups around here !Must be real small and cute! The smallest crucible I have is one of those 1kg graphite ones, I think it's roughly 300ml and I thought that was relatively tiny when I got it.


