Mike's Slow Speed Carbide Grinder

Getting close...

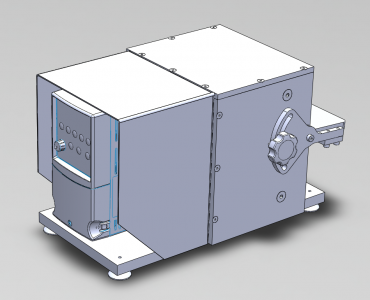
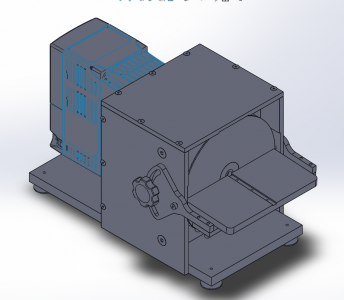
Added fasteners (and related holes) and mounting feet. All that is left is some sheet metal covers for the VFD and lower platter, add mounting holes for the VFD, cable pass thru holes, and drill the pin holes in the lapping disc.

It is held together with #6 flat head cap screws, except for the front bulkhead which uses 1/4" fasteners for stability. The #6 overhang the edge, but I didn't want to go down to #4 screws. The right thing would have been to use thicker side walls, but I have a bunch of 1/4" plate so that is what it is. I'll file the edge of the screw head into a chamfer once it is assembled.

With a bit of planning, I definitely think I could build a drill sharpening jig that mounts onto the fence slot. TBD...
1613094427937.png
 
Thanks for posting all the updates. It’s looking pretty good. I sometimes design things and then realize the scale for certain features is smaller than I realized. The area around your coupler and bearing seems like it could be like that. But clearance is clearance.
 
I liked the idea of a removable water tray that allowed for submerging part of the wheel (though the rusting potential seems undesirable). I’d maybe think a bit about getting whatever tray you plan in and out if it overlaps the the wheel. And a mount for a drip system. And maybe a light under the top front edge.
 
Here is the back of the unit with a simple sheet metal guard. Really brings the look together.

Still need fasteners and other odds and ends but it is getting close.

1613135490698.png
 
I've been struggling with the same concept.
Looking forward to your build. The design and compact structure is awesome.
Meanwhile, I've discovered my Baldor tool room grinder with a diamond wheel does a decent job of sharpening/lapping the Sandvik hand scraping tool carbide.
Please continue to post your progress!!
 
Thanks for posting all the updates. It’s looking pretty good. I sometimes design things and then realize the scale for certain features is smaller than I realized. The area around your coupler and bearing seems like it could be like that. But clearance is clearance.

Yeah, that is going to be tight. Just need enough room to sneak a long T handle allen wrench in so I can tighten that 8-32 setscrew. I wish I had built the AC bearing in from the beginning, but it works nicely. I really wanted to stick with 1/2" plate so I didn't need to go buy something else.
 
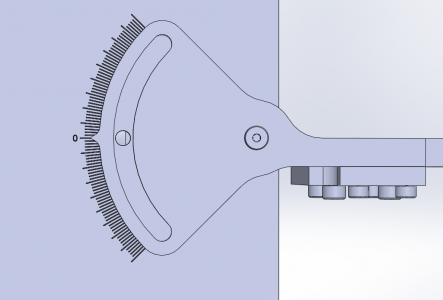
After much frustration, I added a graduated scale to the side of the grinder graduated in 1 degree increments with a major tick every 5 degrees.

I have some super sharp engraving cutters that should have no issue making these features.

1613142606499.png
 
After much frustration, I added a graduated scale to the side of the grinder graduated in 1 degree increments with a major tick every 5 degrees.

I have some super sharp engraving cutters that should have no issue making these features.

View attachment 355229
I sure admire you guys that can draw these things up = clueless here.
 
All done!

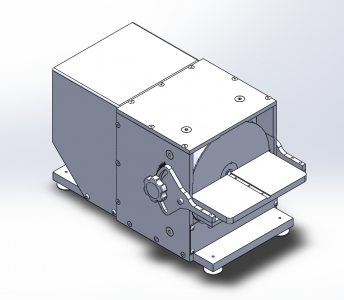
Added a few fasteners I forgot and the drip plate below the table. I'm going to hate myself for the number of tapped holes on the edges of the plates, but I can build this whole thing with scrap I have on hand.

1613236229280.png

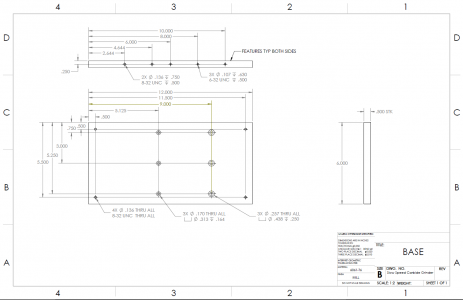
Next step is to figure out how Solidworks drawings work so I can make some prints to build from.

The one deficiency I am questioning myself on is the inability to grind off the side of the wheel (since it is recessed behind the walls). This is perfectly acceptable for the purposes for which it was built (scraper blade sharpening and insert grinding) but it will be a bit limited for other uses.
 
Got one drawing done. Don't know any of the tricks, but the interface is pretty intuitive. For home use, I make simple drawings like this and put each piece of stock I need to use on top. Keeps me efficient and I like having the drawing to reference. This is not the "professional" kind of drawings we make at work - just enough notes so I know what I am doing.

I had some sweet border templates in Inventor that I miss. I'll have to recreate them in SW.

1613244612979.png
 
Back
Top