Models for grinding HSS Lathe Tools

Well, I also blame Mikey for my belt grinder build. :)

I built one of these.

http://dcknives.blogspot.com/p/2-x-72-belt-grinder.html
http://dcknives.blogspot.com/p/bg272-adjustable-tool-rest.html?m=1

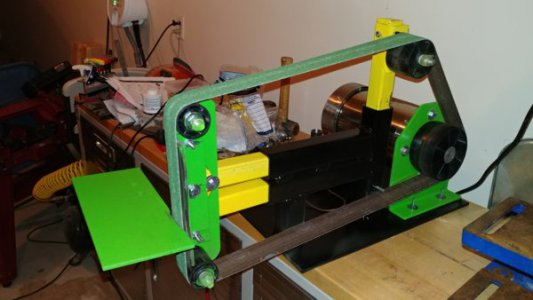
You can get the parts cheaply if you shop for a while. A free treadmill can supply the motor, or you can get a 3 phase and use a VFD for speed control. If you have a lathe, wheels are easy enough to make, the glass-filled nylon ones I got were $70 on ebay from Oregon Blade Maker.

Using a ceramic 36 grit belt at about 5000 sfpm, 3/8" keystock takes about 5 seconds to grind a largish flat. Think the one from Mikey's threading tools. The grind area gets hot, but the bit itself, cut about 4" long, doesn't get bad. The grinder does not appear to notice I'm grinding on it. Just keeps humming away. I picked up a pack of a few different grit belts to put a better finish on them. The 36 grit is pretty rough, as you would expect. I haven't tried HSS yet. I need a face shield. :)

Motor is a Marathon N437. 1750 RPM, 3 phase 220V, 2HP. Run from a VFD. I had it at 100Hz for the test above. I was going to use a treadmill, but lucked into someone selling NOS motors.
20180114_190414.jpg
 
Some of the ideas are starting to gel.......

I am thinking of mounting the 2 HP s.p. 220 under the table with stepped sheave and drive shaft on pillow blocks above.
Hoping to recycle an existing steel legged table with a 2 in. maple top..... keeping depth of the work area to reasonable size and having less dust get into the motor. I may buy ready made wheels with the pressed bearings.

Love the information you included. when I build jigs at the barn we always use 2" and 2 1/2 " in. trailer stock square tubing with 1/4 in. thick walls the extra weight/mass sometimes helps and there are no weld seam inside to grind off.

I would like to make the work area...... adjustable tool rest... to be made out of some thick steel plate and have a groove machined/cut into it similar to a table saw so can build various grinding jigs.

*********How critical is a variable speed motor? when would you need to slow down or speed up? Leaning towards the step pulleys, which are cheaper, and already have a spare 2 hp motor.

*********Would there be an advantage to having the grinding tool rest attached to the table instead of the grinder body itself?

********* are there any situation where reversing the direction of the belt would be of any use???

Getting stuff to Canada is not an issue as I maintain a UPS box just across the border..... save on shipping within continental USA,,,, and 50% of the time you are not asked to pay Canadian sales tax........ no other duties for personal use.

Better start checking out my steel stock .......... I do have some 1/2 inch Duralum but not set up to weld aluminium.

....and I like the reminder to get a proper face shield and maintaining the plastic shield clean. All the ones I have are hard to see through and therefore get covered with grinding dust sitting on the bench/wall unused!!!!!!.

Thanks for your help.

Bob C
 
My thinking on speed changes is that I only expect to use a few. Ceramic belts like high speeds, while finer grit AO belts will want to be a bit lower. And perhaps slowing when I'm getting close to the size I'm aiming for. I don't see a problem with step pulleys if you don't mind changing them once in a while. And if you already have a good sized motor, might as well use it.

I don't see any big pros or cons for the rest being attached to the machine vs the bench.

I haven't come up with any reason for reversing either, unless you wired it wrong I guess. Same thing with versions that allow for horizontal operation.

For the work table I have considered finding a cheap/free/broken benchtop sander or similar to get the table from. For now I think the flat plate will get it done though.

If you decide to build one, please share pics and such. It's always interesting to see other people's takes on the basic design.
 
Hey Bob, the best option is to build or buy a decent belt sander, at least in my opinion. You can certainly grind a good tool on a bench grinder if that is cheaper or more desirable for you. I suspect more tools are ground on a bench grinder than any other kind of tool in the world. A belt sander is faster, cooler, easier to control the tool on and easier to re-grind tools on but it is not the only option.

Now, with that said, if I were going to have a new belt sander it would be a 2x72 like @ttabbal and the other guys have. It would be the ideal tool grinder but more importantly, it would be the most useful for general fabrication around your property. These grinders are simple to fabricate for most hobby machinists and the wheels can be obtained fairly easily on ebay. Very importantly, the belts are widely available in just about any grit or quality level you need. I don't have one (yet) but I recognize their utility and speed. When I do build one the "blame" will definitely go the other way!

A belt sander has to run at decent speeds to actually grind metal. Burr King says this is around 8,000 SFM. Below that, it is considered a belt sander, not a grinder. I've used a big Burr King and it definitely eats metal fast. So, you need a motor that has decent power, 1.5 - 2.0 HP, that is at least 3500 rpm in direct drive or pulleys that allow it to reach grinding speeds. A 3-phase motor with VFD, a decent DC motor or a good old AC motor at 3450 rpm with a pulley system will all get you into the speed range you need.

Variable speed is useful when you go to finer belts. Finishing grits work better when you slow down the belt. For shaping a tool bit, the coarser grits work better at higher speeds.

I don't think a reversible motor is useful for tool grinding but I know the knife sharpening guys run it in reverse to sharpen knives.

As for the tool rest, I think it best to have it as an attachment that slides into place alongside the belt. This allows you to slide the rest away to change belts, then slide it back into place without losing the table angle. The table should allow you to easily adjust angles and mine would have an indexing template for that purpose. The table should have support ears on both sides of the belt to allow you to support the bit as you grind rake angles.

Your platen should be very solid. The basic designs on most 2x72 grinders is fine but in my opinion you should incorporate a glass platen to keep it flat.

Hope that helps you think through your project. I've certainly thought about it and all these guys dangling their carrots in front of me is bugging me. If I didn't already have a belt sander that works well I'm sure I would have moved sooner. When I do build one, it will be well thought out and functional but it is going to be tough to beat the ones our guys have already built.
 
Response to Jeff

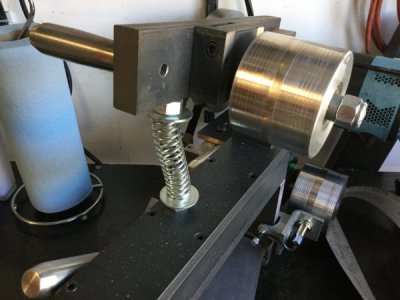
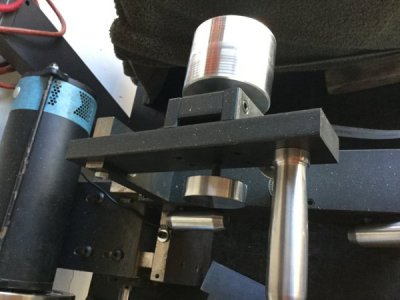
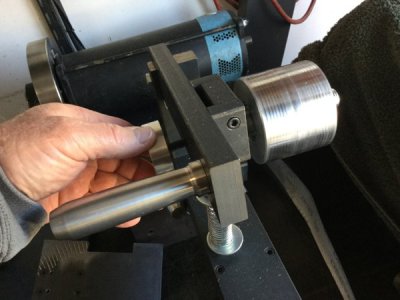
Can you send me some close up of the workings of your tensioner device and belt tracking. In your case which wheel is the domed wheel.... the larger one on the motor or the smaller adjustable tracking/tensioning wheel???

.....for everybody else.....
There is only one basic design ....... but many different ways of getting there. I am trying to learn as much as possible about the different build/design technics ........ will only do one once..so trying to learn from all the postings on Epay and Ewe/tube.

No matter the outcome I will document with pictures for the forum.

I am considering building up the main body from flat plates instead of trailer tubing in order to eliminate the natural slop found in trailer tubing. I have seen a HD design on Epay that has welded flat plates creating a very tight fitting tube for a solid 2 inch steel bar both for the wheel platen support and for the tool rest. I am leaning towards a design that will give me precise settings. Being still at the paper design stage anything can be added or removed with an eraser.

Any source for the corning ware platen strip I will eventually need ?

Thanks

Bob C
 
Thanks guys.

...and the knife maker has Micarta/phenolic material we need to replicate the charging panels used for powering/connecting hard wires for radio installations and workhorse charging systems........ 2 birds with one stone.

Cheers
 
Sorry guys I am getting confused with the "conversation" I am having with Jeff and the information/picture sent by ttabbal

Looking at the green machine from ttabbal..... I was wondering how he accomplished his build of the tensioner on his particular design.

Jeff is supplying me with a set of wheels so I am off and rolling...... my design is still fluid and still considering various options.
 
The drawings show how it works, there is a page with a detail view of just the tracking pillar.

The short version is that I marked the square tube with the angle, then cut that line on a bandsaw.
Then the short side is cut off, leaving a U shape part.
Drill a hole in the long side for the tracking wheel axle.
Drill a smaller hole all the way through both sides for the hinge bolt.

Then the pillar tube has a through hole that is larger on one side, large enough to fit the bolt head into from the tracking hinge.

There is an adjustment bolt going through the tube that pushes on the bolt head for the tracking wheel. So it can sit inside the pillar, or get pushed out by the bolt.

If you have questions, let me know.
 
Back
Top