- Joined
- Nov 23, 2014
- Messages
- 2,612
POTD is mostly done; I can now more or less safely walk through my shop. A lot of us have posted ways of storing material. Here's what I've done. And sorry, I didn't shoot a "before" picture, but take my word for it, my stock was VERY DISORGANIZED!
The project started by pulling everything off the brown metal rack, cardboard boxes on the floor, precariously leaned stock against the walls, etc. and sorting through it by material (aluminum, stainless steel, tool steel, brass, plain carbon steel, copper, etc.) OSHA would have had a field day for trip hazards.
Here are a couple of panorama shots of the west 32' wall of my shop (minus the toilet on the wall behind the Jet mill):
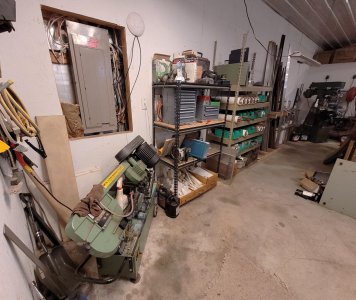
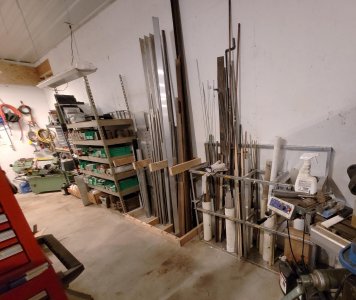
Here are the individual storage areas with some back story. Yes, with Bruce there's always a back story. . .
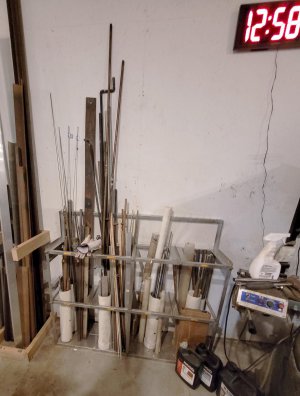
This is a stainless steel rack that came out of my parent's basement. In a previous life, it stored Ektachrome slide film chemistry for an E-6 film processor. It dawned on me after pulling the replenishment pumps from the bottom shelf that this would make a nice rack for storing material. Problem is the top is about 40" tall making it tough to lift 8' or longer material out without hitting my 10' ceiling. Still some work to do here as I ran out of 4" drain PVC. This is where I'll stick stuff between ~2' to 6' long. Currently have it organized going from left to right as plain carbon steel, aluminum/copper/brass/wood, stainless steel/plastic, tool steel. I'll eventually break out the Brother label maker to mark the stock.
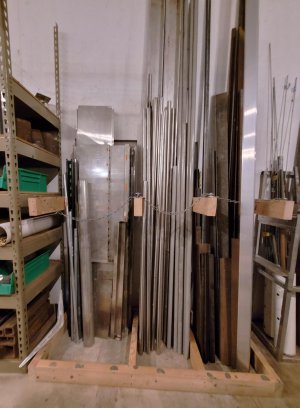
This is a 4' wide rack for longer stuff. My parents ran a photofinishing business out of their basement; multiple darkrooms were framed in the basement. I reclaimed most of the 3/4" plywood cabinetry and 2 x 4's for future projects. I made a little dent in the pile of 2 x 4's here; 20" x 4' base with 3 sectioned areas. I didn't show the work, but the 2 x 4 frame about 3' off the ground has 1/4" aluminum bracing on the 2 x 4's to give the legs some stability. In case OSHA does come in my shop, I put safety chains across the openings. I didn't show the lathe work, but the chains have snap links on them that hook to 1/4" lag bolts. There's a fender washer at the head of the lags and a bushing below to give a landing for the snap links.
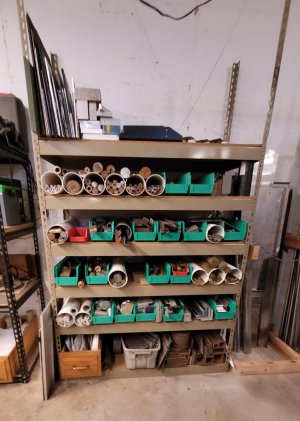
Material rack for shorts up to 22" (rack is 18" deep). The green tubs are around 5" x 5" x 15" deep, came from Menards. The white tubes are 4" drain PVC ~20" long. I didn't show the work, cut the tubing with a miter saw. Set them side by side and punched holes with a Roper Whitney No. 5 punch for 8-32 screws to join them and keep them from rolling. More labeling needed here as stuff is currently organized by type: CRS, stainless, 4140, brass, copper, aluminum, tool steel, etc.
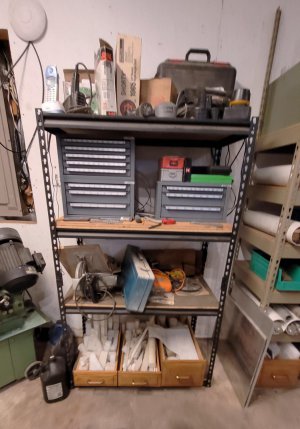
Another rack with some drawers on the bottom shelf with chunks and rounds of plastic. The oak drawers came from a sewing table I made my mom over 35 years ago. I busted up the cabinet as my wife already has one, found a decent repurpose for the drawers. Rest of the story is this rack has rotary tools up top (drill motors, Roto-zips), drill bits on the next shelf, saws on the next one and the plastic storage on the bottom.
I didn't show it, but I still have some piles of stainless, plain carbon steel and aluminum that will be headed to our local metal recycler. They pay ~$0.10 / pound for steel, and ~$0.40 / pound for stainless and aluminum. After pulling everything off the shelves, boxes, floor, wall, etc. and sorting by material, I sub-sorted by separating stuff into "I might use it" and "probably not" piles. Once everything got somewhat organized, there's actually some empty space. Oh the horrors, do I go back through my "probably not" piles and save some of it from the recycler?!?! Nah, plenty of future botched projects to be had with what's there!
Thanks for looking!
Bruce
The project started by pulling everything off the brown metal rack, cardboard boxes on the floor, precariously leaned stock against the walls, etc. and sorting through it by material (aluminum, stainless steel, tool steel, brass, plain carbon steel, copper, etc.) OSHA would have had a field day for trip hazards.
Here are a couple of panorama shots of the west 32' wall of my shop (minus the toilet on the wall behind the Jet mill):


Here are the individual storage areas with some back story. Yes, with Bruce there's always a back story. . .
This is a stainless steel rack that came out of my parent's basement. In a previous life, it stored Ektachrome slide film chemistry for an E-6 film processor. It dawned on me after pulling the replenishment pumps from the bottom shelf that this would make a nice rack for storing material. Problem is the top is about 40" tall making it tough to lift 8' or longer material out without hitting my 10' ceiling. Still some work to do here as I ran out of 4" drain PVC. This is where I'll stick stuff between ~2' to 6' long. Currently have it organized going from left to right as plain carbon steel, aluminum/copper/brass/wood, stainless steel/plastic, tool steel. I'll eventually break out the Brother label maker to mark the stock.

This is a 4' wide rack for longer stuff. My parents ran a photofinishing business out of their basement; multiple darkrooms were framed in the basement. I reclaimed most of the 3/4" plywood cabinetry and 2 x 4's for future projects. I made a little dent in the pile of 2 x 4's here; 20" x 4' base with 3 sectioned areas. I didn't show the work, but the 2 x 4 frame about 3' off the ground has 1/4" aluminum bracing on the 2 x 4's to give the legs some stability. In case OSHA does come in my shop, I put safety chains across the openings. I didn't show the lathe work, but the chains have snap links on them that hook to 1/4" lag bolts. There's a fender washer at the head of the lags and a bushing below to give a landing for the snap links.

Material rack for shorts up to 22" (rack is 18" deep). The green tubs are around 5" x 5" x 15" deep, came from Menards. The white tubes are 4" drain PVC ~20" long. I didn't show the work, cut the tubing with a miter saw. Set them side by side and punched holes with a Roper Whitney No. 5 punch for 8-32 screws to join them and keep them from rolling. More labeling needed here as stuff is currently organized by type: CRS, stainless, 4140, brass, copper, aluminum, tool steel, etc.

Another rack with some drawers on the bottom shelf with chunks and rounds of plastic. The oak drawers came from a sewing table I made my mom over 35 years ago. I busted up the cabinet as my wife already has one, found a decent repurpose for the drawers. Rest of the story is this rack has rotary tools up top (drill motors, Roto-zips), drill bits on the next shelf, saws on the next one and the plastic storage on the bottom.

I didn't show it, but I still have some piles of stainless, plain carbon steel and aluminum that will be headed to our local metal recycler. They pay ~$0.10 / pound for steel, and ~$0.40 / pound for stainless and aluminum. After pulling everything off the shelves, boxes, floor, wall, etc. and sorting by material, I sub-sorted by separating stuff into "I might use it" and "probably not" piles. Once everything got somewhat organized, there's actually some empty space. Oh the horrors, do I go back through my "probably not" piles and save some of it from the recycler?!?! Nah, plenty of future botched projects to be had with what's there!
Thanks for looking!
Bruce


