-
Welcome back Guest! Did you know you can mentor other members here at H-M? If not, please check out our Relaunch of Hobby Machinist Mentoring Program!
You are using an out of date browser. It may not display this or other websites correctly.
You should upgrade or use an alternative browser.
You should upgrade or use an alternative browser.
Power Hammer Project
- Thread starter ex_isp
- Start date
- Joined
- Sep 6, 2016
- Messages
- 113
hman found and contributed a bunch of rebar to the project. Cut them up and stuffed them in the post, to be followed up with sand. Bought a bag of "playground sand" to dump in there but I guess today, it all
comes wet. So it been drying on a couple of garbage bags, getting turned every couple hours. It's getting there but still a touch damp.
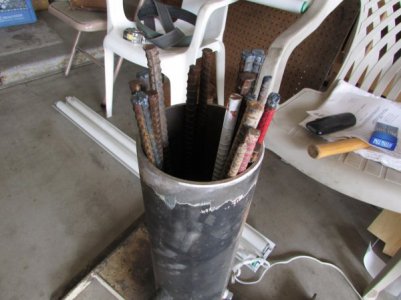
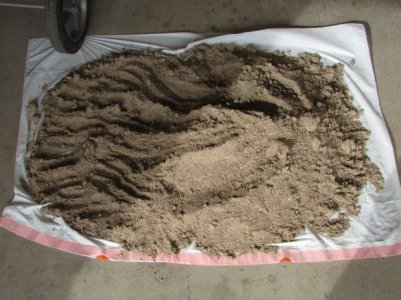
comes wet. So it been drying on a couple of garbage bags, getting turned every couple hours. It's getting there but still a touch damp.


- Joined
- Sep 6, 2016
- Messages
- 113
I think I'll want to thread these on the inside of the pipe with machine thread. That way, I can have my adjustment for length up at the top and bottom rather than
flipping around in the middle where more flex is likely to occur. Still thinking about how I want to connect the linkage between the crank plate and the spring at the top.
flipping around in the middle where more flex is likely to occur. Still thinking about how I want to connect the linkage between the crank plate and the spring at the top.
- Joined
- Sep 6, 2016
- Messages
- 113
OK! You might even want use a couple tees on the ends of the pipe to connect it to whatever. (You can stop by and use my lathe to bore out the threads if needed.) Just be sure to get the right length of pipe. Note that Home Depot and other stores have pipe cutting/threading machines, so you can get whatever length you need.
That piece of linkage will be one of the last pieces I install. Since I am not fully building by plans, I'll build that linkage once everything else is in place.
- Joined
- Sep 6, 2016
- Messages
- 113
Got the anvil finished today. Nearby construction manager gave me all the 3 and 4 ft pieces I could fit in the post. Still added sand
although only used about 1/2 of it.
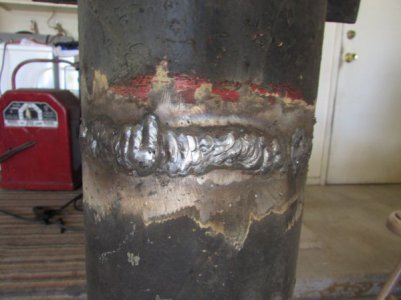
Put the post back together with the aforementioned 6011 root, ground clean, 7018 filler and cap. Both ground clean before overlay.
Cap was big wide sweeping bead an inch wide and burned in well. All 3 passes at 115 amps AC. First two were burned in almost to the point of under-cutting.. almost.
3/8th" thick tube.

- Joined
- Sep 6, 2016
- Messages
- 113
Picked up steel yesterday. Boy did I pick up steel yesterday. 2ea 4' X 8' X 1/2" plate at ~640 lbs each. What a job getting them out of this yard and onto the trailer!
Rented the trailer for 4 hrs... that didn't work out so I took it back today and paid for the day (only $10 more). Had to cut it to be able to set it on the trailer.
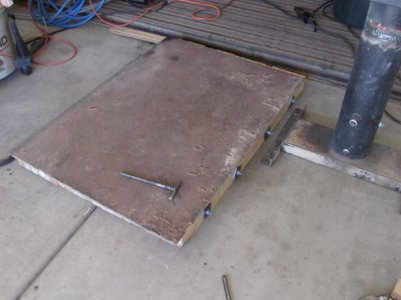
So, here's the cut and mostly in place base (wood on bottom the steel). Had to get this "floor plate" to weld the vertical pieces to. Should be more progress now.
I'll likely dowel the steel to the wood base plate to keep it from moving around.

- Joined
- Sep 6, 2016
- Messages
- 113
Here it is two days later and my hands still hurt from handling 300+ lb half sheets. Arthur is hurting
in previously unknown places! Got the anvil stand just tacked to the top plate and decided it needs to be forward about 4 to 5 inches.
I'm going to grind those tacks off, layout all the pieces on the plate, then I can see heights for pillow block mounts
as I'll have to weld those on with plate. I have plenty of steel now! Start again tomorrow after two
days for the hands to rest! lol
in previously unknown places! Got the anvil stand just tacked to the top plate and decided it needs to be forward about 4 to 5 inches.
I'm going to grind those tacks off, layout all the pieces on the plate, then I can see heights for pillow block mounts
as I'll have to weld those on with plate. I have plenty of steel now!
days for the hands to rest! lol
Last edited:
- Joined
- Sep 6, 2016
- Messages
- 113
More done finally!!! Cut off the initial tacks on the anvil post and slid it forward about 7 inches. That leaves me more room on the platform for other parts to weld or bolt to.
Today, got the center post cut, layed out and welded in place. I really need more room. Crap scattered around so I can barely walk in here. That will change as some of these
parts begin to move onto the project platform.
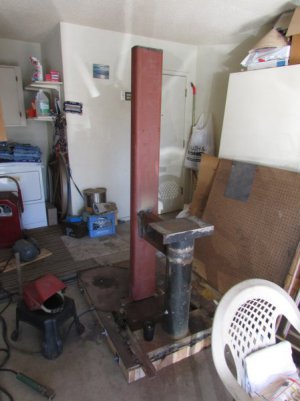
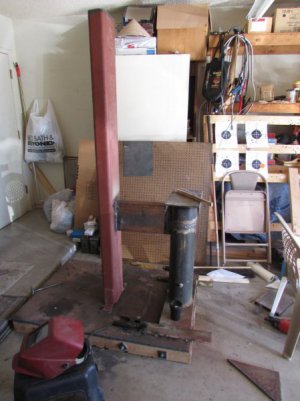
Today, got the center post cut, layed out and welded in place. I really need more room. Crap scattered around so I can barely walk in here. That will change as some of these
parts begin to move onto the project platform.


- Joined
- Jan 2, 2014
- Messages
- 8,852
Great build, thanks for sharing it!
You have definitely gone vertical with this last step forward. It's starting to show how massive this thing will be......I LOVE it!
This is one of those that the neighbours may be surprised about.
I notice a little "clutter" about. Please do be careful with the rugs and cardboard boxes with the welding in the vicinity.
I understand we all work with what we have, but play safe....I want to see this finished and operational........safely!
-brino
You have definitely gone vertical with this last step forward. It's starting to show how massive this thing will be......I LOVE it!
This is one of those that the neighbours may be surprised about.
I think that is an eternal issue........I really need more room. Crap scattered around so I can barely walk in here.
I notice a little "clutter" about. Please do be careful with the rugs and cardboard boxes with the welding in the vicinity.
I understand we all work with what we have, but play safe....I want to see this finished and operational........safely!
-brino
- Joined
- Sep 6, 2016
- Messages
- 113
Point well taken and stated Brino!
Wed, I picked up a rear wheel hub/bearing and tire/rim from a VW Jetta. Next is to weld the axle shaft into the hub. The other end of the axle is where the crankshaft plate will mount. That plate will have a center hole (for the axle) and an offset hole (3") that will make the connecting rod go up and down, pushing the leaf spring up and down, operating the hammer. Got a 3 leaf spring (97 dodge truck) and removed the center spring. Reversed the small spring and sucked them down tight with all thread rod. While still held with the all thread, I stuck the assembled (now flat) spring in my big vise, added a large c-clamp to the top so I could take the all thread out and install the grade 8 bolt and washers that will hold that spring together in operation. The reason for turning the small leaf around was specifically to straighten the assembly. Still need to make the connecting rod throws which will be sched 80 black steel pipe with grade 8 3/4" bolts through them. All rotating points will either be tapped for grease zerks or simply drilled for oil holes if clearance doesn't allow for a zerk, or the attachment of a grease gun.
Should have another photo or two tomorrow.

