Proximity stop setting distance

Ischgl99

H-M Supporter - Gold Member
H-M Supporter Gold Member
I have been threading away from the chuck for smaller threads using left hand tools, but I have a right hand 16IR internal threading bar that I got some time ago I was thinking of using or selling it to get a left hand tool, so I had the components on hand to set up a proximity stop and thought I would give it a try to see which method I like better.

I couldn’t find this discussed in previous threads, but curious how people using a proximity stop for threading are setting the stop location. I am using the 200rpm gear selection at 100% vfd speed with a decel time of 0.2 seconds and that gives me 0.7x rotation of the spindle for a stopping distance. Based on the thread pitch I am doing, I can calculate how much further the carriage will travel after getting the stop signal and moving the sensor that distance closer to the saddle, but wondering if I am missing a simpler method for setting it up?
 
I have mine setup to stop more quickly. I move the carriage to where I want it to stop, adjust the proximity stop to just trigger at that position using the micro-adjust, and I'm good. You can see in the video at this link that on my setup repeatability is ±0.001" at 550 RPM and the fastest feed rate.
 
Basically what Mr. Best says.

Dry runs. I calculate the final compound depth because that will affect the overall z length, set the compound at the theoretical depth, hand wheel to where I want to stop, then set the prox stop. Back the tool away from the part, pick my speed and thread pitch followed by a dry run. Finally use the fine adjust knob to fine tune where the tool is stopping. I'll make 3 or so dry runs before I make my first scratch pass. I find that it usually stops within .002" of where I want. I haven't tried to tweak the settings to get it more accurate as it hasn't been an issue.

This was 5/8-11 on some kind of steel. Just turned down and put a new thread on for a repair job. I shot the video to send to a buddy who says this is cheating. I think its just awesome.

Sorry my machine is dirty, I don't know how some keep theirs so clean.
 

Attachments

  • 20230112_211627.mp4
    24 MB
Thanks for the feedback David. Are you setting a quick decel time and dialing in a lower speed setpoint to get faster than the minimum decel time? I tried setting my decel time to 0.1 seconds and tried 200 rpm at 100% speed, then tried a higher gear and turned down the speed to 200 rpm and got significantly better stopping times. I didn’t think it would stop faster than the minimum setting, but it appears it will. I don’t have a braking resistor since I never needed to stop faster than half a second, and my VFD can easily handle that, so I can’t try faster than 200rpm yet, but if I decide to stick with this, that appears to be necessary.

When I started this, I was thinking along the lines of setting it in the middle of the thread relief and needing to be somewhat accurate, but I guess if I set it to the front of the thread relief, the deceleration would stop it in time by using your method since the relief is usually 1.5-2.5x the pitch.
 
Basically what Mr. Best says.

Dry runs. I calculate the final compound depth because that will affect the overall z length, set the compound at the theoretical depth, hand wheel to where I want to stop, then set the prox stop. Back the tool away from the part, pick my speed and thread pitch followed by a dry run. Finally use the fine adjust knob to fine tune where the tool is stopping. I'll make 3 or so dry runs before I make my first scratch pass. I find that it usually stops within .002" of where I want. I haven't tried to tweak the settings to get it more accurate as it hasn't been an issue.

This was 5/8-11 on some kind of steel. Just turned down and put a new thread on for a repair job. I shot the video to send to a buddy who says this is cheating. I think its just awesome.

Sorry my machine is dirty, I don't know how some keep theirs so clean.
Thanks for the feedback Jason. I thread with the cross slide, so set up would be a bit easier for me, but the engineer in me defaults to calculations when simple trial and error sometimes is the best method.
 
When I started this, I was thinking along the lines of setting it in the middle of the thread relief and needing to be somewhat accurate, but I guess if I set it to the front of the thread relief, the deceleration would stop it in time by using your method since the relief is usually 1.5-2.5x the pitch.
I should have specified that I set it to stop at the end of the thread/beginning of thread relief. I usually shoot for a .060" thread relief and let the backside of the insert set the angle. That thread relief was done with a DCMT but I'm going to be getting a VCMT tool. At .060" with a lay down insert, I don't think I can get much closer to the shoulder.
Thanks for the feedback Jason. I thread with the cross slide, so set up would be a bit easier for me, but the engineer in me defaults to calculations when simple trial and error sometimes is the best method.
On coarse pitch threads, I have found using the compound will help with chatter in the threads. I have been guilty of trying to over think things myself at times. I'm sure we all do.
 
I should have specified that I set it to stop at the end of the thread/beginning of thread relief. I usually shoot for a .060" thread relief and let the backside of the insert set the angle. That thread relief was done with a DCMT but I'm going to be getting a VCMT tool. At .060" with a lay down insert, I don't think I can get much closer to the shoulder.
I’m glad to see I was starting to think in the right direction by choosing the start of the relief. I also use a DCMT insert for the external thread groove, but wanted something at closer to a 45 degree angle and have had a VCMT tool on my wish list as well. For internal threads, I just bought a carbide thread relief tool from Redline Tools that I want to try out.

I do mostly metric things, and there is a DIN standard for the thread relief the equipment I learned on uses, Horn has inserts for that exact profile, but until I’m rich, I’m not buying lol.

On coarse pitch threads, I have found using the compound will help with chatter in the threads. I have been guilty of trying to over think things myself at times. I'm sure we all do.
I took my compound off and use a solid plinth, I’m hoping I won’t need to put the compound back on for the coarsest threads I do, but I will keep your procedure in mind in case I do need to use it.
 
I would recommend doing things a bit differently, and I thread up to 600+ RPM. First thing to understand is it is not about what you set the braking speed too, the VFD can only deaccelerate at a maximum speed and using anything under 1 second will most likely result in less repeatability and possibly an overvoltage fault with a larger chuck/mass that will put you into a free run mode with no braking. If a VFD is setup to prevent an overvoltage event because the braking rate is too fast, it will modulate the braking which changes the stopping position. Second is that the VFD braking rate is based on your maximum Hz setting, so if it is set to 100 Hz and 1 second, it will brake at 0.5 seconds at 50 Hz and 0.25 seconds at 25 Hz. Third you do not predict where the VFD/cutter will stop, as this can vary greatly based on the spindle RPM, mass, Hz, etc. It is not something that I calculate.

First you need to determine the stopping position that you want, put the cutter to the end of thread position, if using the cross slide than this is where the cutter stops in a perpendicular plane to the long axis, if using the compound then it is the position with the compound advanced to the final cutting depth where you want it to end in the relief groove. Zero your DRO or dial gauge to this position. Turn you speed dial to about 25-30% of maximum speed and select a gearing range that gives you your target RPM. So if your maximum Hz is 100, and you want to thread at 200 RPM, select 800 RPM maximum and turn the speed pot down to 25% (this is with 1 second braking). With the threader off or away from the work, engage the half nut and do some trial runs, until your stop position is at the "0.000" stopping point. with the cutter just touching the starting diameter zero the cross slide dial and if using the compound zero that dial. Do a scratch pass to verify everything and begin you threading runs. The stopping distance should repeat within 0.001".

I gave up a long time ago using the compound, and just use the cross slide for thread cutting, the main reason is the stopping position of the cutter tip does not change as opposed to the compound. I use the thread cutter to cut my relief, I add about 0.01" to my target depth. I get clean cuts no matter what the material, steel I thread in the 300 RPM range for 1" diameter stock, aluminum 600+ RPM. I have threaded down to 11 TPI, below that point a compound may be a better option. I just complete some 1"-14 threading in 1144 and 4140 to an external depth of 0.098" and an internal of 0.106", I start out at 0.02" 1st pass, then 0.01" advance per pass, at around 0.08" start reducing the incremental DOC, and one spring pass when done.

Example below was for multiple pieces that all needed to be indexed (started/stopped) at the same point relative to the square stock so they all thread to the same position when screwed in. This required indexing the part and accurate start/stopping position, the half-nut was not disengaged for all four pieces, pitch was 5/8"-11. Chuck and parts were marked, I used a rod in the tailstock to set the stick out of the square stock to start the thread at the same point. This was done using the cross slide to advance the threading tool, probably 600 RPM.
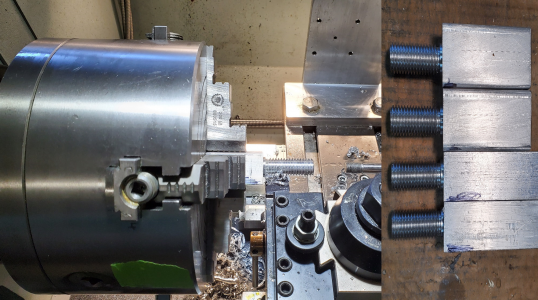
1676675653546.png

 
Mark, you work on some interesting projects, great process on the threaded rectangular pieces.

I’ve worked with VFDs in industrial environments for about 30 years, but never had to deal with braking, we always used coast to stop. I haven’t installed a braking resistor on my VFD since it can handle stopping fast, but I wasn’t stopping as fast as needed for threading with a proximity sensor at higher speeds. If I decide to stick with the prox stop, then I will definitely be adding that so that I can thread faster.

It doesn’t seem intuitive that setting the decel time to 1 second and setting the speed to 30% to get a decel time of 0.3 seconds would be better than just setting the time to 0.3 seconds, but I did some testing on my lathe and it does seem to be more consistent that way. I’m not using a shielded sensor, so getting the right one should help improve that too. I’m getting +/- 0.005” deviation, but free components is a nice way to test something.

I like using the compound to thread, I have been doing that for a while, I don’t anticipate threading more coarse than 3mm pitch, so with good quality tooling, that should be doable.

Thank you for the detailed description on your setup procedure, I’ll play with this some more using the info provided here.
 
It doesn’t seem intuitive that setting the decel time to 1 second and setting the speed to 30% to get a decel time of 0.3 seconds would be better than just setting the time to 0.3 seconds, but I did some testing on my lathe and it does seem to be more consistent that way. I’m not using a shielded sensor, so getting the right one should help improve that too. I’m getting +/- 0.005” deviation, but free components is a nice way to test something.
I definitely learned something today.
 
Back
Top