Quarantine Projects!

Ah the slotting of the bend line is a great trick! Especially if you have access to a plasma.

Have you seen magnetic bending brakes? That's some cool stuff there! I don't have a good way to bend metal right now so every now and then I lok around at options.
Not even heard of magnetic brakes but I'm not in the fab world anymore and 80% of what I did was in the field during an install.

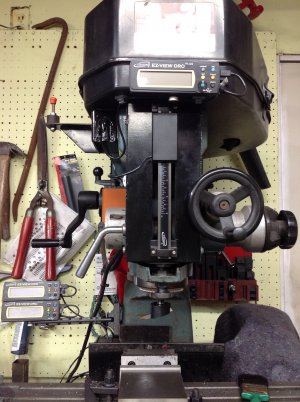
I'm not sure of where I got the tab cut idea but it was certainly out of necessity. I don't think you could do those kinds of tab cuts without a plasma. We had a small plasma and mig that I did all my field fab with and I loved that setup so much I copied it for my small home shop. All my stuff is geared for the lighter end so my little Hypertherm 350 and Lincoln 175T work perfectly and can do heavier work but fit on one old small HF cart. The only example of that kind of tab cut is the front cover I replaced the old plastic cover on the front of my RF30 when I put a DRO on it.
 

Attachments

  • image.jpeg
    image.jpeg
    761 KB · Views: 23
Magnetic brakes are pretty neat. In the pic below the red bar on top gets magnetized to the body underneath and that's the hold down for your work piece. Pretty small form factor but lots of creative ways to use it.

1585780858614.png

In this pic you can see the little blue piece is used as a small hold down and a small closed shape can be bent. There's even demos out there on Youtube of using a piece of steel pipe or round bar as a hold down and bending nice radii. In thinner stuff of course.

1585780789818.png

All my stuff is geared for the lighter end so my little Hypertherm 350 and Lincoln 175T work perfectly and can do heavier work but fit on one old small HF cart.

The Lincoln 175 is a nice size. I only have a 135 and I question it's ability to make a solid weld in anything over 1/8" steel. Maybe 3/16" with flux core. I've done welds in 1/4" with the flux core but I don't think I'd trust it with anything super critical. Plasma is a nice thing to have as well. I only have an oxy-acetylene setup but it's versatile with the ability to weld, cut and heat.

Your part in the picture looks very nice. Good tight bends.

Another good trick for getting tight bends in thinner sheet is to score along your bend line with a cut-off wheel. I've done that in 16ga with great results. Score about halfway through the thickness of the sheet and bend towards the score so you can't see it on the outside corner. It works in thicker stock as well but you end up having to grind a V groove because the thicker material will have to meet up like a miter if you bend into the score. You can bend away from the score but then you'd have to weld it for a good appearance.
 
Todays adventures .
You call that a 'burn pit'? Here's a burn pit. This one was easily 50 feet long/15 feet tall. Burned 3 days. Just buried the remnants this morning. Did the first one about a week ago - just a little smaller than this one.

thumbnail.jpg IMG_0462.jpg

Regards,
Terry


IMG_0463.jpg IMG_0466.jpg
 

Attachments

  • IMG_0466 (2).jpg
    IMG_0466 (2).jpg
    168.6 KB · Views: 12
That mag brake certainly is nice. I would think mucho $$$, no? Have to check out the vids. The "score with cutoff wheel" was standard practice until I got around a plasma. My favorite plasma cutting jig was a long piece of 3/8" keystock and two welding magnets to hold it in place. I have a notch in the end of my cheap 6" trisquare that I keep in my apron that is the setback of the plasma nozzle. Set notch on the cutline and bump the key up to the side of the trisquare rule and dead on. I also have a small set of OA which I use to weld and braze with. I'm ok with the OA cutting head but not as good as plasma.

The 135 is a good machine. Used a 100 110v with flux core and was surprised. I actually went in to buy a 100 at Home Depot because that all the $$ I had and they had the 175T in the slot where the 100 was supposed to be. I went and got a sales person and they looked everywhere and couldn't find a 100 so they gave me the 175 for the same price! Talk about floored. Here I'd talked myself out of the 175.
 
I decided this would be a good time to do some plumbing and electrical work in my shop.


kHPIM6450.jpg

OK, April Fool! It's based on an image I've seen on the interwebs a few times. Here's what the sink looked like before the "improvement."
kHPIM6397.jpg
 
$3300 gets you in the door.


Don't buy any thing that Baileigh makes its all cheap chinesium and breaks right in the middle of the job when you need it most....

Their mill drill is trash, the hand wheels break, the motor is crap and eats capacitors almost weekly..... New out of box about .004" spindle run out..

Their 220v slip roll is garbage it loosens up and the rollers move making all the parts wrong..... We had to weld it to stop it from moving.....

Their 110v tube bender is the worst one I have ever used.

Their 6Ft box brake exploded on us while folding 18Ga aluminum sheet metal.... lol
 
Wow, quite the review! This is one of the reasons that I like the old machines. I think it's really awesome when a machine has "Rockford, Illinois" cast right into the iron body, versus that little silver foil sticker that says "Made in China"
 
I started another small project yesterday. I'm trying to make a strap wrench. I got a design idea from a recent oxtoolco YouTube Video where he restores an old level.

This is his wrench. The handle threads into the head to capture the strap.

sw01.jpgsw02.jpgsw03.jpg


This is my interpretation of it. I just drew up a quick sketch on the old Auto PAD.

EM520640.JPG


Cut out all the parts and cleaned them up. This is the rough layout.

EM520643.JPG


In retrospect I'm not sure why I chose to make the 1-1/4" square plate and not just weld the side plates directly to the nut. But I began by drilling a 3/4" hole in the square bottom plate.

EM520644.JPG


One of the best things I ever did was mill small slots in my drill press vise. Super handy.

EM520645.JPG


Drilling such a big hole on my small press is kinda hairy. It only goes down to 620 rpm so I stepped up many times to make light cuts. It's a little off center but not critical for this job.

EM520646.JPG


Tacked it to the nut.

EM520647.JPG


Here I began welding up the main body.

EM520648.JPGEM520649.JPGEM520650.JPG


Now I tacked the nut to the body. The aluminum bar is just a test thread I made a few months ago. My first lathe thread actually! I didn't make it to any specs, just kinda winging it to get a feel for the process. It is the same thread as the nut but it's not formed properly so it's really tight going in. This would be my undoing...

EM520652.JPG

Part two coming up!
 
Back
Top