- Joined
- Jan 28, 2011
- Messages
- 3,583
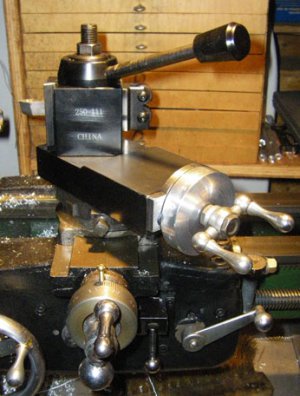
I added a bit of information here as a step by step for future use. The included picture hopefully help with the previous pictures.
As per the pictures
1. Square up the steel on the 4 major sides, it doesn't need to be perfect, as you will see. The ends will be done at the end.
2. Rough out the dovetail and screw nut channel with a straight rougher. I made the DT channel about .030" deeper than original. This is to allow for cleanup mentioned in step 7.
3. Set up the dovetail cutter and take a few passes to clear out the majority of the material on both sides. Remember that with the cutter having a taper it will want to move down. Check your tool holder/collet for oil etc that will allow slipping of the tool. Remember that you are only feeding the tool sideways to deepen the cut, NOT down!
4. When the cutter starts to cut full depth of the dovetail take smaller cuts to make a smoother cut.
5. Remember to fit the male DT with the gib in place but no screws on the gib. You want the best fit that allows for future adjustment.
6. Take a couple of free passes to take care of any spring in the tool. When done you will likely have .001 to .002" clearance if all went well. Remember that if you have extra clearance it is not the end of the world, that is what the gib and screws are there to do.
7. Now that the dovetail is done DO NOT REMOVE FROM MACHINE YET! You want to face the running surface of the slide with everything the same as when you cut the DT. Put in a flat end mill and face the 2 sliding surfaces of the slide. This ensures that the DT and the sliding surface of the slide are parallel to each other.
8. Now you can flip the slide over and place on parallels if you need to clear the vice. Make sure the vice and/or parallels are square to the mill and then face the top of the slide to finish. At this point I did mill the 2 ends to square them up.
9. Note that I did not put in a T-slot for the tool post. As the top slide is only 3" wide the post would only fit properly with a centrally located hole anyway. My tool post used a 9/16" X 18 TPI mounting hole other sets will vary i.e. 14mm X 1.5.
10. I moved the slide to the surface grinder to finish the top surface and then bead blasted the 5 sides that one sees but not the running surface. The running surface I lapped on a glass plate with extra fine grit until most but not all the machining makes were removed. I wanted some marks to remain, as these will hold some oil for lubrication.
11. Thread the gib screw holes and the slide screw holder bracket holes. Broken all edges and on the DT edges I removed some more there as a sharp edge is not needed and you may need the DT corner clearance for the male DT. I ended up with about .015" clearance above the male DT and the corners are clear of any possible rubs as well.
Done. I did blacken the slide with a phosphate coating for some rust protection.


Last edited:

