RF30 DRO & Scales Install

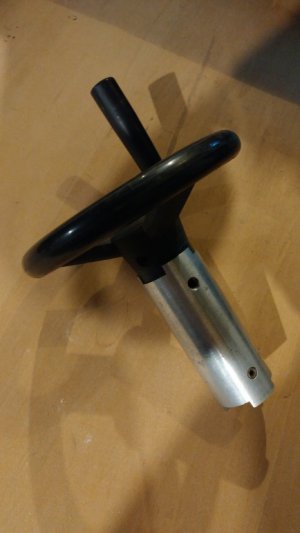
A nice setup. Very similar to the one I did on my RF30 clone. One addition might be an extension for your left hand crank. I melted some aluminum scrap for my raw material. I found that with a slight modification, I could get a couple of more inches on my x axis travel so my extension is 4-1/2" long. I don't normally use it as a cabinet for the computer for my Tormach mill is just to the left of the mill/drill but it is available if I need it.
Mill Extension .JPG
 
A nice setup. ... One addition might be an extension for your left hand crank. .... I could get a couple of more inches on my x axis travel so my extension is 4-1/2" long. ...

Thanks, I can get the table all the way over to the right with the stock handle setup, that's why I carved the scoop out on the Y scale mount- no lost travel.
 
What size scales did you use? Nice build!

Thanks :)

I used 600, 200 & 150 mm length scales, note though that depending on who you order from the length may refer to the complete assembly or to the read head travel length.
 
Last edited:
Issues-

One of the scales died, had to jump through a bunch of hoops to convince the seller what was happening & wait 3 weeks for a replacement.
:(


The replacement scale appeared to have some issues of it's own, plugged into the Y port it worked fine for 3" or so of travel then it started driving the X axis nuts- rapid changes in the reading, like 5 or 6 times normal rate. Sometimes the x would just start counting up at an extreme rate, sometimes moving the x would affect the Y. Tapping a scale would start or stop the craziness. The Z axis worked fine, rock solid.

I suspecteded it was generating some noise on the 5v power rail, after sporadic troubleshooting trying to pin down the source of the problem I eventually ended end up getting a replacement Y scale from a different supplier.

Same thing :(

Then the X stopped working at all :(

Had to be the DRO.

So I contacted the seller again explaining the the situation & what I had done to isolate the issue & why I thought the DRO was bad, I also mentioned the two year warranty the advertised on their ebay listings as well as on the back of the manual. After some very creative miss-interpretations of the correspondence they just stopped responding altogether.

Grrrr.

With nothing left to lose I opened up the DRO & started tracing things out-

View attachment 352808

The inputs hit the main board & go through a R-L-C-R-C-R-C-R-C conditioning circuit. There's 3 signal lines per port although the supplied scales only use the A & B lines, I'm guessing the 3rd is for the half rate Z signal even though the manual doesn't show it.

The signal lines run to hex Schmitt triggers- X & Y run to U2, Z to U4. U4 would also handle port "U" for the four channel version.

There's also a U7 that seems to be there for an unused usb port & something (W) that might be a serial interface.

Working through with a scope I could see nice clean square signals all three inputs on X , Y (U3) & Z (U4) but the outputs of U3 were low & had a funny sawtooth component on the low side of the signal waveform which was also showing up on all six lines even with only one scale connected. Z out lines on U4 were clean. I found I could see the sawtooth on U3's pin 7 (ground connection) but not on the ground pad it was soldered to.

???

I hit the pin 7 joint for a sec with the soldering iron & No More Problems :)

Everything is now working perfectly. :)

Lesson learned- you buy cheap from china & it's a crap shoot on what happens after that :(


So with all that I've now found:

Scales from different providers are wired differently- there seems to be no standardization on pin outs for the DB-9 connector. If you mix & match be prepared to do a little re-arraigning with the soldering iron at the connector.

The Z axis scale could have been a little shorter but I ordered everything the next stock size up from what I figured I needed just to give me some options & slop for alignment.

I've found my x lead screw is no wheres near as good as I thought is was, some spots towards the right end are off by 20 thou/"
o_O


The Y axis seems to not too bad but there's still some wear.

Z axis is perfect, guess that didn't get used much.
:rolleyes:


And that's it. :)


For now ...
Howard,-
Just reading your thread, nice install, especially the Z. I noted a comment you made about the accuracy of the X screw. You said there are some spots towards the right end that are off .020". That is a lot and the end travel doesn't get used like the centre. Is this according to the DRO? Does the hand wheel and the DRO shift sync at that point? Just curious but would like to know what and how you found it.
I have a the same mill under the King PDM 30 label. It has 19.2" of X and the DRO and the hand wheel dial were exactly the same after 192 turns (whew), maybe I was just lucky?

Canuck75
 
Basically I just cranked the X hand wheel over one turn at a time & looked at the readout, and yes it was a lot of cranks :) I guess whether the register is out at the ends or the middle depends on where the table is when you zero the display.

I was doing some work last month & forgot the set the table locks, the end mill dug into the aluminum part & the whole table immediately visibly moved to the right with a rather impressive CLUNK. :(

Probably time for a new screw & nut. :concerned:
Howard,-
Don't quite have a clear picture yet but it sounds like it might be a backlash problem vice a wonky X lead screw. Also sounds like you were climb milling and the cutter grabbed letting the table jump ahead by the amount of backlash. If you are going to climb mill you need to get rid of the backlash first, or always mill against the rotation of the cutter. Lots of ideas from different members about how to get rid of backlash, but, as a first idea, you need to tighten the split on the existing nut to see if that will fix it. Shouldn't have to set the X table locks unless you are working only on the Y. Hope this helps.
 
I would like to thank OP for this wright up! It gave me motivation to start and hopefully complete this job. I have the Z to finish still.
 
Last edited:
Back
Top