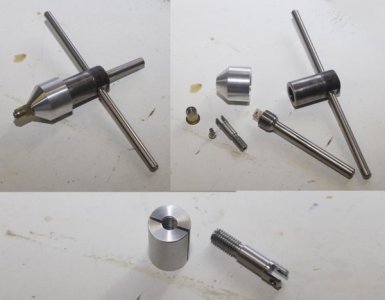
Riv-nut tool stage one

There is nothing like making something for your own use.

I myself just bought one of these from HF and picked up some different sized inserts on Amazon.
https://www.harborfreight.com/45-piece-threaded-insert-riveter-kit-1210.html
Worked great. I spent more on the inserts than I did for the tool.
Used them when I put together my sand blast cabinet instead of the bolts and nuts that came with it.
I am sure your tool was cheaper and may well work better than what I have constructed - we all make choices.
 
riv-tool stage 2.jpg
Well today moved along with the project. Just need to decide how I will attach a handle to the centre shaft. The bottom image is of the clamping holder I machined up to hold the 10mm riv-nut adapter while I cut the slot in the end on the milling machine.
 
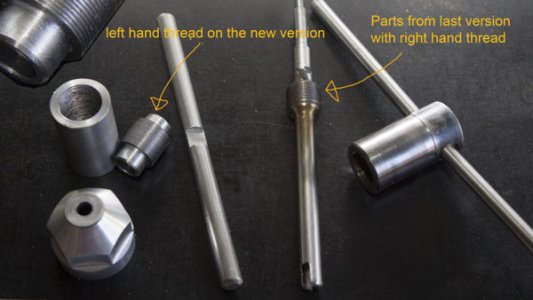
Well it looked OK but worked very poorly. I have considered my fundamental mistake was using a right hand thread - so here is the first stages of the next generation which will be using a left hand thread - same 1mm pitch with a 22mm diameter. It was good cutting the LH tread using HSS hand ground cutters. Good experience and very happy with the smoothness of the interface.MAL_9564 LR.jpg
 
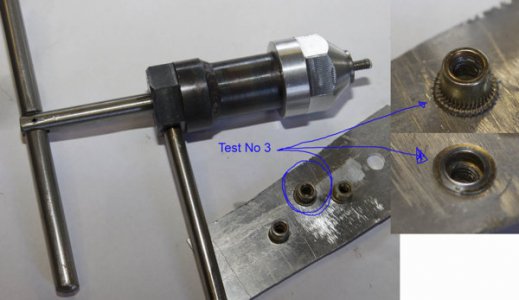
Well got the 6mm version of my riv-nut tool operational today. The critical success point was realising I needed a LH thread - the steel riv-nuts still require a lot of grunt even in the 6mm size - so not sure what to do about the 8mm and 10mm sizes. Learnt lots of things doing this project even though it would have been cheaper to just buy one. Though at least if I was to buy one now I would be looking carefully at the design before parting with the cash.

Mal
MAL_9570.jpg
 
....Learnt lots of things doing this project even though it would have been cheaper to just buy one. Though at least if I was to buy one now I would be looking carefully at the design before parting with the cash.

Mal
View attachment 265326

Allright Mal, you need to repeat the Hobby-Machinist's creed 10 times every morning. Here it is in case you forgot...

"I shall never purchase an item if I can can make one at greater cost and significant expenditure of time".

BTW: In the States, these are commonly called Pem Nuts. There are so many applications and configurations, I would guess that each insertion tool is a custom item. https://www.pemnet.com/design_info/animation-library/pennengineering-animation-library-nuts/

Good job. Carry on...

Ray
 
When I first saw this post, my peabrain translated riv-nut to “pop rivet” and I couldn’t believe someone would go to this much effort for a pop rivet installer. Then I saw your final photo I says to my brain, “you dummy, riv-NUT is not a pop rivet”!!. In view of this revelation I now admire your work Mal. Very fine indeed and well worth the effort and very well implemented.

CHuck, the guy with a faulty processor in his ancient old noggin.
 
Allright Mal, you need to repeat the Hobby-Machinist's creed 10 times every morning. Here it is in case you forgot...

"I shall never purchase an item if I can can make one at greater cost and significant expenditure of time".

BTW: In the States, these are commonly called Pem Nuts. There are so many applications and configurations, I would guess that each insertion tool is a custom item. https://www.pemnet.com/design_info/animation-library/pennengineering-animation-library-nuts/

Good job. Carry on...

Ray

I have the oath now laminated in my workshop and a copy on the fridge so my wife understands why I am doing illogical things out back.

Thanks for the links, always good to know there are different options - some very interesting little critters in that lot.

Thanks Ray.
 
When I first saw this post, my peabrain translated riv-nut to “pop rivet” and I couldn’t believe someone would go to this much effort for a pop rivet installer. Then I saw your final photo I says to my brain, “you dummy, riv-NUT is not a pop rivet”!!. In view of this revelation I now admire your work Mal. Very fine indeed and well worth the effort and very well implemented.

CHuck, the guy with a faulty processor in his ancient old noggin.

Chuck, I cant believe I spent so much time making a tool I could have bought for $50 - though I learnt lots of things - using the lathe, mill and TIG. I had all the material as offcuts from previous projects, so mostly it was time and electricity to run the beasts.

Last year I bought a Colchester lathe and it is still a thrill to have a DRO and a fair swag of tooling - so I can make things given the time and inclination.

Don't worry about the processor, faulty means it still works to some degree - there are worse options.

Regards


Mal
 
Mel
Thanks for the pep talk, the ol noggin isn’t always a slowfunctioning processor, just every now and then I find some part if it napping.

Your riv-nut installation wrench isn’t something you can buy for $50, it’s a much more valuable learning experience. When we get started in this “hobby” making and modifying parts and tools that we will end up using, is the best thing that we can do for our own education. Then when we need to actually make a precision part we already have a hands-on knowledge base to work from. Keep it up, and keep us in the loop.

CHuck the grumpy old guy
 
Chuck - everything you say is right on.
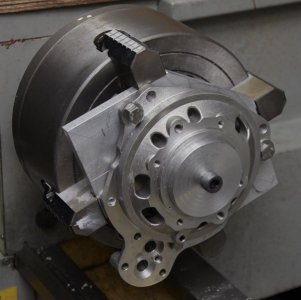
MAL_0175.jpg
I rebuilt my son's BMW engine a year or so ago - here I had to machine a part to ensure the end float on the crankshaft was correctly centred. Had to machine up a quite complicated holding plate and then of course sort out the run out on the four jaw. From memory took me a few hours and quite a bit of perseverance. The good news is that the engine is still purring along after it's rebuild. New crank, pistons, bearings etc. My bike is next but just can't seem to clear the work bench of other smaller more urgent and to some extent less important projects.

But hopefully can get onto it soon.

Mal
 
Back
Top