SB 9A Lathe Excessive Bed Wear?

Keep it, use it, and keep an eye out for another bed or whole lathe that you could swap parts to. That's what I would do. Model C lathes come up more often than A models, so you are lucky to have an A
I always liked the apron configuration of the A model, very intuitive
-M
 
Looks to me like a previous owner needed more space near the headstock to clear a part and ground the ways to get it. He did not grind anywhere near where the saddle will run so you may be okay, depending on the condition of the rest of the bed.

Yup. That's exactly what happened. It's not uncommon for those that don't have gap bed lathes to cut out the top of the ways completely to turn larger pieces.

I don't see a wear ridge at the top, so it does look serviceable.

Couple of quick tests....
Saddle up at the headstock. Screw the carriage lock finger tight, then loosen just slightly so the carriage will slide without resistance. Then slowly run the saddle down to the tailstock. If it get's tight as you move away from the headstock it's indicative of wear.

You need an indicator for the next one.
Tailstock ways are usually much less worn, if not near pristine. Saddle and tailstock together up at the headstock.
Put a magnetic indicator base on the tailstock- and the dial indicator tip on the front left corner of the saddle.

Start spinning the saddle down the bed. The saddle will push the tailstock (the tailstock ways serve as the reference surface here) along, and the indicator will show "drop" due to wear on the front way as you go down the length of the bed.

The bottom of the tailstock is also a good place to check for wear.

Honestly, even "significant" bed wear doesn't mean the machine isn't workable. Unless you're turning over long lengths it won't matter much- and even then you can learn to compensate for it.
 
If you want to go where others fear to tread, there are HM projects, and links to complete re-works that will take out the wear ridges, and scrape the ways, and end up with something aligned along it's whole length. Do not go there unless you are completely aware of what it takes. The end result is beautiful, but a hard road to get there.

One can have the bed ways re-ground. This can cost more than you think the kit is worth, but I have heard some places can do it for $400 - $500. Setting up a good bed regrind is not trivial. You have to trust the firm has the skills and experience. You have to keep in mind some other "adjustments" needing shimming or whatever to take care of the position of the carriage relative to the leadscrew, and it's gears, etc. if the regrind lowered the bed beyond the trivial. That you got it as a freebie may affect your decision (or cloud your judgement).

From the Connelly "Machine Tool Reconditioning", available on this site, he counsels "top down" method. I have seen YT videos on how the bed ways scraping was progressively adjusted to get the travel relative to the spindle axis exact while doing the minimum of metal removal work.

There us one (scary) set of videos where first the unworn surfaces, tops of ways, front side and under, etc. were established, then he set up a ghetto arrangement using an old router to re-grind the ways keeping parallel to the original spindle axis. The outcome was a work of art, but I am not sure he would do another like that.

Even with the localized wear, a bit of judicious scraping to in effect make the unworn parts "catch up" can make a superb lathe performer. That is another route I will not go! The lathe works well enough without it.

Plating Experiment
I have been the route discovering how to mask the unworn heights, and locally apply homebrew nickel electroplating to add metal to to low regions, and then scrape back to original.

It worked, but it is my little adventure. I had nothing much to lose, because I acquired the whole lathe, 4-jaw chucks, tooling, bench etc. for less than 150 bucks. Yes, I did it to a "test" section of the ways. Yes, it takes ages to build up enough nickel, and my wear ridge is not as deep as yours. Yes, nickel is much harder to scrape than bed-iron. Some of my plating stuff is in HM posts. I may go there again, but the best discovery is that a 3 minute dunk in nickel-loaded vinegar leaves a part so it will never rust again! I now have other nickel solutions, and I still may go at it again this way. I also might be the only nutter in the entire HM membership who would attempt this.

I have two SB9s, one working, and one in pieces. Playing with restoring one machine, sometimes using the other to do it, is as much fun as machining for any other project. On the way, I may end up with the most measured SB9 anywhere.

Measure it a little
Get a bit of pipe, plug the ends good enough to face and and give centers. Weld in some metal, or JB Weld glue it, whatever. Cut the central region a bit down leaving the dumb-bell ends, and make a test bar. Use a micrometer on them. Use a eBay test bar with indicator to check alignment. Even just turn something and measure to check if you are not making a taper. You may be more than satisfied, and happy to leave the lathe as it is, but you have to be sure of the line between the lathe condition, and your turning and measuring skills.
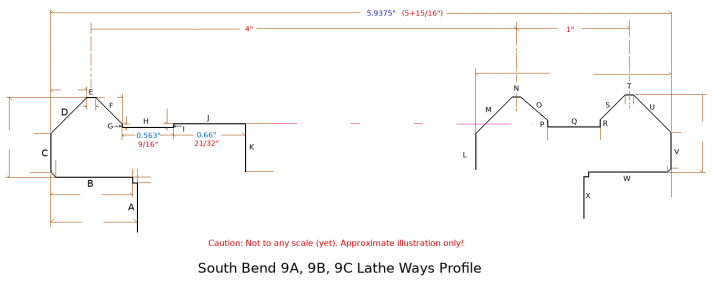
SB9-profile3.png

Above is my homebrew nominal profile of the major factory measurements.
Surfaces B, C, E, H, N, T, V, and W have a very good chance of being accurately aligned to the original axis.
Surfaces E, N , T may have got a bit dinged up in places, but usually are still close enough to "unworn" to set a level on.
Establishing something you trust, like standing blocks on H and Q, or using E and N is essential if you want to asses the condition.

Of course, one of the first things you do is put an indicator on the carriage, and test down to H, or against C, to discover just how much the carriage sinks in a worn area. Simply because the carriage ways straddle a wide region, and average out the wear, you could be surprised how little the accuracy is affected by a whole lot of wear.

I do have my partly filled out spreadsheet , measuring up the profile in sections, in tables for the length of the bed every 100mm. I will post if you like, but most folk here use inches, and they can probably make a spreadsheet just as well as I can.
As sample fragment looks like this -->

SB9 Measure Fragment.png

From your real nice pictures, my impression is that the lathe looks nothing like the rusted up hell that many of them end up in. So far, everyone is saying keep it and use it. If not, at the very least, @Superburban will have it. Clean up, measure up, and you may find that with few minor tweaks and maintenance, you have something nice.

Suggest..
1. Perhaps get the tailstock adjusted true.
2. Maybe pay attention to the chuck jaws (lots of info her on how to do that)
3. Check out the leadscrew nut. Keep, replace or make another.
4. Check for backlash in slide adjusts. This is partly about the ACME thread, and what it runs in, and partly about the shim washer(s). There has to be at least some tiny amount, or you never know if the tool is true in the direction you are going.
5. Of course, check it out for basic catastrophic stuff - like missing gear teeth. Motor must run, connections and switches safe.
6. Get all the gibs adjusted up sweet. Make sure the oilers are accepting oil.
7. Peek up the tapers. They may need a clean-out, and possibly a gentle refresh with a hand MT2 or MT3 reamer.
On that last point, take care, I have recently discovered that some SB9s were made with MT2 at both ends, and some had MT3 spindle with MT2 tailstock.

Try it! If it still leaves you unhappy, send PM to @Superburban :)
 
Last edited:
If you are up for a challenge then go for it, don't expect to get the money you put in back out tho because that is just how projects are Flustered
 
Hello,

I'm brand new to the forum, my name is Matt. I am a mechanical design engineer by trade and have some experience operating both a mill and lathe, I live in Minneapolis, MN.

I recently acquired a 4' South Bend Model 9A lathe from a friend. He paid nothing for it and since he had no use for it he gave it to me. I knew nothing about the condition of the lathe when I agreed to take it off his hands but now that I have it in my basement I can see quite a few issues that need to be addressed to make it operable (worn bed, excessive backlash on cross slide & compound, plenty of end play in the spindle, the list goes on :)

Before I saw the lathe in detail in my basement my plans were to refresh it into working order, the condition of the bed however makes me wonder if restoring this lathe is worth the time and effort. I'm hoping someone here can help advise me. I do not yet have an indicator to make measurements, I have only my eyes.

If you look at the pictures of the ways you can see that the very peaks on the spindle side are completely worn down for like 4-6". Its almost as if someone came over with an angle grinder and buzzed the tops off. You can also see that the sides of the ways are quite worn with lots of scoring. Is this lathe a lost cause? Should I just chuck this thing?

Thanks,
Matthew LaBerge
I would clean and lube it, and make chips. I have a 9A that came out of a scrap yard. It's in a lot worse shape than yours. I use it all the time. It makes good parts and is easy to use. Have fun with it.
 
I would clean and lube it, and make chips. I have a 9A that came out of a scrap yard. It's in a lot worse shape than yours. I use it all the time. It makes good parts and is easy to use. Have fun with it.
@matthew_laberge mentioned a 4" lathe. I think he meant a 4" chuck. Anyways, the place the ways got hurt a bit was where a chuck got dropped, or something dinged it there, then the dig was ground off. It's in a place the carriage saddle never slides right up to anyway. I would think the lathe could be cleaned up and used. It's possible he might have to do a bit of leveling, tailstock adjusting, maybe glue-splice a new belt, etc. The standard route is to invest in "A Guide to Renovating The South Bend lathe 9 Model A, B, & C Plus Model 10K". There are eBay offers which provide all the new felts, springs, etc along with a book. Then binge watch YouTube for really excellent knowledge gathering.

I have two SB9s. One is in pieces, and the other I kept working, though temporarily stopped to be given it's new drive belt. So far, the SB9C has been used to help fix up the SB9A. I don't need much in the way of other projects while I mess with these. I will admit to arranging Santa to bring me a MT3 1HP mill drill, with milling-type goodies, but the lathes are the precision pleasure, even if they are from last century.
 
I would clean and lube it, and make chips. I have a 9A that came out of a scrap yard. It's in a lot worse shape than yours. I use it all the time. It makes good parts and is easy to use. Have fun with it.
this!
I have a 9b with ways like Superburban. I filed the ridge off because it ****** me off every time I looked at it. It's wore out and I have $1k in it. Paid $500 and put another $500 in it, Not counting the new chuck, qtp, and tooling. That said, I'm the most inaccurate part of my setup, and like my lathe a lot.


Sent from my SM-N975U using Tapatalk
 
@matthew_laberge mentioned a 4" lathe. I think he meant a 4" chuck. Anyways, the place the ways got hurt a bit was where a chuck got dropped, or something dinged it there, then the dig was ground off. It's in a place the carriage saddle never slides right up to anyway. I would think the lathe could be cleaned up and used. It's possible he might have to do a bit of leveling, tailstock adjusting, maybe glue-splice a new belt, etc. The standard route is to invest in "A Guide to Renovating The South Bend lathe 9 Model A, B, & C Plus Model 10K". There are eBay offers which provide all the new felts, springs, etc along with a book. Then binge watch YouTube for really excellent knowledge gathering.

I have two SB9s. One is in pieces, and the other I kept working, though temporarily stopped to be given it's new drive belt. So far, the SB9C has been used to help fix up the SB9A. I don't need much in the way of other projects while I mess with these. I will admit to arranging Santa to bring me a MT3 1HP mill drill, with milling-type goodies, but the lathes are the precision pleasure, even if they are from last century.
He has a 4' bed.
 
Looks to me like a previous owner needed more space near the headstock to clear a part and ground the ways to get it. He did not grind anywhere near where the saddle will run so you may be okay, depending on the condition of the rest of the bed.
Mikey hit the nail right on the head. Al
 
this!
I have a 9b with ways like Superburban. I filed the ridge off because it ****** me off every time I looked at it. It's wore out and I have $1k in it. Paid $500 and put another $500 in it, Not counting the new chuck, qtp, and tooling. That said, I'm the most inaccurate part of my setup, and like my lathe a lot.


Sent from my SM-N975U using Tapatalk
You filed away the dings. What else did you do to the ways? I have to agree that if you ended up with a nice SB9B for $1000, I think you did OK. Most of us can expect to put in a bit more, over time, for QCTP, various extra goodies. I plan to add on a Chinesy DRO kit, and I fancy trying out a YouTube project to make up a nice steady rest, starting with a pair of disc brakes discs (OK then - disks).

My SB9C has not got significant wear on the ways. Only the paint job colour puts me off. The tops of the ways look a bit rounded, but in fact, are not a wearing out surface, and are in fact a great reference. The same goes for the SB9A way tops, even though the ways are more worn.
You can see in the picture in post #13 how I measured from B to E to check it out from original placed surfaces. I now know that I can put a parallel, or a level straight across it, and take out twist, and verify alignment. It's very handy.

If you really want to check out the ways ..

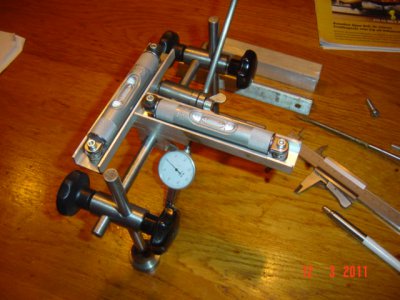
The Kingway alignment tool is covered in other threads in HM. I had thought to try and make up my own version, because it can be done entirely from turned parts and some easy Aluminium extrusions. I have a pair of (Chinese again!) 100mm levels, and those knobs can be had from eBay.

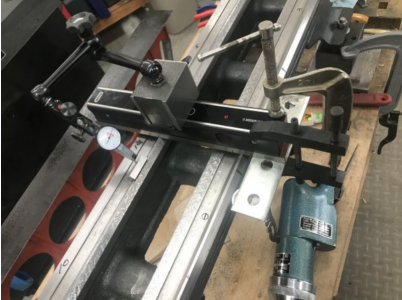
Rex Waters lashed up what he called his "ghetto" Kingway by clamping to a level a bit of metal to which he had epoxied a couple of washers to touch to a unworn reference surface. There was also a leaned over loose gauge block involved.

Alignment detector.jpg - - Ghetto Kingway-RexWalters-version.png

For convenience to those interested, I put the info I have all together here. The original patent US2761217 does explain all the various ways this kit can be used, but various improvements have been figured out since, and many versions are now easier to make. The example set of dimensions are in a text file that originated from a UNIX-Type OS, so I do hope it displays OK in a Windows based system. It seems OK here on NotePad. If there are problems, I can put the text direct in the posting.

The best is to search on YouTube. There are videos of measuring kit that look easy enough for beginners as a project.

[Edit: The explanation from @mikey seems exactly right]
 

Attachments

  • US2761217-Kingway Alignment Tool.pdf
    748.6 KB · Views: 16
  • US Kingway Alignment Tool Dimensions.txt
    1.9 KB · Views: 13
Back
Top