Hi. In previous visits I've gotten remarkably good advice on some tricky (for me!) problems, and I've some back to the well, so to speak.
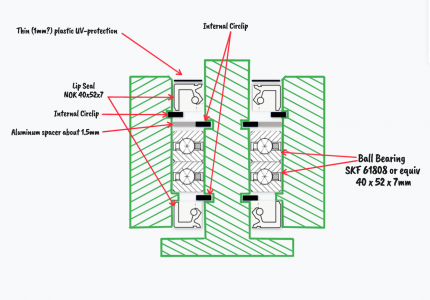
I've got an assembly in which an inner cylindrical piece (diameter 40mm, or about 1.6") of anodized aluminum revolves inside an outer collar, with a couple of bearings and two grease-seals. The anodized surface on which the seals ride got marred, and I'd like some advice on how to deal with this.
Here's the setup. I've made a rough cross-sectional drawing of the assembly:

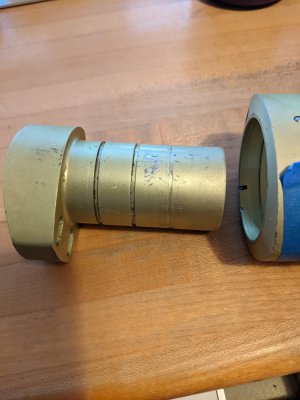
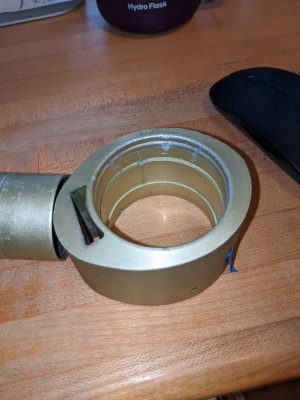
Here are the two main parts, lying on their side:

When I separate them, you can see that the surface of the smaller piece on which the bearings and seals ride got somewhat damaged by an aggressive 'helper' who tried to remove some snap-rings with the wrong set of pliers. The surface of the collar also got damaged a bit (by me this time!), but that's less of an issue.
.jpg")
The picture above shows two deep grooves (in which the snap-rings fit) and one shallow groove to hold a thin plastic ring that shields one of the seals from the elements (that end of the inner piece is the one that points upwards when everything is assembled). Just to the left of the left deep groove, you can see where one of the seals 'rides', a slightly lighter color. A little bit farther to the right of the right deep groove, you can see the track of the other one. And you can see in each case that the tracks go over some damaged area. (The left one doesn't look bad...but that's because you can't see the other side.)
This isn't an ordinary shaft-sealing kind of application: the assembly spins about 20 turns, twice a day, at a speed of perhaps 300 RPM, i.e., it turns for a little more than 3 seconds, twice a day.
I'm considering various alternatives:
(a) continue smoothing things out with emery cloth until it feels pretty smooth to the touch, and hope that a combination of thick grease and the spring on the seal-lip will do the job
(b) clean the exposed areas with acetone and/or xylene, then smear the area with JB-Weld, and then remove the excess with emery cloth to get a nearer-to-smooth surface
(c) turn down the damaged area by a thousandth of an inch or two, clean well, mask everything else, and try to re-anodize the newly-exposed metal, and trust to the spring in the seal to absorb the reduction in diameter.
Any thoughts, suggestions, better alternatives?
I'm at best an amateur machinist, so if it involves welding aluminum, etc., I'll need to get a pro involved.
Thanks in advance,
--John
I've got an assembly in which an inner cylindrical piece (diameter 40mm, or about 1.6") of anodized aluminum revolves inside an outer collar, with a couple of bearings and two grease-seals. The anodized surface on which the seals ride got marred, and I'd like some advice on how to deal with this.
Here's the setup. I've made a rough cross-sectional drawing of the assembly:
Here are the two main parts, lying on their side:
When I separate them, you can see that the surface of the smaller piece on which the bearings and seals ride got somewhat damaged by an aggressive 'helper' who tried to remove some snap-rings with the wrong set of pliers. The surface of the collar also got damaged a bit (by me this time!), but that's less of an issue.
The picture above shows two deep grooves (in which the snap-rings fit) and one shallow groove to hold a thin plastic ring that shields one of the seals from the elements (that end of the inner piece is the one that points upwards when everything is assembled). Just to the left of the left deep groove, you can see where one of the seals 'rides', a slightly lighter color. A little bit farther to the right of the right deep groove, you can see the track of the other one. And you can see in each case that the tracks go over some damaged area. (The left one doesn't look bad...but that's because you can't see the other side.)
This isn't an ordinary shaft-sealing kind of application: the assembly spins about 20 turns, twice a day, at a speed of perhaps 300 RPM, i.e., it turns for a little more than 3 seconds, twice a day.
I'm considering various alternatives:
(a) continue smoothing things out with emery cloth until it feels pretty smooth to the touch, and hope that a combination of thick grease and the spring on the seal-lip will do the job
(b) clean the exposed areas with acetone and/or xylene, then smear the area with JB-Weld, and then remove the excess with emery cloth to get a nearer-to-smooth surface
(c) turn down the damaged area by a thousandth of an inch or two, clean well, mask everything else, and try to re-anodize the newly-exposed metal, and trust to the spring in the seal to absorb the reduction in diameter.
Any thoughts, suggestions, better alternatives?
I'm at best an amateur machinist, so if it involves welding aluminum, etc., I'll need to get a pro involved.
Thanks in advance,
--John