Single Point Threading Issue - might be gearing?

This is the kind of part that a Sherline lathe excels at making because threads are cut manually by turning the leadscrew by hand. You might try spinning the chuck by hand to see if it works. If it does then it might be a good idea to make a handwheel to turn the spindle on these smaller threads.
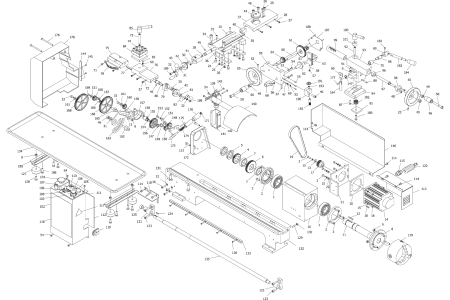
If I turn the chuck manually, the leadscrew advances. How would one attach the handwheel? Removing one of the spindle nuts? (#5) There seem to be two of them, I guess acting as a jam nut. M27x1.5 is what the parts list shows. They are more of a spanner nut, rather than a hex nut. There's no spare thread left on the spindle.
1584241346362.png
 
My reflexes aren't fast enough to stop the threading if I go from tailstock to headstock.

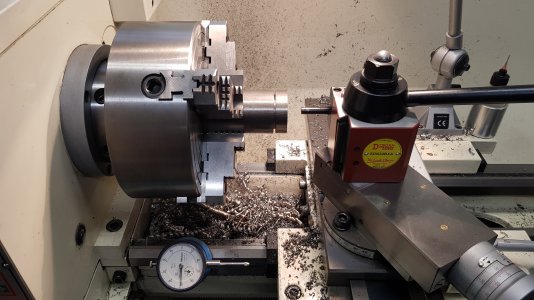
How close do you need to get to the shoulder? Does the part require no thread relief between the thread & shoulder? With practice you should be able to get it. I can thread into a 1/16" wide thread relief no problem disengaging the half nut without any aid.

By aid what I mean is a dial indicator. When I single point threads I set up a dial indicator to read zero 10 thou off a shoulder or blind hole. I use the modified flank method for threading so to set the dial indicator after setting tool position off the work, I retract the cross slide, advance the compound to the full depth required for the thread pitch being cut, then move the carriage so the cutter bottoms out on the shoulder or the blind hole. Then I set the dial indicator for the carriage +.010. I set the 0 mark at 12:00, the needle starts moving from 6:00 on my DI.

I'm certainly not a pro or even close but I'm able to disengage at 0 on the dial indicator pretty consistently or within a few thou. So in theory I could probably get even close than 10 thou but I never have a need to get that close & to play it safe. Sometimes I thread with no thread relief at all using this method. I know I'm not the only one that uses a dial indicator for threading. Although I have a DRO now, a digital display is pretty much useless for the Z axis for threading.

Threading from headstock to the tailstock is great & allows you to run higher spindle speeds than you normally would & should give you a better surface finish but there are downsides too. Pretty much always need a thread relief which most people use anyway (stronger with no thread relief). But if threading a very coarse pitch the thread dial will be moving pretty fast. There is no room for error engaging the half nut on a specific mark when needed. At least with threading conventionally from right to left you do have room for error & can reset with no damage if you miss your mark. But this shouldn't be an issue once you are used to it. If you are threading a metric thread & you have an imperial lathe (or vice versa) you can't use the half nut here & if the thread is up to a shoulder or a blind hole, getting your carriage lined up for the next thread will be tricky. On top of all that you'll need LH tools. Not knocking the method, just saying it's not for everyone.

20200221_132345.jpg

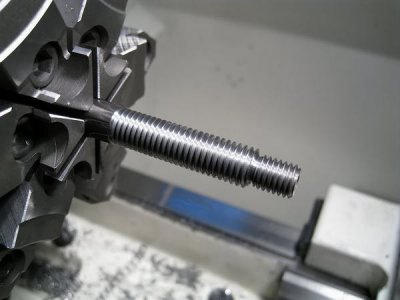
No thread relief
Img_6324.jpg
 
If I turn the chuck manually, the leadscrew advances. How would one attach the handwheel? Removing one of the spindle nuts? (#5) There seem to be two of them, I guess acting as a jam nut. M27x1.5 is what the parts list shows. They are more of a spanner nut, rather than a hex nut. There's no spare thread left on the spindle.
View attachment 316717

Don't remove those spindle nuts, they are usually for bearing preload. Some people attach a handwheel to the leadscrew, on the right end. I have also seen people make a hand wheel to attach to the ID or OD of the spindle.
 
For these small lathes, many have made an expanding mandrel to manually turn the spindle. The most-often used approach is a rod and tube with a diagonal cut so they slide past each other and capture the inside of the spindle when tightened against each other using a bolt . The other end of this thing has a crank on the end of the rod you use to turn the spindle, which also drives the lead screw. With this approach you get all the control you need, even with coarse threads (which can be pretty "exciting" to cut under power).

The controller on my mini lathe can turn the motor at very low speed so I haven't found the need to make one of these yet. I've cut 1/2-20 threads under power but the RPMs were low, and I had the luxury of being able to cut a run-out groove to make things easier. Threading from headstock to tailstock sounds pretty good, too, but you still can't get right up to a shoulder unless you exclusively advance the cross slide -- setting the compound (or top slide) to 29.5 degrees and advancing will move the cutter toward the shoulder. Maybe I'm wrong here but it seems like an Aw Shucks scenario to me....waiting for someone to set me right :).
 
If I turn the chuck manually, the leadscrew advances. How would one attach the handwheel? Removing one of the spindle nuts? (#5) There seem to be two of them, I guess acting as a jam nut. M27x1.5 is what the parts list shows. They are more of a spanner nut, rather than a hex nut. There's no spare thread left on the spindle.

There are a few threads about this mod. This one is pretty good, and this is also illustrative. Essentially, you are looking to somehow tie a hand wheel to the spindle so you can manually turn the wheel to provide the motive force to the leadscrew via the gearing that is set up for the threads you wish to cut. It will allow you to cut threads without worrying about crashing the tool into a shoulder.

You can also do the Joe Pi thing but as Will said, there are advantages and disadvantages to all these methods.
 
a good idea to make a handwheel to turn the spindle on these smaller threads.

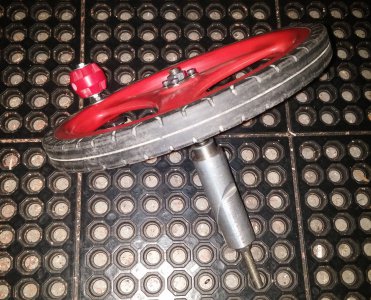
Yes, that is an excellent Idea. I've been doing it for several years. What I did ws copoy the mechinism that hods a bicycle handbar in place. Make a piece of round steel, just under the ID of the lathe spindle on the left end of the lathe. abut 2 /12/3 inches long. Drill half way through with (for example) clearance for a 3/8" bolt, drill the rest of the way through with a tap drill for 38-16 p itch threads.
Tap the small end. Then (this is the hardest part) saw the longest diagonal you can manage, the more the better and Mill/file/polishboth cut surfaces smooth. Make/use a handle/crank drilled to clear a 3/8 bolt, assemble the whole, insert into the back of the spindle, and tighten the screw, drawing the two inside pieces together. NOw you can crank your chuck awile lthereading. you'll have to determine how much you can take with each pass. but you can stop rotation at the same place eaach time you get to the end of the cut, or go the other way (Joe Pie) and it will all work out. There's a video somewhere on the internet showing a guy threading a brass shaft with a pedal operated lathe.
 
My Atlas/Craftsman 6 x 18 also has a non-adjustable thread dial, it is possible to adjust the dial by adding/removing shims between the thread dial mechanism and the the carriage apron. The shim will change the relative position of the thread dial mechanism to the half nuts. The range of shims will be less than the lead screw pitch so if the lead screw is 16 tpi, the maximum range would be .063". Rather than try to make shims of impossible thickness (thinness?) add .063" to the desired thickness which will move the thread dial out an extra tooth. A range of shims can be made using soft drink cans and some varying thickness washers turned on the lathe.
 
I would never try to discourage someone from trying new things or improving their skills.

However, if the object is to produce that little pin from O-1, I suggest simply using a die and (if necessary) making a very narrow undercut at the shoulder. It is difficult enough to get a decent surface finish threading O-1 at the appropriate cutting speeds. For this diameter, I calculate a turning speed of 1000 rpm and threading about half that. Slowing it down enough to compensate for your lack of experience is a recipe for extreme frustration. Feel free to try single-pointing for the practice, but be prepared to use a die to get the job done. I've done a lot of single-point threading, and I would use a die.

Learning to thread is much easier on larger parts with better machinability where the rpm's are lower and it's easier to get a finish. Once you've worked out the moves and timing you can progress to more challenging jobs.

You have to learn to walk before you can run.
 
Last edited:
Don't remove those spindle nuts, they are usually for bearing preload. Some people attach a handwheel to the leadscrew, on the right end. I have also seen people make a hand wheel to attach to the ID or OD of the spindle.
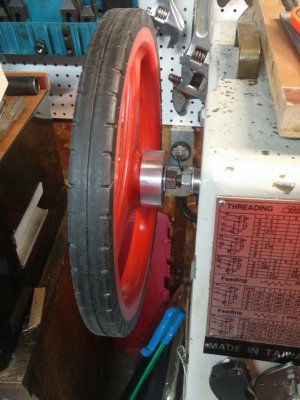
The picts show Rev.1, on Rev.2 I was able to add counter balance to it so I can actually run the lathe under power.
I actually did mistakenly engage power once and just with a 1/4" bolt and solid knob it got interesting real quick, really fast.
001r.jpg...003r.jpg
 
If I turn the chuck manually, the leadscrew advances. How would one attach the handwheel?


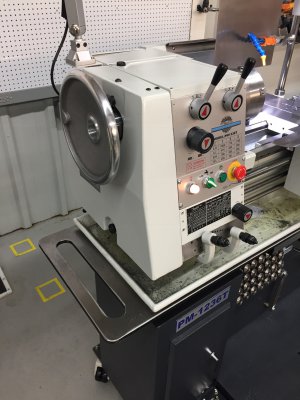
WobblyHand, I attached a handwheel to my PM1236-T by attaching a solid wheel bored centrally to the same size as my spindle bore using a collar attached by an interference fit. This setup allows you to maintain your spindle bore for longer pieces and the solid wheel helps prevent you from getting entangled in the wheel spokes. It is removable but it pretty much stays on the machine. I use it all the time, especially when doing things like centering a piece in the 4JC. I bet a similar setup will work for your project. It amazing how one simple project leads to others. I have a pretty detailed description of it here on H-M.
7CB9195E-4204-4B3B-A194-692248ED56AE.jpeg

Mike
 
Back
Top