[How-To] Speeds and feeds (general advice)

Thankyou so much for your help here really appreciate it ive used that little machine shop calc in the past and did for this job but the noise was just hurendous at the speeds that were shown :(.

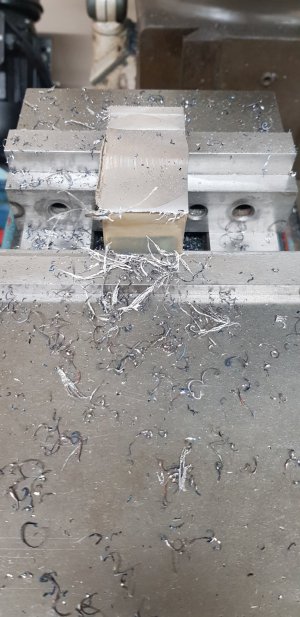
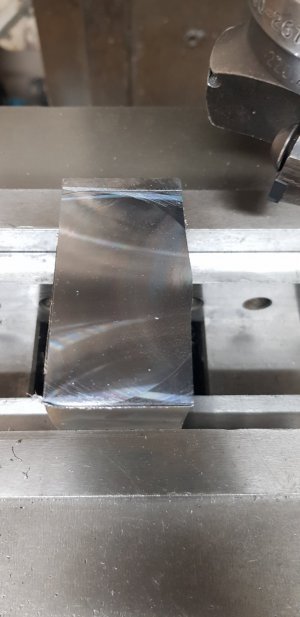
I upped the feed rate and it just sounded even worse and prodced more burs (pictured) im assuming this is bad as it looked more like the material was being pushed rather than cut?

Ill shall have ago at tramming and see if it improves the cuts so thanks for the vid!

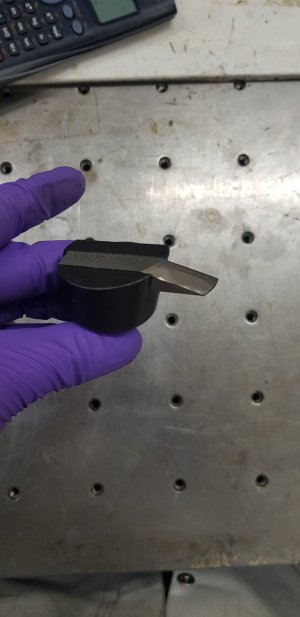
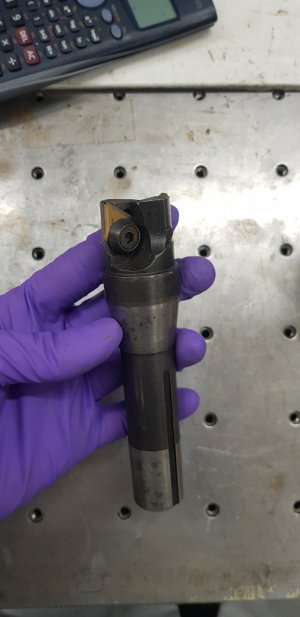
Ive looked around in the tool cabinet for this miller and managed to dig out some bits (pictured) one is i think the fly cutter you spoke of but i think the insert is ground to the wrong shape (plus ive never used one before)

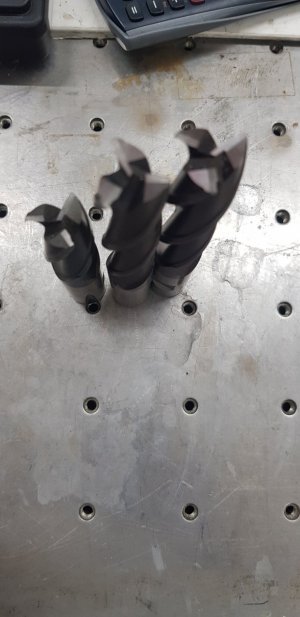
The cutter displayed in the video and then one youve shown earlier (not had chance to shop yet) require inserts?

Thanks for all the help hinestly its nice to get some answers to confusing noises (and scary) ones haha

Edit: just tried with 2 inserts defently better still some noise and a little vibration but with a better finish BUT these are fresh tips....
 

Attachments

  • 20230201_135535.jpg
    20230201_135535.jpg
    98.4 KB · Views: 14
  • 20230201_143910.jpg
    20230201_143910.jpg
    229.5 KB · Views: 15
  • 20230201_135521.jpg
    20230201_135521.jpg
    110 KB · Views: 12
  • 20230201_135514.jpg
    20230201_135514.jpg
    152.3 KB · Views: 12
  • 20230201_145909.jpg
    20230201_145909.jpg
    130.4 KB · Views: 14
Last edited:
No worries, happy to help!
Yeah I think that's when you start hitting the wall of stability issues, as you ramp the feed up.
The noise is probably chatter which makes it cut horribly bad.
So the mill simply can't run a cutter that large at those speeds, but the cutter wants to run that way basically.
I would say that generally more burrs indicate worse F&S data, and, deburring parts is annoying.

The cutter in the vid and link uses APMT1604 inserts, I haven't entirely figured them out but they come in some variants.
What I mainly look at is nose radius. Smaller nose radius = lower cutting forces = easier for the mill to keep up.
shorturl.at/bcfPS (3.2 nose radius, probably going to sound like WW3 from high cutting forces)
shorturl.at/sMNS0 (0.8 nose radius, most likely "sharper" and lower cutting forces, also allows shallower cuts)

I think a rule of thumb is that you should at least do your nose radius as a DOC but there's plenty of room to play around with that and test things out.
I've seen datasheets saying you can go up to 15mm DOC on these but definitely not on my 1200kg mill.
More than 3mm DOC on steel and you start getting really rough noises that I'd rather not hear.
I rather do it in more passes than potentially break/strain the machine and considering how ridiculously fast you can feed carbide it's fine.

First head definitely looks like a small flycutter but I've never seen that kind of grind on an HSS flycutter.
This is what I use, a 40mm weldon holder and basic flycutter head with a replaceable bar in it.
The bar has been crashed few times and the cutter is far from new but still produces fairly good result even in this gummy construction steel.
Notice how the burr is mostly on one side because I'm basically "sweeping" the steel that way and the cutter is not sharp enough and not going deep enough to cleanly "snip" the metal off.
IMG_5946.JPGIMG_5951.JPG

Another thing to look for is chip formation.
This is from a whole bunch of different cuts but same material, cutter and rpm.
Notice how the smaller bits are solid blue, this was with low feed and crazy amounts of heat were in the cut and got sent flying with the chips.
The more I up the feed the more of a brass color I get, this would indicate that the chips are still evacuating heat from the cut but things aren't getting insanely hot which is better(imho).
The cuts with low feed also produce all that "dust" rather than clean shavings.
So blue = too little feed and/or too much rpm
The biggest brass-colored ones were 1100rpm, 500mm/min, 6mm DOC with that 30mm endmill.
The small blue ones were 1100rpm, 100mm/min and 1mm DOC.
IMG_5948.JPG
 
Another thing I've noticed with that online calculator is that especially on larger diameter tooling, it will assume very large chips which becomes a bit weird. So a 20mm endmill is calculated to 0.12mm chip load per flute/tooth whilst a 120mm endmill is suddenly supposed to manage 0.72mm per tooth. Just something to be aware of.

Videoed a bunch of test-cuts with the APMT1604 inserts, maybe the visuals will give you an idea of what I usually look for.
 
@MrCrankyface , I want to thank you for what you've added here. I've been trying to use one of those calculators to improve my feeds and speeds, and frankly the numbers I've been getting have not been useful. Nobody ever seems to throw in "if your mill can keep up", or tell how to determine if your mill can keep up, and what to do once you determine that you've exceeded the mills limit.

I've been working on some A36, and just getting horrible chatter with a 2.25", 4-insert facemill on my Enco Bridgeport clone. It looked like fish scales. Faster. Slower. Shallower. Deeper. Either the bit was skipping across the material, shaking the whole house, or the belt was slipping. Nothing seemed to make it better. Last night, I removed two of the inserts. I got the best finish I've ever been able to attain in this crap steel, and I was able to adjust the feed rate to change the type of chip from slender blue pigtails to golden nines.

I think I'm on to something now.
Happy to hear some of my ramblings helped! :grin:
 
Feed and speed calculators make assumptions, for example, they give you a maximum speed for ultimate productivity. That doesn't mean it's the right speed. Some calculators will report the result at a given HP, which is better, but it's still an all-out max value that the calculator returns. Carbide has extremely high feed capabilities that well exceed what a 3hp manual mill can do.

I find calculators are useful for two things only: 1.) A sanity check, and 2.) a max limit as a starting point. Sometimes, it's best to use 10% of a calculated value for carbide. HSS is a little different, the calculated values there are pretty useful because HSS has a narrower performance envelope at higher speeds, and is nearly bottomless at lower speeds.

There is a lot of tool data to look at as well. One end mill's flutes may accommodate a much higher chip load due to design than another, an so on. All things that matter at the maximum end of the range, but don't mean much on a manual mill. A 20k RPM CNC with 20 horsepower sees a very different relationship with the tool and finish than my knee mill, and as the owner of that mill, that's my part to figure out.

Every calculator and every measuring instrument will generate numbers in the hands of users. Remember, the answer to life, the universe, and everything is correctly given as 42. The calculator was right given the input. Unfortunately, it takes a little more than that to work out a proper feed and speed on a job-to-job, machine-to-machine basis.
 
Thanks everyone for your replys its been really helpful, im definitely a beginner when it comes to milling so any and all advice has been welcome and helpful. Ive got to agree with shotgun about removing two of the inserts from a face mill and getting a 100% better cut! (Very helpful).
 
No worries, happy to help!
Yeah I think that's when you start hitting the wall of stability issues, as you ramp the feed up.
The noise is probably chatter which makes it cut horribly bad.
So the mill simply can't run a cutter that large at those speeds, but the cutter wants to run that way basically.
I would say that generally more burrs indicate worse F&S data, and, deburring parts is annoying.

The cutter in the vid and link uses APMT1604 inserts, I haven't entirely figured them out but they come in some variants.
What I mainly look at is nose radius. Smaller nose radius = lower cutting forces = easier for the mill to keep up.
shorturl.at/bcfPS (3.2 nose radius, probably going to sound like WW3 from high cutting forces)
shorturl.at/sMNS0 (0.8 nose radius, most likely "sharper" and lower cutting forces, also allows shallower cuts)

I think a rule of thumb is that you should at least do your nose radius as a DOC but there's plenty of room to play around with that and test things out.
I've seen datasheets saying you can go up to 15mm DOC on these but definitely not on my 1200kg mill.
More than 3mm DOC on steel and you start getting really rough noises that I'd rather not hear.
I rather do it in more passes than potentially break/strain the machine and considering how ridiculously fast you can feed carbide it's fine.

First head definitely looks like a small flycutter but I've never seen that kind of grind on an HSS flycutter.
This is what I use, a 40mm weldon holder and basic flycutter head with a replaceable bar in it.
The bar has been crashed few times and the cutter is far from new but still produces fairly good result even in this gummy construction steel.
Notice how the burr is mostly on one side because I'm basically "sweeping" the steel that way and the cutter is not sharp enough and not going deep enough to cleanly "snip" the metal off.
View attachment 435824View attachment 435825

Another thing to look for is chip formation.
This is from a whole bunch of different cuts but same material, cutter and rpm.
Notice how the smaller bits are solid blue, this was with low feed and crazy amounts of heat were in the cut and got sent flying with the chips.
The more I up the feed the more of a brass color I get, this would indicate that the chips are still evacuating heat from the cut but things aren't getting insanely hot which is better(imho).
The cuts with low feed also produce all that "dust" rather than clean shavings.
So blue = too little feed and/or too much rpm
The biggest brass-colored ones were 1100rpm, 500mm/min, 6mm DOC with that 30mm endmill.
The small blue ones were 1100rpm, 100mm/min and 1mm DOC.
View attachment 435826
Ridiculous helpful this reply, its nice get help but then understand the help at the same time so thanks for explaining!

In regards to your fly cutter and bar am i best just buying a bar that fits my holder and getting some inserts?

My bar was ground like that (not me ) for cutting some graphite hence the odd shape ‍♀️

So blue chips arnt always a good thing? Im best looking for that brass colour?

Thanks again for the help!
 
Well, my reasons for going with a seperate bar and inserts is ease of replacement.
The "head" I could make pretty quickly in the lathe to fit a holder I already had and then just mill a slot for the bar.
In my case, I know I'm eventually going to crash my tools so having the bar replaceable is nice.
And replaceable inserts means both that I can work pretty hard materials and not need to worry about "zeroing" if I ruin the "edge".
The important thing here is using inserts with very low cutting forces since the setup itself isn't very solid.
You want it to cut as easily as possible to deflect as little as possible.

From what I've learnt/remember/guessed, blue chips means things are getting too hot, especially if you're using HSS cutters.
Not as critical with inserts but I don't like it since it usually just means I can feed a lot more.

Uncolored chips tells me that I could both rev and feed more so I'm just losing time here.
Blue chips says that it's incredibly saturated with heat and probably can't take much more heat out of the cut.
Brass colored chips feels like a good "in-between" where it's still taking quite a bit of heat out of the cut but nothing is getting insanely hot.
BUUUT this is imho one of those subjects where people have wildly different opinions.
 
Back
Top