

-
Welcome back Guest! Did you know you can mentor other members here at H-M? If not, please check out our Relaunch of Hobby Machinist Mentoring Program!
You are using an out of date browser. It may not display this or other websites correctly.
You should upgrade or use an alternative browser.
You should upgrade or use an alternative browser.
Surface Drum Sander Build
- Thread starter rdean
- Start date
- Joined
- Feb 2, 2014
- Messages
- 1,062
Thank you Janderso for the kind words. I make many mistakes but I am usually able to cover them up or turn them into new features.
If you don't know what will or won't work then you are truly open to new successes.
Ray
If you don't know what will or won't work then you are truly open to new successes.
Ray
- Joined
- Dec 9, 2016
- Messages
- 1,133
In my neck of the woods there is no such thing in a shop as a "Mistake!" We call them Creative Challenges or design improvements.I make many mistakes but I am usually able to cover them up or turn them into new features.
- Joined
- Feb 2, 2014
- Messages
- 1,062
Bought a roll of this tape today. It has fiberglass fibers along the width and the length of the tape.
Just a quick and dirty trial on a piece of 2" wide sand cloth and I was impressed. I could not pull it apart but tomorrow will be the ultimate test on the conveyor belt.

Ray
Just a quick and dirty trial on a piece of 2" wide sand cloth and I was impressed. I could not pull it apart but tomorrow will be the ultimate test on the conveyor belt.
Ray
- Joined
- Feb 2, 2014
- Messages
- 1,062
I removed the old tape I had put on the conveyor belt and cleaned up the bottom side where the tape was. On the top of the belt I used my hand sander to remove as much of the grit that I could get off in a 2" wide swath. I installed the new Scotch tape on the top and bottom of the belt, installed and tentioned the belt.
We will see if it holds up or gives up.


I made the mounting bracket for the conveyor drive and a dummy alignment sleeve to locate it properly. I have a flexible coupling on order and it should be here soon.

For the control box I cut down a metal box I got at a garage sale over 2 years ago. I installed the speed control assembly for the conveyor in the box.

Thanks for looking
Ray
We will see if it holds up or gives up.
I made the mounting bracket for the conveyor drive and a dummy alignment sleeve to locate it properly. I have a flexible coupling on order and it should be here soon.
For the control box I cut down a metal box I got at a garage sale over 2 years ago. I installed the speed control assembly for the conveyor in the box.
Thanks for looking
Ray
- Joined
- Feb 2, 2014
- Messages
- 1,062
Robert I was concerned that tracking might be a problem so I made the conveyor driven roller adjustable. Each end of the roller can be adjusted independently or skewed to correct any tracking issues. I found that after running the conveyor about a half hour the belt tracked just fine with no sideways motion.
Now to make a proper sanding belt for the drum.
Ray
Now to make a proper sanding belt for the drum.
Ray
- Joined
- Feb 2, 2014
- Messages
- 1,062
The coupling came in for the conveyor drive. I had to bore it to size and install it. The shafts even lined up with no wobble.

Bought a couple of switches one for the conveyor and one for the main motor. Installed in the electrical box and finished up the wiring.

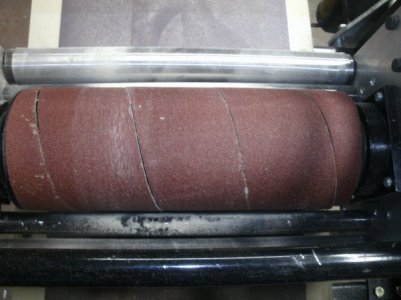
I had some 2 1/2" wide sandpaper 100 grit and glued the hook and loop material on the back.

After a few cut adjustments with the sizzors I wound the sandpaper on to the drum.
Now for the first real test I found a scrap piece of poplar that I had used to check the temperature of my branding iron. As you can see there were deep burn marks and an uneven surface.

This is how it turned out after taking about 0.100 off.

I expected there would be a few things to work out from the beginning but there weren't any. The only thing I adjusted was the conveyor speed as I had it too fast. The board was sanded to within 0.010 thickness all around with a very smooth surface no scratches or lines. The conveyor tracked perfectly and the belt never slipped. The wood didn't slip on the belt and the press rollers worked fine also. The sanding belt stayed smooth and tight on the drum with no indication of coming off.
Everything just worked like it should but oh what a mess, saw dust all over the shop. I guess I got really lucky.
Next will be some covers and a vacuum port for the dust.
Thanks for looking
Ray
Bought a couple of switches one for the conveyor and one for the main motor. Installed in the electrical box and finished up the wiring.
I had some 2 1/2" wide sandpaper 100 grit and glued the hook and loop material on the back.
After a few cut adjustments with the sizzors I wound the sandpaper on to the drum.
Now for the first real test I found a scrap piece of poplar that I had used to check the temperature of my branding iron. As you can see there were deep burn marks and an uneven surface.
This is how it turned out after taking about 0.100 off.
I expected there would be a few things to work out from the beginning but there weren't any. The only thing I adjusted was the conveyor speed as I had it too fast. The board was sanded to within 0.010 thickness all around with a very smooth surface no scratches or lines. The conveyor tracked perfectly and the belt never slipped. The wood didn't slip on the belt and the press rollers worked fine also. The sanding belt stayed smooth and tight on the drum with no indication of coming off.
Everything just worked like it should but oh what a mess, saw dust all over the shop. I guess I got really lucky.
Next will be some covers and a vacuum port for the dust.
Thanks for looking
Ray
Attachments
- Joined
- Jan 2, 2014
- Messages
- 8,852
I guess I got really lucky.
Nope, not lucky.
From where I sit it looks like the outcome of planning and skill on the part of the builder.
Next will be some covers and a vacuum port for the dust.
Great progress keep it coming!
-brino