Taking Micrometer Apart

I don't have access to my photos at the moment but I used a graduated nut from a Bridgeport quill stop similar to this one on Ebay: https://www.ebay.com/itm/Bridgeport...272428?hash=item2615c951ac:g:OIoAAOSwuG1celjH

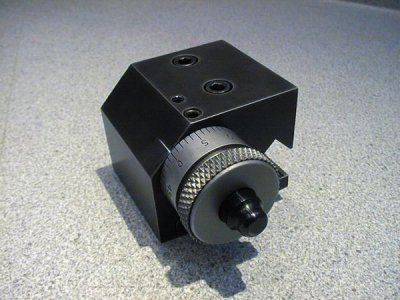
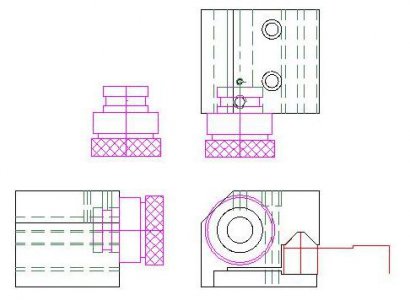
The nut is already threaded 1/2-20 and graduated for .05" per revolution. I've made carriage stops for three different lathes using these. You trap the nut in the carriage stop body and when you rotate the nut the threaded shaft moves in and out of the body just like a factory adjustable carriage stop does.
 
I've been using a micrometer head on and off for over 20 years on my Sherline lathe. I agree that the screw is not intended to take a lot of impact so I don't use it that way. I power feed almost all the way to the stop and then slow down so I just make gentle contact with the head. Used this way, the head lasts for many years and remains accurate. I normally use this thing when doing a precision bore, not when doing routine machining. For that, I use a screw that interchanges with the micrometer head.
 
Just need a mill & dividing to make the dial though.
A dial can be made with just a lathe and a couple of easily made accessories.
IMG_0027.JPGIMG_0028.JPGIMG_0029.JPGIMG_0062.JPG

Made this dial for my Clausing 8530 mill. The dial on the carriage stop was made in the same fashion. The pattern for the degree wheel was printed from a website and the materials scrounged from the scrap box.The accuracy is sufficient for most applications. Borrowed the idea from one of the moderators here.
 
Last edited:
This may be of help
If you are interested in making your own, Tom Griffin has a nice set of plans for this one on his "Tom's Techniques" website. It's shown on my Atlas, but I have made an adapter that mounts it to my Smithy lathe also.
I thank you for showing me this bc i will have to make this now. Bc of Savarin showing me his post i may not be able to use the mic unless i do some threading to make the internal barrel that the anvil would screw on. I guess i will put it together and maybe it will be a junk micrometer that i can throw around and have near the mill and lathe. Obviously i would check it against a guage pin to make sure it is still reading good but if it doesnt read right then oh well.
 
Here's the ones I made with a Bridgeport nut for my Traytop and the second one is for a Logan 820.
I found a simple cad drawing showing the assembly too. One setscrew retains the nut so that it freely spins and the other rides in a groove in the shaft of the1/2"-20 rod to keep the rod from rotating.
 

Attachments

  • traytop 019.jpg
    traytop 019.jpg
    31.9 KB · Views: 10
  • Carriage stop.jpg
    Carriage stop.jpg
    61.1 KB · Views: 11
  • carriage stop.jpg
    carriage stop.jpg
    20.6 KB · Views: 12
Back
Top