

-
Welcome back Guest! Did you know you can mentor other members here at H-M? If not, please check out our Relaunch of Hobby Machinist Mentoring Program!
You are using an out of date browser. It may not display this or other websites correctly.
You should upgrade or use an alternative browser.
You should upgrade or use an alternative browser.
The Giant Binocular
- Thread starter savarin
- Start date
- Joined
- Mar 25, 2013
- Messages
- 4,617
Really sweet! Post some more detail pics when you can. The resized image does not do it justice!
Will it be hard to align the "tubes" so both images fall in the same place on the retinas? How does that work exactly?
Robert
Will it be hard to align the "tubes" so both images fall in the same place on the retinas? How does that work exactly?
Robert
- Joined
- May 16, 2016
- Messages
- 1,700
So the final assembly begins, like many others I can't wait to see the finished result. So far so good.
- Joined
- Aug 22, 2012
- Messages
- 4,121
Will it be hard to align the "tubes" so both images fall in the same place on the retinas?
That will be the proverbial PITA.
Its an iterative process going back and forth like a yoyo.
I've done it in two different 40x100 binoculars and its a patience game.
I will attempt to get them mechanically aligned then see how far out they are optically.
I'm lucky to have a very large aerial on a mountain so I can sit in comfort and lock the bino to start getting as close as possible.
Once the images can be fused then its under a dark sky to fine tune.
The brain can fuse the images when they are well out of alignment but that will produce cracking headaches after a while.
I have the process written down somewhere so will have to dig it out.
The mirror cells have to tilt, and move in x-y, the tertiary and secondaries tilt, move in z and rotate so all in all its a hell of a lot of movement to get set.
- Joined
- Feb 17, 2013
- Messages
- 4,407
Too many "degrees of freedom" ... best wishes on getting things aligned with minimal fuss. I noted your point about the brain being good at "adjusting" images. I've run into what amounts to the same thing when having my eyes measured for glasses. Initially blurry images get better over a second or so, making it hard to know what to tell the doctor is a better image, etc. Eyeballs and brain do everything they can to "help."
- Joined
- Jan 9, 2013
- Messages
- 1,020
You can get a magnificent headache from trying to view a field of stars etc through a misaligned set of binoculars. Short peeks OK. Sometime you can get it to work for a short time, but after awhile it can get truly painful.
A Grumpy old Astronomer.
A Grumpy old Astronomer.
- Joined
- Aug 22, 2012
- Messages
- 4,121
Taking on a long term project such as this does have a couple of "gotchas", some small but often some are quite large.
Stuff made at the beginning may not be acceptable near the end as skill levels and knowledge accumulate, either that or I'm just too damn fussy.
The tertiary mirror holders and focusers that were made from plastic plumbing parts that I was so proud of are just not good enough.
If I was only using them individually I believe I could have got away with them but as a pair no way.
There are too many "freedom of movement" parts for adjustments that will cause too many problems later on.
SO, another design change.
I will use a couple of standard commercial (cheap) 90' diagonals something like these
 www.ozscopes.com.au
and cast a totally new fitting from aluminium for them.
www.ozscopes.com.au
and cast a totally new fitting from aluminium for them.
75mm dia cone tapering to the 1.25" diagonal.
I'm awaiting a reply to check if the two tubes can be unscrewed from the triangular base as I want to replace the eyepiece tube with one a lot longer threaded at the top for another tube to thread over it giving a helical focuser for the eyepiece.
I'm in a hurry for this so no pattern, I've just loaded up two tin cans with aluminium ingots and will heat them just enough to puddle then set in the cans.
I expect they will tear in the centre as they cool and shrink but as that will be machined out I hope to get away with it. I will find out by the end of today.
If this works then I will change out the cheap diagonals for superior ones once everything works optically to my satisfaction.
I better get the furnace fired up now.
Stuff made at the beginning may not be acceptable near the end as skill levels and knowledge accumulate, either that or I'm just too damn fussy.
The tertiary mirror holders and focusers that were made from plastic plumbing parts that I was so proud of are just not good enough.
If I was only using them individually I believe I could have got away with them but as a pair no way.
There are too many "freedom of movement" parts for adjustments that will cause too many problems later on.
SO, another design change.
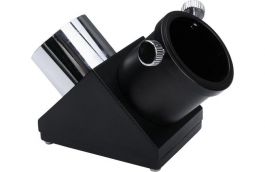
I will use a couple of standard commercial (cheap) 90' diagonals something like these
SkyWatcher 1.25
Ideal for both Astronomical and Terrestrial Use Mirror Diagonal Fully Coated Optics 5 Years SkyWatcher Warranty
75mm dia cone tapering to the 1.25" diagonal.
I'm awaiting a reply to check if the two tubes can be unscrewed from the triangular base as I want to replace the eyepiece tube with one a lot longer threaded at the top for another tube to thread over it giving a helical focuser for the eyepiece.
I'm in a hurry for this so no pattern, I've just loaded up two tin cans with aluminium ingots and will heat them just enough to puddle then set in the cans.
I expect they will tear in the centre as they cool and shrink but as that will be machined out I hope to get away with it. I will find out by the end of today.
If this works then I will change out the cheap diagonals for superior ones once everything works optically to my satisfaction.
I better get the furnace fired up now.
- Joined
- Aug 22, 2012
- Messages
- 4,121
Looks like the idea of just barely letting the ingots melt worked.
There is some porosity but barely visible.
A quick view down the holejust as the last bit melts

Peeled out of the can, pretty ugly

The start of the turning

There are some shrinkage voids in the centre but I was expecting those and I think I can remove them when I bore out the centres.
Thats all I managed today.
There is some porosity but barely visible.
A quick view down the holejust as the last bit melts
Peeled out of the can, pretty ugly
The start of the turning
There are some shrinkage voids in the centre but I was expecting those and I think I can remove them when I bore out the centres.
Thats all I managed today.
- Joined
- Aug 22, 2012
- Messages
- 4,121
Bored it out for the 1.25 dia hole to fit the diagonal.
I need a smooth but tight fit so as this was rather warm when I finished and the diagonal fit very tight I thought it best to let it cool to ambient and take the finishing cut tomorrow.

I need a smooth but tight fit so as this was rather warm when I finished and the diagonal fit very tight I thought it best to let it cool to ambient and take the finishing cut tomorrow.
- Joined
- Aug 22, 2012
- Messages
- 4,121
The touch up to the bored hole went perfect, a very nice slip fit with no wobble.
Then I taper bored the inside leaving 1" of the original a straight 1.25" dia.
Then decided to taper the outside for looks.
I've only finished one so the other block has to be reduced to the same size and shape,


This is how it will fit but I have to remove the top corner of the black triagonal so the eyepieces can fit closer together.
Approximately where the mark is by my thumbnail.
This diagonal unit is plastic so I expect to replace it with a better higher quality version assuming the system works as hoped.

Cant start the next one till I clear the chips up from this one.

Then I taper bored the inside leaving 1" of the original a straight 1.25" dia.
Then decided to taper the outside for looks.
I've only finished one so the other block has to be reduced to the same size and shape,
This is how it will fit but I have to remove the top corner of the black triagonal so the eyepieces can fit closer together.
Approximately where the mark is by my thumbnail.
This diagonal unit is plastic so I expect to replace it with a better higher quality version assuming the system works as hoped.
Cant start the next one till I clear the chips up from this one.