- Joined
- Dec 24, 2020
- Messages
- 1,030
Part 5:
In the last post I mentioned the lube flow issue. For reference, the lubrication pump runs any time the motor is running on this machine (a question I saw many people had). The short version is that when I would start the motor there was solid flow to the sight glasses, where lube sprays on the inside and the returns that form sort of a lube waterfall on the inside. After a few minutes the flow was down to a trickle everywhere. Turning off the machine for a minute or two, then starting again would repeat the cycle with strong flow that tapered off. I determined the filter/screen was the problem. I did some online searches and there really isn't much info out there on the lube system on these machines. A lot of it is actually wrong, but now I can see why people were confused. I'm hoping this post might help someone in the future.
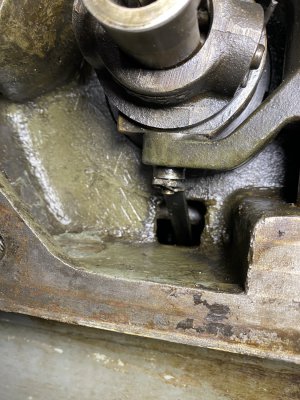
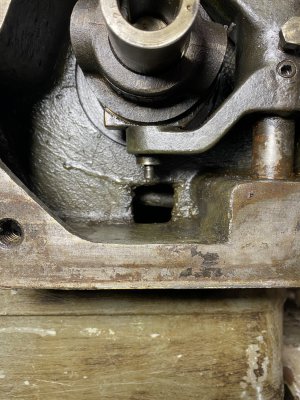
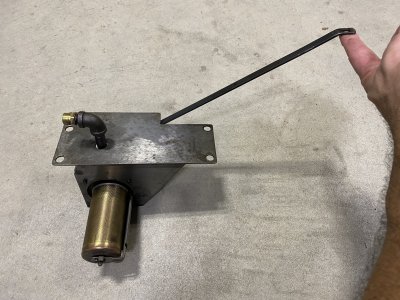
When there isn't much oil in the sump you can easily see the oil filter/strainer. It's near the back of the machine, below the gears, mounted to a plate that goes across the width of the casting. There's also a piece of flat stock poking through the mounting plate that runs into the side of the machine where the gear selector is. Many people have commented that the oil pump must be under the plate and that the filter sticks forward from the pump. That's actually incorrect. The plate is just a mount for the strainer and the system that wipes/cleans the strainer each time you pull the clutch lever to activate the ram. The flat stock going to the gear selector area is the strut that actuates the wiper when you move the clutch lever.
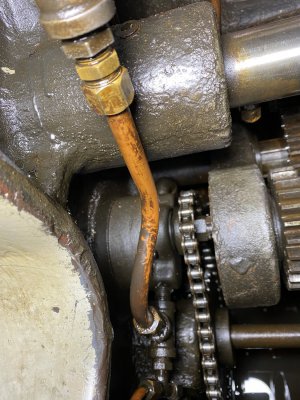
The pump itself is mounted to the inside of the casting just below and behind the side access door. There are copper lines that go down to the filter. The diagrams are a bit confusing on what powers the pump, but it appears that it might be the shaft below the pump is geared to the input shaft driven by the main pulleys, and the bicycle chain is what rotates the pump.
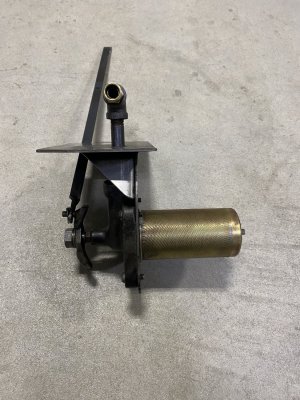
I disassembled my filter assembly, ran the screen itself through the ultrasonic cleaner for about 45 minutes, then soaked it in acetone for probably an hour, blew it out with compressed air and then put it all back together. I reinstalled the assembly, fired up the motor and the pump was really putting out a lot of volume to the point it pulled the level of oil in the sump down at least an inch. I let it run for maybe half an hour and the flow never changed for the worse. I may have been imagining it, but I honestly thought there was more flow towards the end, and that could be the system flushing out old debris...or it was wishful thinking!
Here are some pics and videos of the filter assembly, the ratchet system it uses, where the strut attaches, and a shot of the pump (partially blocked by the copper lines, but it has the bicycle sprocket and chain on it).


In the last post I mentioned the lube flow issue. For reference, the lubrication pump runs any time the motor is running on this machine (a question I saw many people had). The short version is that when I would start the motor there was solid flow to the sight glasses, where lube sprays on the inside and the returns that form sort of a lube waterfall on the inside. After a few minutes the flow was down to a trickle everywhere. Turning off the machine for a minute or two, then starting again would repeat the cycle with strong flow that tapered off. I determined the filter/screen was the problem. I did some online searches and there really isn't much info out there on the lube system on these machines. A lot of it is actually wrong, but now I can see why people were confused. I'm hoping this post might help someone in the future.
When there isn't much oil in the sump you can easily see the oil filter/strainer. It's near the back of the machine, below the gears, mounted to a plate that goes across the width of the casting. There's also a piece of flat stock poking through the mounting plate that runs into the side of the machine where the gear selector is. Many people have commented that the oil pump must be under the plate and that the filter sticks forward from the pump. That's actually incorrect. The plate is just a mount for the strainer and the system that wipes/cleans the strainer each time you pull the clutch lever to activate the ram. The flat stock going to the gear selector area is the strut that actuates the wiper when you move the clutch lever.
The pump itself is mounted to the inside of the casting just below and behind the side access door. There are copper lines that go down to the filter. The diagrams are a bit confusing on what powers the pump, but it appears that it might be the shaft below the pump is geared to the input shaft driven by the main pulleys, and the bicycle chain is what rotates the pump.
I disassembled my filter assembly, ran the screen itself through the ultrasonic cleaner for about 45 minutes, then soaked it in acetone for probably an hour, blew it out with compressed air and then put it all back together. I reinstalled the assembly, fired up the motor and the pump was really putting out a lot of volume to the point it pulled the level of oil in the sump down at least an inch. I let it run for maybe half an hour and the flow never changed for the worse. I may have been imagining it, but I honestly thought there was more flow towards the end, and that could be the system flushing out old debris...or it was wishful thinking!
Here are some pics and videos of the filter assembly, the ratchet system it uses, where the strut attaches, and a shot of the pump (partially blocked by the copper lines, but it has the bicycle sprocket and chain on it).