What have you done in your shop lately?

Today I am looking to set up a carbide grinder. I am waiting for a silicon carbide wheel to come, but surprised to find I have something maybe it.
It has this label:

pg3m 6x1x1 cc90

The part cc90 is a guess.

The other side is a diamond wheel. Not sure the speed is too fast for it.

I need a nut, maybe a wheel cup and an adjustable tabke rest.

20200418_145558.jpg20200418_133938.jpg
 

Attachments

  • 20200418_133908.jpg
    20200418_133908.jpg
    1.8 MB · Views: 17
I have been using a similar setup for years to sharpen carbide lathe tools. A 6" bench grinder running at 3,500 rpm with a diamond wheel bonded to steel. I run mine dry and make sure the direction of the wheel is towards the cutting edge which reduces micro chipping of the edge. Don't use the diamond wheel on steel; it's not effective, nor good for the wheel. On brazed carbide tools, relief grind the steel with a regular wheel, then grind the carbide only with the diamond wheel. I would like to see more pics when done.
 
The captivity overcame me, I just had to make something. Awhile ago I posted about making a tilt table, which turned out really well, and surprisingly useful. I have had troubles with my V-blocks being too large occasionally, so I made a smaller and simpler pair for the mill to hold smaller round items.

Making two identical blocks, trying to be as accurate as possible lead to retramming the mill.

The tilt table is very quick to set up, with the flat at 45 degrees and the previously aligned vise. Checking with a 45 angle block, the table angle comes out as exact as visual checking can be, so basically perfect. It was easy to scribe a reference midpoint line on one block, put the end mill flute exactly on the line and move the table in Y and Z the same amount to get a good V.

I think these little blocks will be useful fairly frequently.

90DACFB4-60B5-4218-A56F-7239DA25AEF6.jpeg1260AF8D-8185-4F15-9498-29870394F84E.jpeg
 
I have been using a similar setup for years to sharpen carbide lathe tools. A 6" bench grinder running at 3,500 rpm with a diamond wheel bonded to steel. I run mine dry and make sure the direction of the wheel is towards the cutting edge which reduces micro chipping of the edge. Don't use the diamond wheel on steel; it's not effective, nor good for the wheel. On brazed carbide tools, relief grind the steel with a regular wheel, then grind the carbide only with the diamond wheel. I would like to see more pics when done.
Thanks. I was making a backing plate for it, but then think through this again, and I have to shelf the grinder. There are too many things to fab for this, especially the safety cover, while I am in the middle of other projects. I also have other "complete" grinder that I should get them to working perfectly.
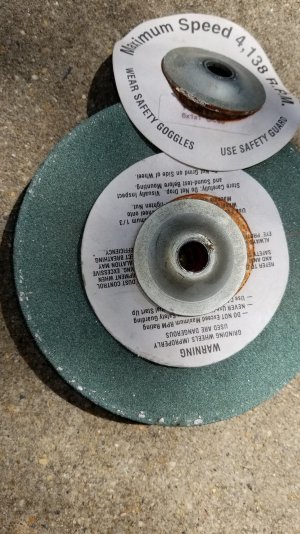
Other than that, I was looking at a few way to true these things up. This grinder has about 2 to 3 thous off.
A little update on this ... I ended up taking out a grinder that I was rebuilt before. It had a run out issue. One was 2 thous, and the other was 5 I think. I took it apart and used a press to true both of them. The 5 thous end now is about 1/4 thous, while the 2 thous is now 1/2 thou. This would have been super easy to do when I was rebuilding it, but that's when I didn't know much about grinder. I just finished putting it back, but now need to get a better electrical cable for it since the segment inside case, it melts. The motor says 10.5 amp.

Update 2: I checked the side edge of the shaft for play and use a file to true it up. I am not quite sure, but I think maybe it's good to about 2 thous. I regret not put the motor rotor and shaft in a lathe to true it up. That would be much quicker and better. I also took the 4 wheel flanges and cut a very thin slide off the center on a lathe to true it up.

I saw some make the flanges themselves, which has tighter inner radius and thicker. Before, the grinder would walk, but now it is still. However, a nut still fall off if I put it on top of the motor.

I put thin painter tape around the plastic shaft adapter. That gives a tight fit. I tried to do the same on the shaft. It was close, but not close enough to get the adapter on it. Making dedicated adapter out of steel or aluminum would work good. I may do that someday if this grinder doesn't give a good result.

I am very happy with it though, since I didn't dress the wheels yet. They're visibly out of round when I turn them.

Comparing the dressing wheel with diamond dressing T stick, which would be better, or they have their purposes. I feel like the wheel is better at removing coarse wheel with large amount, while the T stick is for finer dressing, but that's a guess. In your experience, what would you use?

Here is the grinder I was working on. Have been put it off for years

20200419_192941.jpg
 
Last edited:
A little more than a year after I got my Unisaw I finally finished the mobile base tonight. Got the extension table support in and mounted and I tapped the holes in the cabinet and bolted on the uber-rare cast iron motor cover. Feels good the have it finally on the saw.
 
Have heard of a lot of car breakins within our town. Have the ring doorbell and am part of their community updates. I decide to be alittle proactive and make a nice warning sign for the deadbeats. Friend has a plasma table so we came up with this nice little sign. My son wanted it painted like his archery target which I thought was a pretty good idea. Plan on putting on a stake like others do for their security system sign.
B669CF10-6C9B-424F-BB5A-6AC95146FDA5.jpeg
 
After truing up the other grinder, and the staying at home, I decided to true up the other grinder as well. The hardest part is how not to destroy the bearing when take it apart.

Here are some pictures.

20200420_200520.jpg20200420_185705.jpg20200420_182544.jpg20200420_182149.jpg20200420_173837.jpg
 
Back
Top