-
Welcome back Guest! Did you know you can mentor other members here at H-M? If not, please check out our Relaunch of Hobby Machinist Mentoring Program!
- Forums
- THE PROJECTS AREA
- PROJECT OF THE DAY --- WHAT DID YOU DO IN YOUR SHOP TODAY?
- Project of the Day Mega-Thread Archives
You are using an out of date browser. It may not display this or other websites correctly.
You should upgrade or use an alternative browser.
You should upgrade or use an alternative browser.
2014 POTD Thread Archive
- Thread starter Smudgemo
- Start date
If my wife opened our storage cupboard and found your little friend I would soon be visiting her in the psychiatric ward of the local hospital.
Non venomous - that one looks like its only a couple of metres long. Just a baby.
bollie7
- Joined
- Apr 6, 2011
If my wife opened our storage cupboard and found your little friend I would soon be visiting her in the psychiatric ward of the local hospital.
Same here and additionally the house would be on the market the same day.
-Ron
Started work on a spindle mounted work light for my PM45M-CNC.
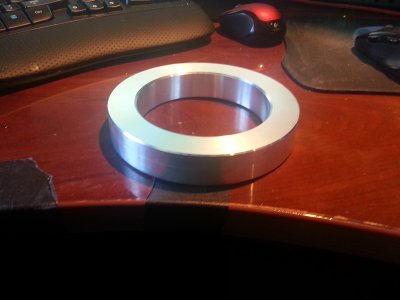
I had some 6" diam aluminum that turned into a doughnut on my Lathe
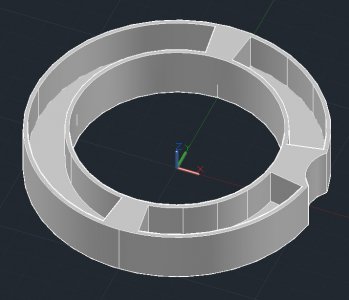
Next I used AutoCad to draw the part with the pockets to put the LEDs into
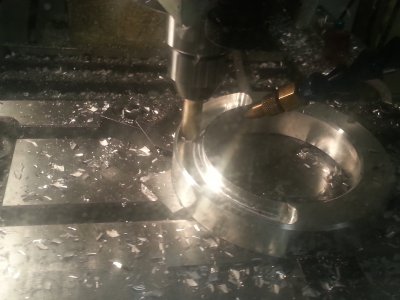
Then into BobCad and onto the Mill
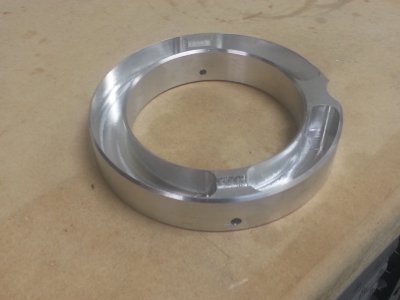
Next I used an v-point engraving bit to score some Perf Board that I can use to mount the LEDs onto. The Perf-Board was 0.063 think so I scored it 0.04. I was surprised at how tough it was to break apart with just 20 thou. Ended up spending a little bit of time at the sander to clean up the edges.
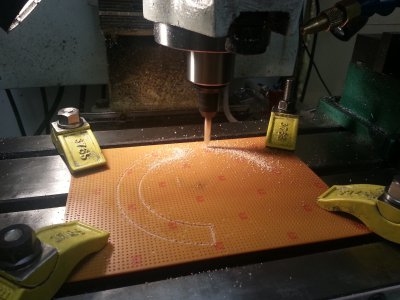
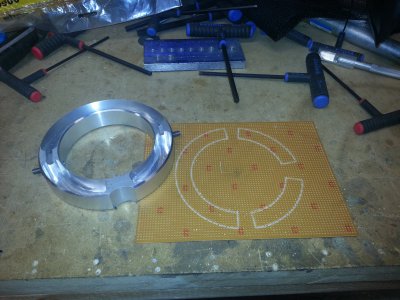
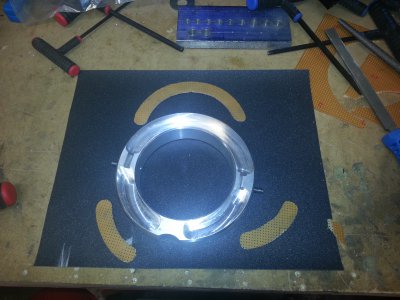
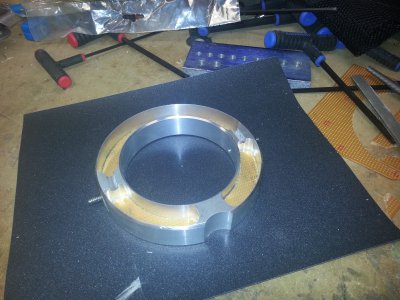
This week I can mount the LEDs onto the perf-board with current limiting resistors and a connector to supply power from a wall-wart. Then I plan to fill the cavities with Clear Casting Resin. I have not decided yet if it should stay completely Clear or if I should add a little bit of White color so the light is more diffused. This could help reduce shadows but will come at the cost of lower overall light output.


I had some 6" diam aluminum that turned into a doughnut on my Lathe

Next I used AutoCad to draw the part with the pockets to put the LEDs into

Then into BobCad and onto the Mill


Next I used an v-point engraving bit to score some Perf Board that I can use to mount the LEDs onto. The Perf-Board was 0.063 think so I scored it 0.04. I was surprised at how tough it was to break apart with just 20 thou. Ended up spending a little bit of time at the sander to clean up the edges.


This week I can mount the LEDs onto the perf-board with current limiting resistors and a connector to supply power from a wall-wart. Then I plan to fill the cavities with Clear Casting Resin. I have not decided yet if it should stay completely Clear or if I should add a little bit of White color so the light is more diffused. This could help reduce shadows but will come at the cost of lower overall light output.


Very nice job.
One question though, does it also supply coolant via the tap? Ha-Ha.
I am busy building mine as well, though not as fancy as yours. I'll finish it as soon as I can find all the spares after moving.
Just a general question. Which combination is most suitable for a home workshop, 40:1, 60:1 or 90:1?
I have a very odd 16:1 combination, made up of a 32 teeth gear and a 2 start worm. First job will be to cut a proper gear and worm to get closer to standard.
Work, for time waits for no man.
- Joined
- Feb 17, 2013
- Location
- Chandler. AZ
I have not decided yet if it should stay completely Clear or if I should add a little bit of White color so the light is more diffused. This could help reduce shadows but will come at the cost of lower overall light output.
That looks like it's going to be a fantastic mill light.
I'd offer two suggestions:
First, you should consider a clear cover (which you can screw mount to the three webs) instead of potting the circuitry. That will allow you to service the light if an LED or two decides to burn out some time in the future.
Secondly, even if you only use a paltry 12 LEDs, you'll have so very many sources that shadows will NOT be a problem. There's absolutely no need to add white to the resin, or if you go with a cover, to use anything other than clear.
I'm sure you'll be very happy with your mill light. Keep us posted!
- Joined
- Feb 19, 2013
If you decide to change the design slightly, there are white strip lights of smd wafers available on ebay - look for SMD5050 they come in different sized from 3 X 3 matrix to I believe 6 X 8 for a total of 48 leds per wafer - this gives more light than descrete leds and you don't have to have a current limiting resistor with them - just connect them to 12 VDC!
http://www.ebay.com/itm/9-12-15-20-...arts_and_Accessories&var=&hash=item5661e235a1
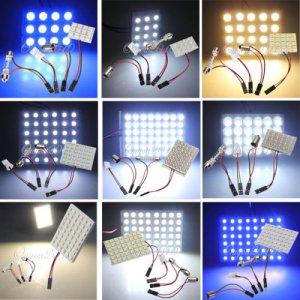
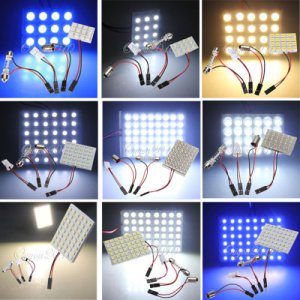
http://www.ebay.com/itm/9-12-15-20-...arts_and_Accessories&var=&hash=item5661e235a1


thanks for the suggestions
I thought about a removable cover but considering where this will be mounted and the fact that LEDs can last a lifetime as long as you don't over-current or over-heat them I figured I would not likely need any service but that could be a V2 option. As for various LED configurations. I do a lot of Electronic systems design and looked at a number of different LED modules. There are many out there that can provide more volume of light that the one that I am making. I wanted to balance size with light output. I settled on a 1000mcd 50mA thru-hole mounted LED. I have 10 of them on order. I think they will provide more than enough volume of light and will fit in the small round space that I have. I'll hook them up on the bench and if I think they are not bright enough, I have enough room to double the quantity and there are also other LEDs with higher output.
I thought about a removable cover but considering where this will be mounted and the fact that LEDs can last a lifetime as long as you don't over-current or over-heat them I figured I would not likely need any service but that could be a V2 option. As for various LED configurations. I do a lot of Electronic systems design and looked at a number of different LED modules. There are many out there that can provide more volume of light that the one that I am making. I wanted to balance size with light output. I settled on a 1000mcd 50mA thru-hole mounted LED. I have 10 of them on order. I think they will provide more than enough volume of light and will fit in the small round space that I have. I'll hook them up on the bench and if I think they are not bright enough, I have enough room to double the quantity and there are also other LEDs with higher output.
- Joined
- Sep 28, 2013
that is really really cool Boswell! Personally I don't think amount of light is that important, but quality is - high CRI and a nice neutral white (~4500K) is easy on the eyes.
I just noticed that my pics didn't show up properly (lazy cross posting), so here are my "DROs"
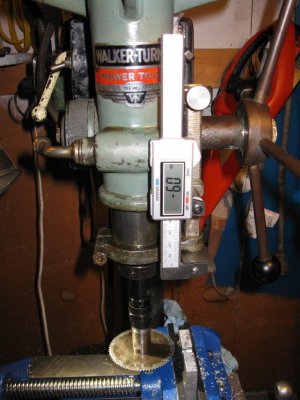
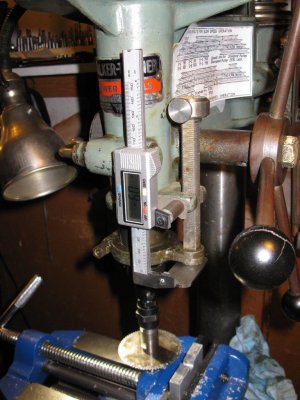
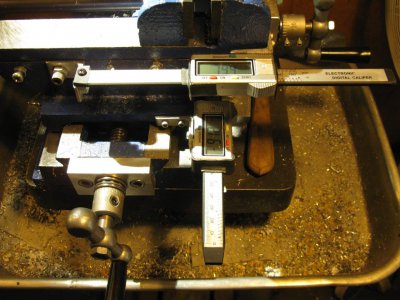
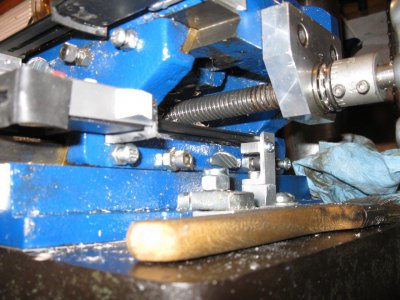
actually used it last night to take 0.2mm of each side of a seatpost clamp to make it fit a new seatpost - took a couple of minutes (including changing speeds on the DP!) and came out perfect, compared to the 10min+ spent filing it down which would have been my previous approach. I love having a "mill"


I just noticed that my pics didn't show up properly (lazy cross posting), so here are my "DROs"


actually used it last night to take 0.2mm of each side of a seatpost clamp to make it fit a new seatpost - took a couple of minutes (including changing speeds on the DP!) and came out perfect, compared to the 10min+ spent filing it down which would have been my previous approach. I love having a "mill"


- Joined
- Aug 27, 2014
I'm sure you'll be very happy with your machine's performance. And it's a fun build as well.
This is my first time to own, or make, or use a dividing head, so I am not a good answer man. I think I did read somewhere that most all of the current commercial units will be built with a 40:1, so perhaps there is something effective or efficient about that.
I have only watched videos on cutting your own worm and wheel, but that really looks like fun. I think I would use the method where you make a hob out of an acme threaded worm gear. I think my first try would be with grey iron for the hob and aluminum for the wheel.
I have included a picture of today's (my first ever) gear.
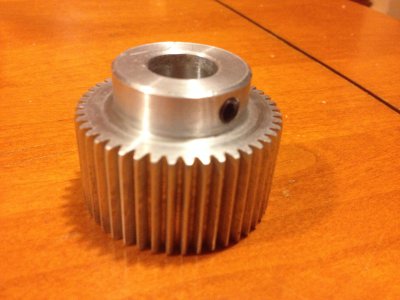
Bob

This is my first time to own, or make, or use a dividing head, so I am not a good answer man. I think I did read somewhere that most all of the current commercial units will be built with a 40:1, so perhaps there is something effective or efficient about that.
I have only watched videos on cutting your own worm and wheel, but that really looks like fun. I think I would use the method where you make a hob out of an acme threaded worm gear. I think my first try would be with grey iron for the hob and aluminum for the wheel.
I have included a picture of today's (my first ever) gear.

Bob


