2015 POTD Thread Archive

Nice job on the shop, I recently had squirrel issues as well, i,came home one day and one was on my counter, they got into through the heating system under the house, bought a trap door trap, humane type of trap, but I'm not sorry to say that over the next few weeks the squirrel population decreased in my area. The trap was placed in front of the hole they dug, caught up to 3 in one day
 
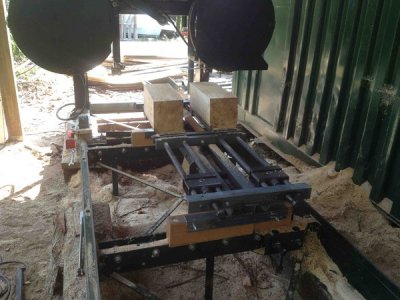
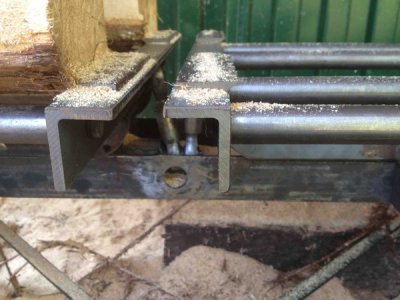
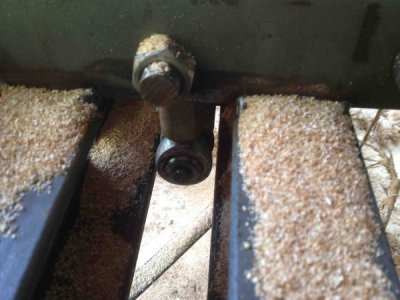
Thanks brino, sorry no video. Its a pretty simple mechanism. The sections that hold the blocks pivot on a shaft at the middle of the block. Another shaft with an eccentric pin runs down the length of the machine with a handle out the back. Flipping the handle back and forth 180 degrees brings the pin to the top and bottom of the stroke, about 3/16th of an inch of movement. The pin is connected to the end of the sections holding the blocks with ball and socket joints.
IMG_0163.jpg

IMG_0164.jpg
IMG_0165.jpg

After each pass you change the angle of the blocks by flipping the lever and lower the blade 11/32 of an inch . That gives a shingle tapering from 1/4 to 1/16.

Greg

IMG_0163.jpg

IMG_0164.jpg

IMG_0165.jpg
 
Greg,

Great looking shop,
Did you fab-up the sawmill or is it a purchased machine?
 
OK, so you got me thinking. I realized I did have something that was supposed to be calibrated in tenths. My economy grade Fowler Jo blocks. Imports. However, I had nothing else so I did a test. The Chinese calipers only read 5 or 0 in the tenths spot. I used two blocks and made three measurements each. The results:

Fowler Economy Grade (import)

Block 0.1002

Micrometer
0.1003
0.1003
0.1003

Calipers
0.1010
0.1005
0.1005


Block 0.1007

Micrometer
0.1008
0.1007
0.1007

Calipers
0.1005
0.1010
0.1010

I found that caliper reading seemed to shift according to where I placed the block in the jaws, returning a higher value towards the end.

So, as I said before, your Chinese calipers appear to be better than mine.


Boostin, good job, especially for a first job. Good attention to design and detail.
If calipers are not properly adjusted for their sliding fit, the torque applied by closing the jaws can twist the head giving erroneous readings. Where the measured part is located in the jaws determines the amount of torque applied and can account for differing readings. Another cause is non-parallel jaws. When I went through metrology on calibrating calipers and micrometers, we were taught that the first thing we had to do was determine whether the jaw were parallel or not. To do so, we put a known parallel (e.g. a gage block) in the jaws and the block was supposed to engage the block uniformly, i.e. not pivot in the jaws.

The digital calipers have a minimum resolution determined by the spacing of the scale. In the case of the Chinese calipers, it is .01mm or .0004" The software inside the caliper converts a metric measurement to inches and rounds to the nearest .0005". It is not possible to resolve any better than that.

I had Chinese calipers calibrated by a metrology lab on several occasions to meet our ISO9000 requirements and have not failed to have a calibration certificate issued.

From the measurements that you have made with your calipers, I would have no problem writing a calibration certificate for them (assuming measurements for other gage blocks performed similarly, of course). As has been pointed out a number of times previously, calipers were not intended to provide sub-thousandths accuracy. We use micrometers for that.

Bob
 
Well I need an extention for a 11/64 drill bit to drill holes in the bottom of an SS rail at work. With out it the chuck hits the side of the bracket I am drilling through. So a little shop magic and this is my quick fix.
I have used this trick myself on a number of occasions. I have also used it to make extensions for taps for working in close quarters.

Of late, I drill the socket for the drill shank and squirt some Super Glue into the socket and slide the drill home. It sets in a few minutes and I have never had one break loose in use. To remove the drill, simply heat with a torch or heat gun and pull the drill out.

Bob
 
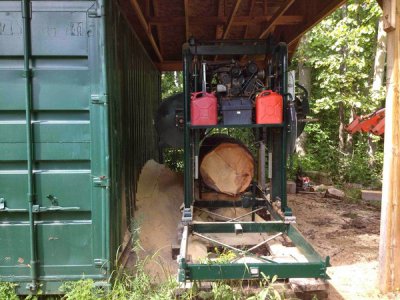
Thanks Realtor, woke up one morning and decided I couldn't live with out a sawmill so started building one. Was an on and off project that lasted about a year. It will cut up to 30 inch width and about 17 foot long logs.
Had a 2 cylinder Yanmar diesel off a truck heater unit so it became the power source. Burns about a litre an hour sawing. The band wheels were 24 inch sheaves off an oil well pump jack. Most of it was scrounged.
IMG_1343.jpg

Greg

IMG_1343.jpg
 
I wouldn't bother. Every time you make something you check diameters at each end and make the adjustments as you take the bar down to size. Take small amounts if you don't have much to remove and after a few cuts you should have it close. In other words you have a newly made test bar for every size of shaft you make as you make the part.


Thanks John in days of yore that's what would have happened.

These days with my lathe skills , eyesight and limb control I'd tend to get a traffic cone shape and as soon as I " Adjusted " it.
The major diameter would mysteriously move to the opposite end ........ that's how my 1" test bar stock ended up as a just over 3/4 " parallel bar. :D

I checked it this morning , when all tools & metals were to same cold temperature and it's reading 0.01 mm difference over three checks ..I'm chuffed to goolies.

I still will be making the test bars but this time in steel not just to have some quick centre to centre references , but to also get a lot of time running circles . It will help me live & breath the lathe to become familiar with tip shapes & cutting speeds etc . so everything becomes second nature & semi automatic in my stroke recovering brain.

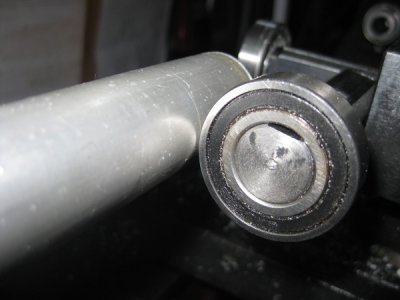
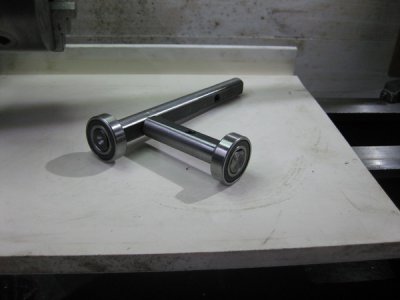
Here is my speedy accurate Setting Up Device ( SUD ) ...... it fits in the QCTP boring bar block ( will actually live there till I have to change things ... one day ? IMG_6309_zpsd3y4ivz8.jpg

Here it is in action .
IMG_6306_zpsnnkeqhm7.jpg

I used a bit of household cling film food wrap to nip up to the bar to roll the SUD bearing by inserting it between the bar & the precision roller bearing , turning the chuck by hand & gently & slowly advancing he cross feed into the test piece .
Once it had been nipped up and checked all round the bar , then eased the film out as I turned the chuck . I was not able to advance the cross feed anymore on to the bar so that it was noticeable on the 1 thou marks on the hand wheel dial .

It came in very handy this afternoon ..I use the SUD to reset up some studs that had to be taken off my lather to my neighbours to see how well they fitted his wood work lathe . A 3 thou shaving on the second session saw all four of them slide in position like they'd been made to fit by a real good machinist to a technical drawing spec.
IMG_6309_zpsd3y4ivz8.jpg

IMG_6306_zpsnnkeqhm7.jpg
 
Last edited:
David, I hope you have a speedy recovery. All the learning and doing in the shop will help a lot. I see that you are in England. You must watch Doubleboost's - John's youtube videos - he's your neighbour! He made an SUD which I also copied. Instead of the SUD you have to get yourself a dial indicator to see how far out a bar is. It will also be used for tailstock adjustment. In case you haven't seen them, you can learn a lot by watching Keith Fenner, Abomb79 (Adam Booth), Oxtools (Tom Lipton), Mrpete222, and Tom's Techniques to name a few of the best. Each of them have 200 to 300 videos on YouTube. Cheers!
 
Back
Top