2015 POTD Thread Archive

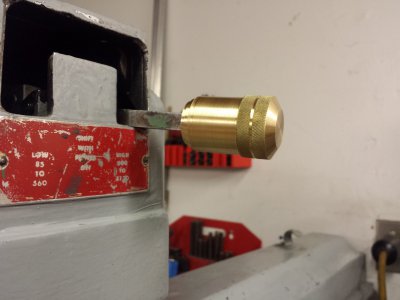
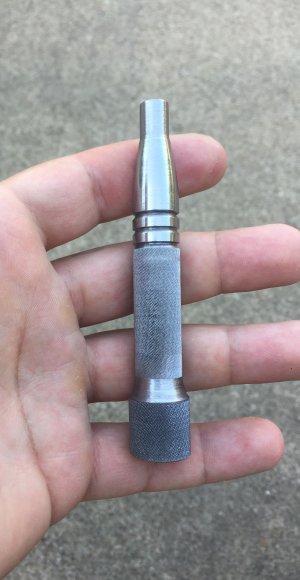
I made a handle for my qctp hold down. This is the very first actual thing I have made on a lathe. I know it's not perfect and beautiful. Especially compared to others, but it's a start. The knurling is fine to the touch, which I wanted. The tapers were done free hand, didn't use the compound, I was experimenting. All I need to do is thread the little nub and chuck it back up in soft jaws to hit it again with various grit wet/dry paper to remove my beginner tool marks. All in all, I'm happy with it. Edit:I should of cleaned it off better before the picture, it's still dirty.
image.jpg
 
I really, really like those knurls!

Thank you. That was also the first time I attempted to knurl anything. I did a bunch of reading before hand then just went at it. Probably should of practiced on some scrap first. Oh well.
 
Outstanding, Jumps. I would have no idea where to start to make something like that.
 
I've been working on this for a couple days. I finished it up this evening. It is an adjustable support arm for one of the study rigs at my clients clinic.

I utilized a photo light stand for the arms. They had to be shortened. The ends are milled to provide attachments to the rig. It had to be adjustable from 12.5" to about 20".

adj arm_0693.JPG

adj arm_0696.JPG

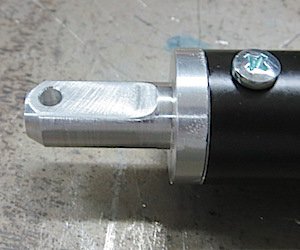
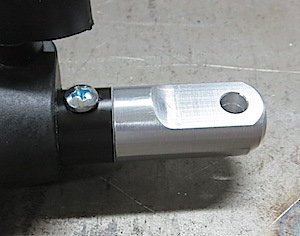
I fabricated the attachment ends on the lathe and mill.

adj fitting_0695.JPG adj fitting_0694.JPG

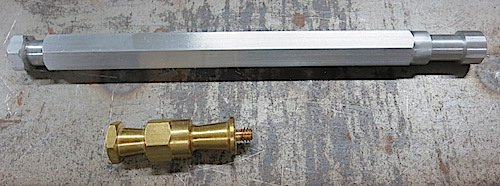
Also, I turned this extension light stand spud. The brass on is a standard spud. They needed a longer one.
It's made from 5/8" aluminum hex rod. The hex end fits in the clamp and the round fits on the light holder.
I didn't cut a taper because I couldn't figure out how. I think I would have had to grind a tool.
There doesn't actually need to be a taper. They are there in case the light is hung upside down.
The application for this one will always be right side up vertical.
Those lights are expensive. The idea is for it to never come loose.

ext spud_0697.JPG
 
I have a cheap $60 USD Chinese set of five metric mic's and also a $20 USD , digital caliper .

Prompted by Charles comment and the video link I decided to check them out last night to see how they compared .

Big surprise when using the 25 mm test piece on the caliper & the small mic ........ they both read the 25 mm test piece consistently at 25 mm .. either I'm very lucky and have an accurate set of measuring tools or they are both reading wrong .
The finish on all of then is a very high quality one .

OK, so you got me thinking. I realized I did have something that was supposed to be calibrated in tenths. My economy grade Fowler Jo blocks. Imports. However, I had nothing else so I did a test. The Chinese calipers only read 5 or 0 in the tenths spot. I used two blocks and made three measurements each. The results:

Fowler Economy Grade (import)

Block 0.1002

Micrometer
0.1003
0.1003
0.1003

Calipers
0.1010
0.1005
0.1005


Block 0.1007

Micrometer
0.1008
0.1007
0.1007

Calipers
0.1005
0.1010
0.1010

I found that caliper reading seemed to shift according to where I placed the block in the jaws, returning a higher value towards the end.

So, as I said before, your Chinese calipers appear to be better than mine.


Boostin, good job, especially for a first job. Good attention to design and detail.
 
For the last 3 days I have been making a level winder screw (diamond screw) for a winch.

Looks like 1.250" / thread. My manual lathe won't go that low. That would make a gorgeous levelwind style reel for giant tuna!
Oh yeh, absolutely beautiful piece of art - I have never seen one made before.
 
I've spent the day turning up a test bar that is about 15 inches long .
It's being driving me stupid for even though I precisely wrote down the metric measurements nothing seemed to work no matter how gentle I was in putting 1/12 of a turn on the adjuster after slackening off the other then nipping the slackened off one up tight . It was either a few thou too much at the tail stock or a few too small.


I left things set up in the lathe and went to collect some parts and food shopping .


On coming back home & after lunch before I started things up again I decided to recheck the dimensions .
Everything was within 0.04 of a mm ( 0.001968504 thou ), puzzled , I put my thinking cap on...Bingo!

The metal had cooled down along it's length , like a twit I'd been using some aluminum bar it and it had become slightly warmer at the head stock end because I'd been using the lathe for three hours to really just warm it up to check/adjust the Timkin taper bearings as per the ATLAS MOLO . I found a slight tightening & the 1/6 turn pre-load was needed .

This is the first time I've run the lathe long enough to get it to proper working temperature warm under turning loads. Other times I did the bearing slap & end float test , it was left to run light for 1/2 hr with just the chuck on it . I guess it never got properly warmed up in such a short time.

I also set up the micro rate feed on the gears and used them to auto strip the ally bar down for the test piece.
It's given the bar a nice finish , but I can still identify the microscopic grind stone marks left on the cutter tip , despite me honing the tip on a nickel/diamond sharpener slab .
My next project appears to be , " Save up the dosh to buy a decent stone set for the grinder "

The cold bar recheck figures with the cool micrometer are even better @ 0.03 of a millimeter on the ratchet ( 0.001181102 ) between the ends over 15 inches .

I think I'll replace the simple slotted end of the threaded rod adjuster screws in the tailstock with some decent Allen key cap UNF screws , as it's far easier to accurately adjust things with these rather than use a screwdriver in a sloppy screwdriver slot.
 
Back
Top