2017 POTD Thread Archive

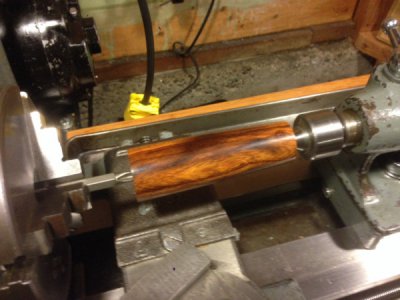
This is just me messing around, never turned pens before nor did I plan to and certainly not on the metal lathe. However, I thought let me chuck up a small piece and see if I can even turn it without creating a ton of dust and cloging up the oil passages on my lathe. After about 30mins of messing around with it I was staring at an ugly pen lol

I used an end mill in the chuck to turn the thing, worked great. However, I'm sure there's a tool out there to hold a wood piece like that in a lathe. May be like this one: http://a.co/cruDnKt

IMG_20170510_101116-1008x756_zpsgvq3f53i.jpg


IMG_20170510_103727-1209x1612_zps6cjl1bdo.jpg


IMG_20170510_110956-1008x756_zpsbz6qajwt.jpg


IMG_20170510_141909-1209x1612_zpsv9hwjzpq.jpg


The cleanup wasn't bad at all with a vacuum and it was surprisingly fun to turn wood on the metal lathe.
 
Hey great idea to use the end mill as a drive centre! I like it! And yes they they do make things like that -- they're called spur centres -- and of course I have one or two on my wood lathe but they weren't small enough for a recent project. Hmmm, no end mill either. What about a Phillips driver bit.....?

Yup, it works too in a pinch.

image.jpeg

-frank
 
Started my day with my gran baby , took her for a ride on my wheelchair. Then I repaired three mowers , one overfull of oil , drained and cleaned cylinder new plug. Checked operation all good . Second needed carb cleaning and air filter and plug . Third needed full service , pulled carb cleaned reinstalled Welch plug , New fuel line , spark plug and oil change , sharpen blades on all three. So being out a few hours I'm paying for in pain. Spastic stabbing pain that feels like my back muscles are being ripped apart or shredded. I'm not going to be able to do anything till I get the spinal operation. It's just so hard to not get out and hustle to repair and sell machines to get some income. I'm not gonna make anything this summer or this time of year. Gonna be tuff with out the few grand I make selling used mowers and lawn equipment. But this was my day may be last till who knows. Surgeons visit isn't till 6th of July.
 
Got a couple of things done today.

My Ruger Mini 14 launched the spent casings about 30 feet. It is pretty hazardous to the other shooters at the range. I made a new gas bushing with a 0.050 gas port. The bushing is 0.262 long and 0.185 diameter and I used a grade 8 bolt for the steel. I learned how tricky it is to drill small holes and how to sharpen a #55 drill. Pretty simple stuff for you experienced guys, but this is the first project that I completed that wasn't a modification/improvement to my G4000. Took the rifle to the range today and the casings now launch about 10 feet plus the recoil is reduced a bit. Success.

The second project is a ball bearing for the G4000 compound. The original was pretty sorry. Now the compound moves smoothly. It will be a pleasure to use. The project involved a making a new screw (M6x1.0 and M8x1.25 threads). The threads were cut by turning the spindle with a large wheel that attaches to the spindle with a bicycle head-tube-type mount. Pretty slow going, but always under control. My first attempt at the screw went in the trash, but the second attempt worked beautifully. I got to use my 4-jaw chuck and a test indicator to bore the pockets for the ball bearing.

It's a good thing I'm not a machinist as a profession (I'm a retired electrical engineer). I'd starve if my meals depended on my machining work.

This site is wonderful. I've learned a lot from the many discussions.

Glen Zoerner
Spicewood, Texas
 
Jim,
Are you happy with your ThermWood cnc? Did you purchase it new? We are looking at a 5 x 12 ThermWood used. Local shop is closing and is up for auction.
Thanks
Martin
 
Jim,
Are you happy with your ThermWood cnc? Did you purchase it new? We are looking at a 5 x 12 ThermWood used. Local shop is closing and is up for auction.
Thanks
Martin

I never intended to buy a router and like many of my machines, this one just kind of showed up on my doorstep.:) I have just enough work for it to justify the floor space. Yes I'm happy with the machine, it's built like a D8 Cat, much heavier than other machines I have seen in this size. It was built with Thomson rails and ball screws. I suspect that mine was built in the early 90's. I bought it from a local company who picked it up as a basket case and asked me to upgrade the controls on it. They ran it for about 3 years then wanted something newer, so I got it for scrap price. I have never seen the original controls so I can't address that at all. With my controls upgrade it is a very accurate machine, typically holds +/- 0.001 inch. I have no idea what the original specs might have been like.

Mine is the only ThermWood that I have seen, so I have no idea what the rest of them are like. Not a very common machine, I suspect that they were really expensive to buy new.
 
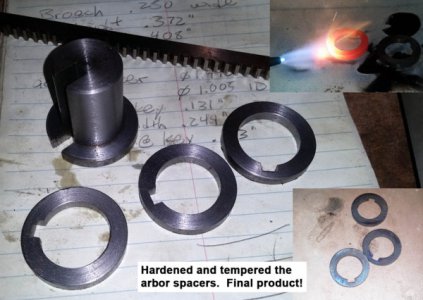
I’m working on tooling up another Erector set reproduction part; case of one step forward then two steps back . . . I’ll post a separate thread of the part (part number BM clam shell bucket) once I get all of the tooling for the various components done. POTD here was making some custom-width arbor spacers for my Atlas horizontal mill, need spacers that are about 0.200” wide for one of the pieces of the clam shell bucket.

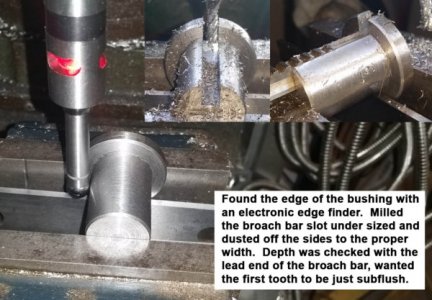
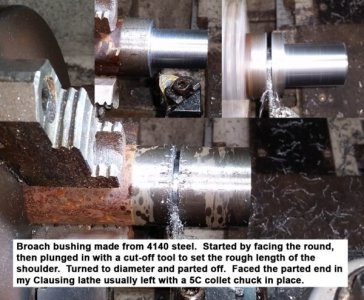
The arbor spacers are 1.5” OD, 1” ID and have a ¼” keyway. I have a ¼” broach, but alas, no 1” bushing. First step was making a 1” OD bushing for the ¼” broach. I used a chunk of 1.5” diameter 4140 for the broach bushing, turned a shoulder down to a shade under 1.000”.

Then to the mill to cut the slot for the broach. I found the edge with an electronic edge finder. Kept dipping up/down while moving the X-axis of the table to find the tangent point of the edge finder ball and the tangent of the bushing. It would have been a lot quicker to go with my Borite electronic edge finder which uses a cylinder instead of a ball to find the edge or a conventional edge finder. Lessons learned for next time . . .

Used a 3/16” end mill to cut the slot, then dusted the sides to a slot width of 0.250”. Determined the depth by setting the broach bar in place and ran a piece of stock at the edge of the slot seeing if it caught the lead end of the broach. Kept taking about 0.010” per pass until the stock didn’t catch the broach.

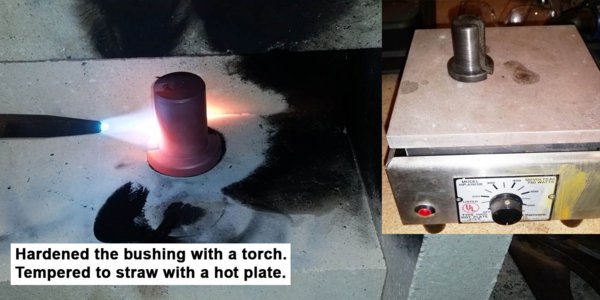
Then off to the oxyacetylene torch to harden the bushing. It was tempered to a straw color on a hot plate.

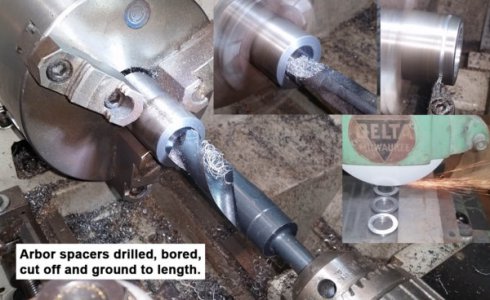
The arbor spacers were made from 1.5” OD 4140 also. Bored the round to a shade over 1.000” and parted them about 0.020” wider than the finished dimension. Then off to the surface grinder to get them to the finial thickness.

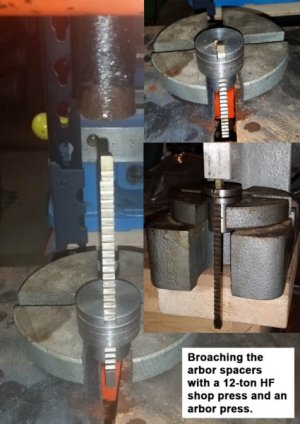
Used the newly made broach bushing and broach to cut the keyways. Started on the HF 12-ton shop press because my HF 1-ton arbor press didn’t have enough head room to fit the broach under it. After the first pass on the shop press the broach bar was shimmed out progressively with 0.010” stock to nibble the keyway deeper. The thin shim let me go back to the arbor press since the broach dropped about 1/2 way through the keyway.

After broaching, off to the torch again for hardening and a hot plate temper to blue/purple. I didn’t shoot pictures of it for this entry, but they fit fine on my 1” arbor and properly space a series of slitting saws to be used to cut strips of 0.100” stainless for the clam shell bucket support arms.

Bruce
20170504_112956.jpg 20170504_121920.jpg 20170505_133540.jpg 20170505_112907.jpg 20170505_123632.jpg 20170505_132723.jpg
 
Last edited:
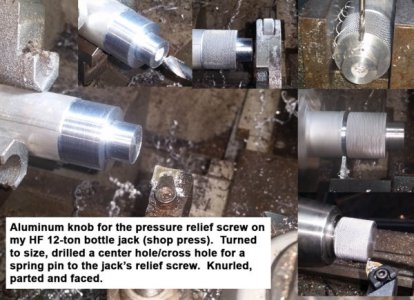
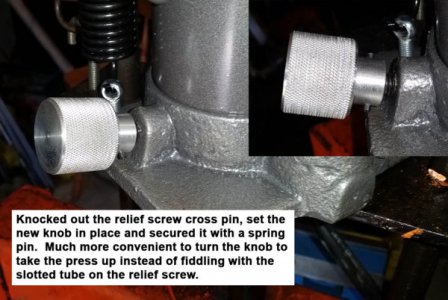
Another quick POTD. My HF 12-ton shop press has an air over hydraulic jack on it. I finally got around to making a knob for the pressure relief screw to retract the cylinder. Using a round of aluminum turned to a comfortable diameter. Knurled and went to the mill to drill a cross hole for a spring pin. Back to the lathe for parting and facing. Knocked out the old relief screw cross pin and set the knob in place. Secured it with a dab of Loctite and a spring pin. Much more convenient to retract the press with the knob than the slotted end of the pump shaft.

Bruce

20170507_145857.jpg 20170507_152626.jpg
 
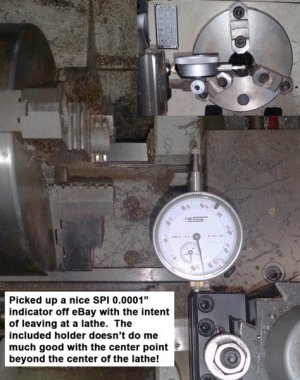
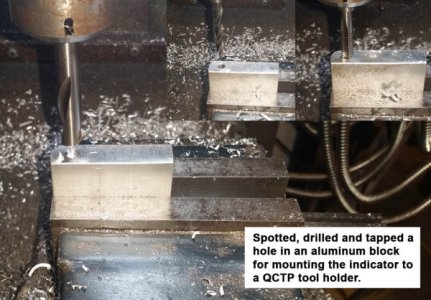
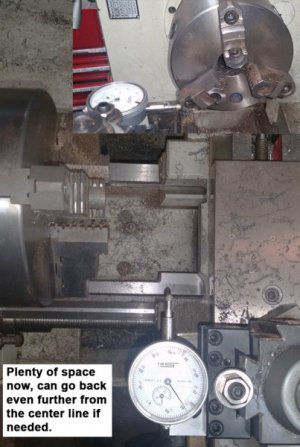
I picked up a nice SPI 0.0001” indicator off eBay with the intent of leaving it at my Grizzly G0709 for 4-jaw work. Problem was the indicator tip was past the center axis of the lathe. Pretty simple POTD, took an aluminum block, squared it up on the mill. Then drilled and tapped a hole for a cap screw to hold the indicator. Now have plenty of travel with the indicator set off to the side of the QCTP.

Bruce

20170503_132255.jpg 20170503_133232.jpg 20170503_134546.jpg
 
Back
Top