Greg's Logan 820 Restoration

Hey;

I doubt any of the Logan shafts are of exotic material or hardened excessively, if at all. My intuition says you wouldn't want the shafts to be out of proportion in hardness to the bushings. A proper balance there is probably best for normal service life longevity.

Another option for tightening up shafts that are worn is to make your own bushings to fit them. This might be the easiest path, and cheapest, eh? Polish the shafts and make 660 or Oilite bushings to fit what you've got. I've got a very old Prentice Bros. gear head engine lathe in the same state. Can't buy shafts, some that are worn .010. I'm truing up the shafts and making bushings to fit so I can take some tooth load off those old gears.

Having said that, if it were a shaft worn out of round, I'd want a new one.
 
Re: Greg's Logan 820 Restoration - Saddle/apron reassembly, make new shaft

Progress report:
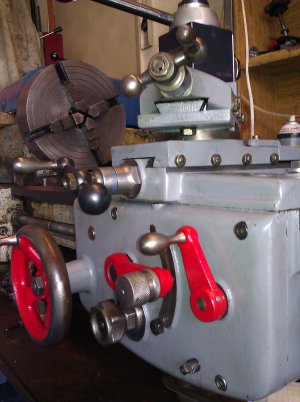
Reassembled the apron and saddle. To summarize from before, I've replaced the handwheel bushings and the longitudinal drive bushing/shaft/gear. But as I said earlier, the handwheel shaft is very badly worn, so this reassembly is only in order to machine a new shaft.
But first, I decided to work on the cross slide and compound slide assemblies. I cleaned them, repainted them, and replaced the bushings. On the compound, the inboard bushing was entirely missing! I keep wondering how many years it's been since this machine was thoroughly maintained. Next year it will be 70 years old.

Photo below: Here it is all back together, certainly looking much better. Until last week I hadn't know that the cross slide crank was non-standard and that it originally had a handwheel here.

apron and saddle restored.jpg

And it's running great, despite my having totally disassembled and reassembled every last piece so far. But it did need it; it was not a violation of the "If it works, don't f*** with it" rule. Some assemblies may not need this full treatment. We shall see...
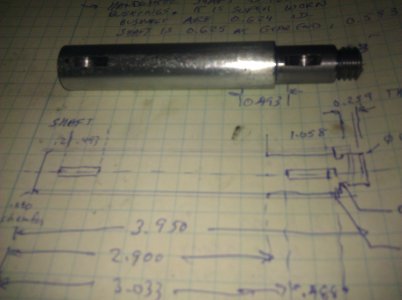
So, now that it's back in operation, I made the replacement handwheel shaft. First time I've every cut a keyslot but it seemed to turn out good enough. Yesterday, I removed the apron and replaced the shaft. Boy, I hate Woodruff keys!

Photo below: my replacement handwheel shaft, with my "engineering notes" for it.
handwheel shaft.jpg

I think the next step will be to tackle the quick change gearbox. So far, the only QCGB problem I'm aware of is a very sticky left selector arm. I may again need to temporarily reassembly the lathe to machine some replacement parts, so at first, I don't intend to remove more than necessary.

Greg

apron and saddle restored.jpg handwheel shaft.jpg
 
Re: Greg's Logan 820 Restoration - Saddle/apron reassembly, make new shaft

Progress report:
Reassembled the apron and saddle. To summarize from before, I've replaced the handwheel bushings and the longitudinal drive bushing/shaft/gear. But as I said earlier, the handwheel shaft is very badly worn, so this reassembly is only in order to machine a new shaft.
But first, I decided to work on the cross slide and compound slide assemblies. I cleaned them, repainted them, and replaced the bushings. On the compound, the inboard bushing was entirely missing! I keep wondering how many years it's been since this machine was thoroughly maintained. Next year it will be 70 years old.

Photo below: Here it is all back together, certainly looking much better. Until last week I hadn't know that the cross slide crank was non-standard and that it originally had a handwheel here.

View attachment 60010

And it's running great, despite my having totally disassembled and reassembled every last piece so far. But it did need it; it was not a violation of the "If it works, don't f*** with it" rule. Some assemblies may not need this full treatment. We shall see...
So, now that it's back in operation, I made the replacement handwheel shaft. First time I've every cut a keyslot but it seemed to turn out good enough. Yesterday, I removed the apron and replaced the shaft. Boy, I hate Woodruff keys!

Photo below: my replacement handwheel shaft, with my "engineering notes" for it.
View attachment 60013

I think the next step will be to tackle the quick change gearbox. So far, the only QCGB problem I'm aware of is a very sticky left selector arm. I may again need to temporarily reassembly the lathe to machine some replacement parts, so at first, I don't intend to remove more than necessary.

Greg

Greg,

Great job! I think I've mentioned it before but if I haven't, these machine restoration projects are by far the favorite part of my hobby-machinist "voyeurism".

All of you guys just impress the hell out of me with your skills and attention to detail and when completed you all have machines that are as good or better than the day they went into service!

I can't express the admiration I have for all you folks that take heavy scrap and return them to their former glory.

Keep up the good work!
 
Somewhere I have some engineering notes that look just like that!
 
Re: Greg's Logan 820 Restoration - QCGB Teardown Part 1

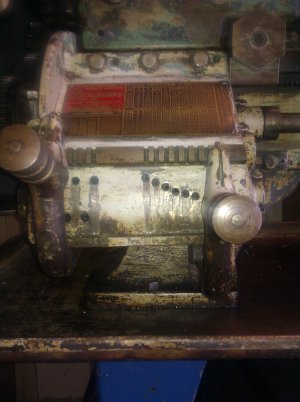
Started the overhaul of the quick change gearbox (QCGB) today. Here it is before starting the job. I've never worked on a QCGB before, this should be interesting.
qcgb, front view, before.jpg
Removing the gearbox was easier than expected. (Apron was already removed.) About a half hour job, including taking pictures and taking notes.

  1. Remove the three bolts on the top edge and the two bolts and bracket on the right side.
  2. Remove the nut, spacer, and gear from the input drive shaft.
  3. Loosen the clamp bolt on the gear arm on left side.
  4. Loosen the bolt holding the rear guide arm (LA-510 Step Bracket).
  5. Remove the gear arm with gear assembly.
  6. Pulled the QCGB loose from its locating pins.

Then with the assembly on the bench, started to inspect, clean and disassemble it. This took many hours (quite some time cleaning and starting paint removal)

  1. Removed the lead screw by removing the nut and 24-tooth gear. (Held the shaft with vise-grips, protecting the shaft with a strip of aluminum from a soda can.)
  2. A quick visual check of the gears -- all look okay, no broken or obviously worn teeth.
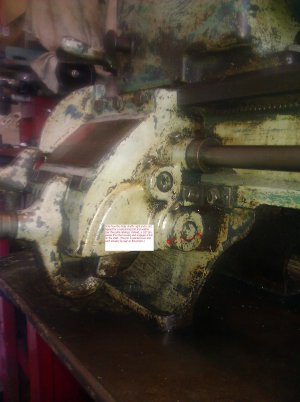
  3. But the slider shaft is badly scored, as suspected, since the left slider was very hard to move back and forth. Contrary to the Logan Parts Catalog, my slider shaft does not have a collar on the left side nor a bolt on the right side to hold it in place. Mine has a 1/8" pin through the bearing block on the right side. See photo below. This is perhaps a more elegant(?) way of restraining the shaft, but seems non-standard.Does anyone else have a similar shaft? If so why isn't it in the Parts Catalog?
  4. Made a drawing of the shaft, in preparation of making a replacement. My shaft has a circumferential groove near the right end and is 8 15/16" long. It looks easy enough to make one, and I already have 3 feet of 3/4" steel rod on hand. Can someone tell me how long the "normal" shaft (with the collar on the left end) is? Might anyone else need one of these shafts?
  5. Onto the shifter arm assemblies... I started cleaning up the grease, crud and old paint trying to figure how to get the gears out. The pin was so tight and I couldn't be sure which way it had to be driven out. Hammering with a brass rod didn't work. Maybe it's loctited? Heated with a propane torch, still nothing. Finally used my vise as a press, using socket wrenches as backing plates and drive pins. This finally worked. Measured the wear on the pins, about .003 of asymmetric wear. Logan Actuator has these pins (#LP-1193) for $7.25 each. Since I don't have any 7/16" rod in my raw materials collection, maybe I'll just order these. OTOH, maybe I'll make these too. And I'll need some bushings for the gears (7/16 I.D, 9/16 O.D, 1/2" long).
This photo shows the right side of the QCGB and is annotated to focus on my slider shaft issue, mentioned just above. Sorry you can't read the text easily, it is basically same as described in the above narrative. Next time I promise larger text. But it's late, sorry.
qcgb, right view, before restoration annotated.JPG
That's all for today. Next shop session, I will finish the teardown. I did not feel any play on the input shaft, it may be okay. But I do feel significant play on the "middle shaft" (LA-470 - shaft with the dozen or so gears). Maybe more parts to make or buy?

Greg

qcgb, front view, before.jpg qcgb, right view, before restoration annotated.JPG
 
I had a logan with the pin in the shaft. I think is was on my 922. Others had 1/4 - 20 bolt with washers on each end. I don't recall the exact length of the shaft but it isn't real critical. I've had several 10" logans and everyone of them had worn shafts. If you want it to work really nice, bore the holes in the handles and put bushings in them...that's assuming they're worn like the ones I've had. When you get to the point of reassembling the gear clusters, either make a dummy shaft or use a piece of dowel to hold the gears in place while you push the shaft through. It'll save a lot of frustration. Good luck

Chuck
 
Greg,

As Chuck said, those shafts are normally worn since there's no good way to lube them. Mine has the bolt/washer at each end as well. It's difficult to measure the length when it's installed but it looks to be about 9". Once you have it apart it should be easy to measure the outside of the bosses of the casting. I would go the bolt/washer at each end as it's an easy make.

Hope that helps.

Steve
 
Re: Greg's Logan 820 Restoration - QCGB Teardown Part 2 of 2

Steve and Chuck,
Thanks for your comments.
I am now leaning toward making the slider with the bolts, rather than the groove/pin. I am thinking with the bolts, it might be easy to pull the slider shaft and clean/lube the slider and selector arms/gears without pulling the whole gearbox off, as would be needed to knock the pin out on my current shaft. Speaking of lubrication, besides oil in the oil cups, what's best on the gears? A graphite grease would be my initial choice.
As Chuck suggests in today's earlier message, maybe bore out the selector arms and add bronze bushings. But securely holding the casting in my mini-mill for the boring may be tricky. I'll investigate further.
And I had read some earlier discussion that mentioned using the dummy shaft/dowel to help in replacing the 14 gears onto the "main shaft." Correct me if I'm wrong, but if the gearbox is off the lathe, it doesn't seem to be any problem to reassemble the gear cluster. Or is this a "field stripping" similar to what I discussed above with the slider?

Today I finished the teardown and inspection of the QCGB.
First was the drive or "input" shaft.
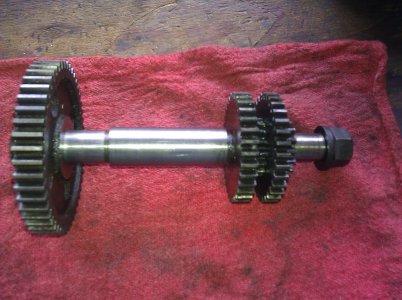
Removed the nut and washer on the inboard end, then pulled the shaft out, releasing the two gears. The leftmost gear is keyed to the shaft, no problem there. But the rightmost gear rides on a bushing that needs replacement. The shaft and its bushings in the casting are okay. Here is what I'm talking about...​
qcgb input shaft, gears.jpg

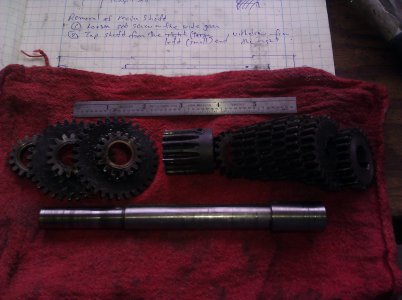
Then, what I'm calling the "main shaft", the one with the fourteen gears on it.
Loosen the setscrew on the wide gear, then tap it out from the left end. This shaft is rather badly worn, enough that it needs to be replaced. So do the bushings on the three left side gears and the bushing on the left side of the casting.
qcgb cluster gears, shaft.jpg
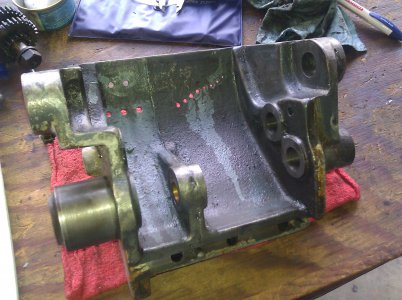
And now, the casting is an empty hulk, ready for cleaning, bushing replacements as needed, and repainting. The label plate with the various setting combinations is faded, but not too bad. I will carefully see if I can brighten it up.
qcgb casting.jpg
Next steps will be to double check my measurements, temporarily reassemble/reinstall the gearbox, and make the new slider shaft, main shaft, and the gear pins. And hopefully to bore and bush the selector arms per Chuck's recommendation. Then tear it down again and install the new parts. Somewhere along the way, repainting too.

Greg

qcgb input shaft, gears.jpg qcgb cluster gears, shaft.jpg qcgb casting.jpg
 
Greg, You'll understand what I mean about frustration when you start trying to line up all of the keyed gears to get the shaft through. You might get lucky and they just fall into place but the dowel makes it easy. I guess your handles must be all wallowed out like most of them I've seen. It's not as hard to set them up for boring as it appears. I have to check and see if I have any pics. I think I just held them in my vise. If you decide to bush the handles, don't try to get too close on your fit or you will be pulling the shaft back out and polishing it down to make your handles slide easier....been there done that.:))

Chuck
 
Back
Top