What is the make of that lathe. Die looks great.I was going to post in the what you did today thread but I'll throw them in here. I am very green with my lathe or any machining for that matter. I made up a 9/16ths dimple die just to "play around on the lathe" plus now I can try to dimple some sheet metal.
View attachment 63042View attachment 63044Mike
-
Welcome back Guest! Did you know you can mentor other members here at H-M? If not, please check out our Relaunch of Hobby Machinist Mentoring Program!
You are using an out of date browser. It may not display this or other websites correctly.
You should upgrade or use an alternative browser.
You should upgrade or use an alternative browser.
Please post pictures of your projects
- Thread starter george wilson
- Start date
- Joined
- Apr 2, 2013
- Messages
- 230
I have worked on a few projects, but because Im a newbee at machining and dont want to flood out the site with a lot of pics I stuck most of my stuff on a blog site. I really do myself like seeing pics of projects here, as I have got so many idea's and future project builds from members posts here (my 50 ton press was started after seeing some cool ones made here ).
This is my latest project.
I purchased a used German Equatorial telescope EQ6 Pro mount to use permanently on the pier in the observatory. My original mount, HEQ5 Pro, will now be the portable mount. The new mount has a different mounting system so I had to make a new mounting plate. In looking things over, I made an adapter to use my original one and make the transition from the EQ6 Pro to the pier.
The pictures show the different bases on the EQ6 Pro on the left and HEQ5 Pro on the right. My original mounting plate and then the new adapter and lastly the new sitting on the old one. I have not taken a picture of the bolts and holes to attach the two together as it is now mounted on the pier. It was a quickee, less than 2 hrs from start to finish. The polar pin is just pressed in.
Only problem was the apron control lever on the lathe became slack and I had to fix that to finish the job. The little grub screw that holds the lever assembly to the apron was not tight enough and had backed out. Spitting out the detent ball etc. Took a bit of fiddling to get it all back together.
Pierre
Hi PIERRE
Nice work
Just curious, how does one turn those recesses U have on that mounting ???
We have a similar project, and no matter the approach of the FACING TOOL, we can,t seem to get a clean EDGE without using a GROOVING TOOL ???
Would one need use a BORING BAR for this type of deep recessing ??? Seems the only choice.
However, we don't have a very deep cut to make, just 8-10 mm's.
And to obtain that lovely finish ???
Do kindly elucidate.
Thanks in advance
aRM
Hello UNCLE GEORGEThere seems to be a lack of sufficient pictures of projects posted by members of the forum. Hey! Let's see your work!!
Well we got some, but not too professional !!!
YAHOOOOOOOOOOO!!!
Finally learnt how to THREAD on my Machine.
Am really chuffed.
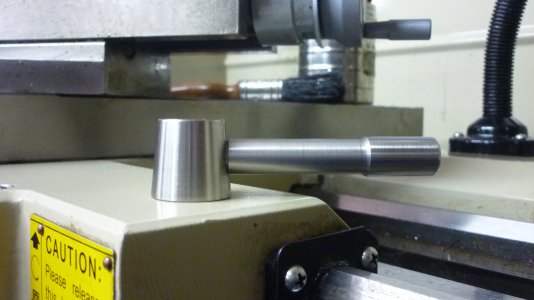
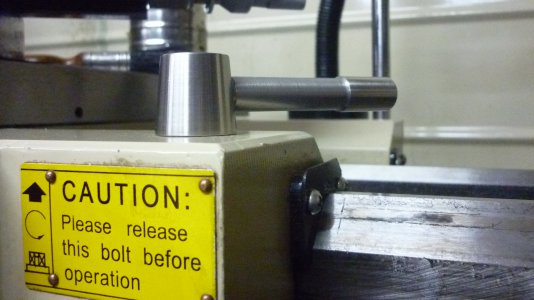
Made my first project as well, a SADDLE LEVER LOCK
And what a pleasure to use it.
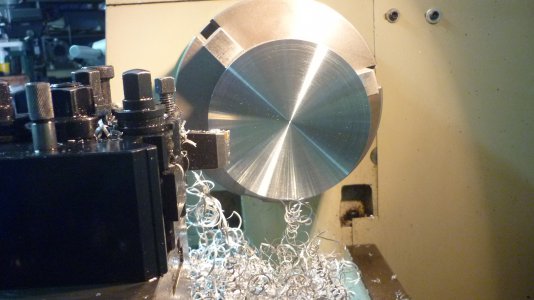
Just to show to some Folks who don't like using Paraffin, Kerosene across the pond, on Aluminium, check out these pics we did a test run with our new SADDLE LOCK.
This Machining is only now getting interesting.
We are on our way to making our own BALL TURNER, IA.
Now that is a challenge for us.
Kindest regards
aRM


What is the make of that lathe. Die looks great.
It's a POWRKRAFT made by Logan. 10X24. It was made in 1942. I am very new and am basically self teaching as I go but I love it.......Mike
- Joined
- Jan 28, 2011
- Messages
- 3,485
Hi PIERRE
Nice work
Just curious, how does one turn those recesses U have on that mounting ???
We have a similar project, and no matter the approach of the FACING TOOL, we can,t seem to get a clean EDGE without using a GROOVING TOOL ???
Would one need use a BORING BAR for this type of deep recessing ??? Seems the only choice.
However, we don't have a very deep cut to make, just 8-10 mm's.
And to obtain that lovely finish ???
Do kindly elucidate.
Thanks in advance
aRM
ARM
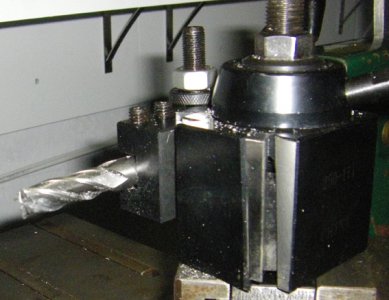
All the work was done dry. As for RPM - I was lazy and left it at 550. The exterior was done with regular tooling, carbide insert in a standard holder. As for the interior, I used a broken carbide end mill. It has a broken fluke therefore I use this as a boring bar and it gives me 4 cutting edges to use as I plunge into the work. I was taking .050" on the radius per pass. The central hole was done first with a 7/8" drill as it was handy at the time. The end mill has to be square to the work otherwise the tooth at the back will drag as you feed out. On the finish pass I fed from the center out to get a smooth finish. No powerfeed used on any surface and not worked afterwards. What you see is how it came off the lathe. I only deburred the edges.
So in your case I would center drill to near finished depth if I could not go through. Plunge to a setting or stop until the hole is the right ID and then to finish the bottom, just sweep from the center out to the ID at the correct depth to clean it up and withdraw the tool just as you get to the finished ID.
The picture shows the tool as used.
Pierre

- Joined
- Aug 7, 2013
- Messages
- 655
I have worked on a few projects, but because Im a newbee at machining and dont want to flood out the site with a lot of pics I stuck most of my stuff on a blog site. I really do myself like seeing pics of projects here, as I have got so many idea's and future project builds from members posts here (my 50 ton press was started after seeing some cool ones made here ).
If you don't mind, where is your blog?
- Joined
- Apr 2, 2013
- Messages
- 230
I have a few up, but again, these are projects by a total newbee lol. Have always liked working with steel and always wanted a nice shop, so why not try to make tools, and even if you fail you learn and have fun (and keeps me away from the live in MIL lol)
Press - http://homemademultifunctionpress.blogspot.ca/
Mill power feed - http://homemadetablepowerfeedformill.blogspot.ca/
Milling machine - http://homemademillingmachine.blogspot.ca/
Indexing head - http://homemadeindexinghead.blogspot.ca/
Misc - http://homemadeshoptools.blogspot.ca/
I update them from time to time when I get time to work on them, as it seems there is always something else I want to do or add (and having a blast at the same time). While they sure are not shop quality builds I have been very pleased with the results (especially the mill).
Hi PIERREARM
All the work was done dry. As for RPM - I was lazy and left it at 550. The exterior was done with regular tooling, carbide insert in a standard holder. As for the interior, I used a broken carbide end mill. It has a broken fluke therefore I use this as a boring bar and it gives me 4 cutting edges to use as I plunge into the work. I was taking .050" on the radius per pass. The central hole was done first with a 7/8" drill as it was handy at the time. The end mill has to be square to the work otherwise the tooth at the back will drag as you feed out. On the finish pass I fed from the center out to get a smooth finish. No powerfeed used on any surface and not worked afterwards. What you see is how it came off the lathe. I only deburred the edges.
So in your case I would center drill to near finished depth if I could not go through. Plunge to a setting or stop until the hole is the right ID and then to finish the bottom, just sweep from the center out to the ID at the correct depth to clean it up and withdraw the tool just as you get to the finished ID.
The picture shows the tool as used.
Pierre
Man, kudos to U
This is superb
U not only a star gazer, U a real star !!!
Much appreciate the clear, detailed informative explanation.
Could not have been better said at a more appropriate time.
Will give this a shot and hope to replicate Your excellent work.
Thanks a mill and
LORD BLESS
aRM
- Joined
- Jan 22, 2011
- Messages
- 8,031
I've had good success doing relatively deep face grooves with the butt end of a carbide end mill ground flat across the section right to centerline and a little back. Relieve the front face and you have the bottom half of the end mill for clearance on the inner and outer sides...Top rake as desired, and also to provide a little extra side clearance, because as you grind past centerline, the effective "diameter" or width shrinks. No reason HSS would not work.

