Straddle knurler build, no mill required (we hope!)

Sad to say, I have stalled on this project. The issue I ran into was my drill press had terrible runout. And I apparently had issues with the drill chuck as well, compounding the problem. Oh, and not all of my drill bits were true. (But I didn't realize this at the time.) So when I used the drill sizes recommended by Mikey, the resultant holes were larger than the reamer diameter! I really followed his instructions very carefully, but apparently his equipment was far superior to mine. I hadn't accounted for that at all. This was quite discouraging.

I looked at rebuilding the drill press and decided against it - as I'd just end up with a slightly better but low end drill press. So the dark forces took over and I ended up buying a PM25MV mill. Can't say I regret my purchase one bit. I was able to transfer over my LED spindle light I had made for the drill press directly over to my mill, so was happy about that.

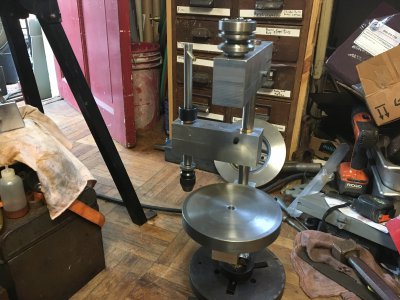
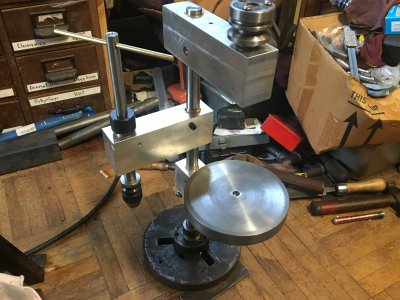
I should finish this knurler, as it would be quite useful to me. But in truth, it wouldn't be very faithful to the title. However, I can continue this thread. You can find Mikey's thread at A Straddle Knurler for the Sherline Lathe Hope to be posting on this further in the new year. A while back all the project bits were gathered to one area, but now I have to find that area, and assess what I need to do next.
 
Well, machining projects have been accumulating. There's too many, so it's time to work on the backlog. Since I started this last year, it seems like I should get this going again. Most of the parts are in a little red plastic Schaller tray, so that is good. Since pausing on this project I found that stub drills seem to work a lot better than jobber drills, especially if the stub drills were bought from a reputable place! My HF drills, even the cobalt one's aren't true enough to take on pre-pre-reaming and pre-reaming tasks. Some drills are fine, others seem to be pretty far off.

So let's go downstairs and see what we need to do.
 
Surprisingly, it's not quite as bad as I thought. The screw, the nut, the half moons and the delrin washer are done and only need minor clean up. Could I do better now, yes, but they are ok. The arms and plates need work, but they are basically fine. Apparently I had practiced drilling the C & D holes in something else. There are no holes in the plates or arms.

The arms are not the same length, nor are the plates square. So that's what needs to happen next. The plates are a little undersized at this point. I have problems with just some of the basics like squaring up stock. I have watched the videos several times, and some of it is sticking, but still have trouble at times. Trading my lower end vise for a toolmaker's vise has helped, and using a dead blow hammer, but still not reliably getting square corners.

So have a simple question. How to get the arms the same length? I have them stacked vertically in the vise and attempted to line up the ends with a square. Before originally cutting the arms I had dykemed one long face, so I have oriented them on the same face. Do I just run a finishing end mill across them to shave them even? Then shave off the other ends? The LOC of the end mill needs to be at least 1" as the arms are 1/2" thick, right?
 
So have a simple question. How to get the arms the same length? I have them stacked vertically in the vise and attempted to line up the ends with a square. Before originally cutting the arms I had dykemed one long face, so I have oriented them on the same face. Do I just run a finishing end mill across them to shave them even? Then shave off the other ends? The LOC of the end mill needs to be at least 1" as the arms are 1/2" thick, right?

If this was me, I would place them side by side on the bed of the vise. If both ends are rough, eyeball them to they're roughly even and make a cut to clean them up. Use the shortest end mill you have and use the flutes up close to the shank so you're using the stiffest part of the end mill. Take light cuts until it cleans up. Then flip them, keeping the same faces in contact with the vise bed, and square the cut ends. Then clean up the other end the same way you did the first.
 
@mikey Thanks for the tip. I didn't see it though, so I will have to remember it for next time.

Have the ends cleaned up. Positive I did it the wrong way, (complete opposite!) but oh well. Lots to learn...

Managed to drill and ream the 1/4" holes without incident. First time I ever reamed on the mill. It was kind of neat seeing the reamer just cutting the hole to size. A minor "disaster" occured on drilling the 3/16" hole. I seemed to have run the #14 drill bit on the slow side, and the bit pulled up the top arm out of the vise. :eek 2: This lost the registration of the top arm to the bottom. Fortunately the bottom piece hadn't moved so I drilled it. Then I opened the vise and put in the top arm again. I used a piece of rod that I measured to be 0.2495" as a locating pin in the 0.2500 hole. Then clamped it in the vise and checked that the other hole was ok. I used the #14 drill and was able to push it all the way through. The #13 drill seemed to not cut as much as the D drill had. Finally reamed it to 0.1875". I took a 0.1875" M2 rod and (after I lined it up correctly) was able to slowly push it all the way through both arms.
PXL_20210601_202739627.jpgPXL_20210601_202826319.jpg
Have a question about your instructions. For the pin retaining screws, (6-32) you use the term 1/8" proximal to the edge of the pin holes. I'm not sure what that means. Do you mean there should be 0.125" between the edges of the holes? Or something else? ) <- 0.125"-> (

To cut out the slots at the end of the arms without a bandsaw, what could be an alternative? I could do this on the mill, it will just take longer, correct?
 
Last edited:
In this case, proximal just means on the arm side of the hole. You just need to place it so the flat on the washer fits into the slot you cut in the pin.

Yes, you can use an end mill to cut the wheel slots in the arms. The bandsaw is just used to rough out the material to reduce the amount of end mill work.
 
Oops, made the hole further than the washer can reach. I'll have to get some slightly bigger washers. Fortunately they are readily available. Gives me an excuse to buy some spiral taps. They are soooo much nicer than general taps. Have to make the postage worth while, right? :D
 
Embarrassed. Yeah, I can make them. Keep forgetting that I can make a lot of things with what I have. It's a different mindset, being able to machine things. Apparently it's still taking a while to settle in to my consciousness... Made the washers.

My standard general purpose 6-32 taps have a scary amount of give to them. Having broken a 6-32 before, I'm being quite careful about that. I have maybe 3.5 threads in, I should be able to get at least 6.5 turns with a bottoming tap, but the amount of force needed is spooking me. It's like I can feel the tap winding up. These are good taps (Widia) but still it's bothering me.

Decided to forge ahead anyways. The Widia's held up for the two 6-32 holes. There's a fine line between just nudging it a bit further and snap! This time it was ok.
PXL_20210602_161948168.jpg
 
Last edited:
6-32 taps are hard to do without snapping the taps. At least I sure have trouble. And I think that a big part of the problem I have is when I try to run taps that small by doing it free-hand. I’ve snapped those small ones even when I was backing out the tap or when I accidentally just cocked the tap handle without even turning it.
I made myself a tapping fixture which has a spindle /chuck . This helps a lot. The fixture is basically a copy of George Thomas’s pillar tool. I didn’t buy castings. I used big chunks of aluminum bar stock.
It really has helped me from snapping those small taps. I still take it slow and use lots of tap-magic.
That said, my go to size screw is the 10-24 and 10-32
 

Attachments

  • 4A540B4E-3CE1-4C16-93DC-B1682DC50D56.jpeg
    4A540B4E-3CE1-4C16-93DC-B1682DC50D56.jpeg
    919.3 KB · Views: 21
  • 5CB18351-7332-4AF5-BAC1-47753CE5924F.jpeg
    5CB18351-7332-4AF5-BAC1-47753CE5924F.jpeg
    848.1 KB · Views: 21
Last edited:
Back
Top