2 X 48 Belt Grinder (again)

Thanks guys. I'm glad someone is following this!
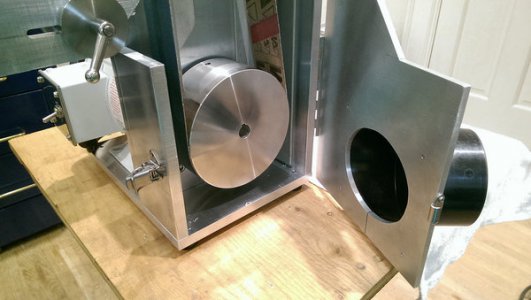
I may put a flat piece of sheet metal in the bottom like a tray to catch dust and particles and make it easy to clean. My bandsaw has something like that. I designed the table mount to make it easy to get back to 0 °. You just drop the table until it hits the horizontal mount on the left; that acts as a zero stop. I plan to make the table in an L shape and have the table extend past the belt (posterior to) on the left. Will that be sufficient or should I make the table in a U and have it extended on both sides? That will be harder to cut.
I have been seeing online that people are using ceramic and glass platten faces. Any good reason to go to that? Does anyone use such a thing? I also saw a water cooled platten! If my platten gets warm I plan to add the heat sink.
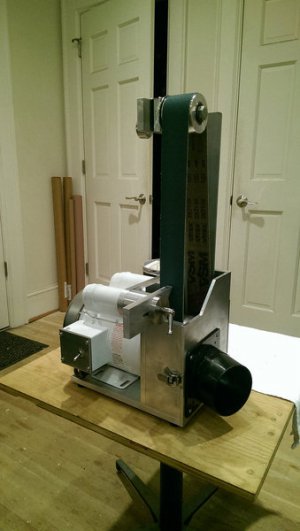
Just waiting for some parts and I can have a video of it in action. I have about 30 lbs of belt tension. The vertical arm is fairly rigid. The tracking works very well. Overall, this thing feels fairly heavy duty and should work well.
Robert
 
You should not need a fancy platen ( unless you want one). My platen is nine inches long and steel. I have no problems. If it gets hot, it is too close to the belt. It only rubs the belt hard when grinding and that is usually short periods. Idling , it should barely touch the belt or not rich it at all. It is important it is parralell to the belt. Your project is fantastic and you have done a great job.
 
The 1/2" trade size cord grip fit perfectly. I wired it with 14 AWG:

26144984234_00430428f9_h.jpg

I put a draw latch to hold the end door closed. So easy to change the belt!
26144984184_edda58e5f1_h.jpg

Dust collection port:
26683953681_765943f866_h.jpg

26144986724_c30b051ba9_h.jpg

26657521652_8233f4c786_b.jpg

So now I just need to finish the table. It will have some type of miter gauge TBD.
Thanks for watching! Completion shots when the table material comes.

Robert
 

Attachments

  • 26144984234_00430428f9_h.jpg
    26144984234_00430428f9_h.jpg
    41.2 KB · Views: 33
  • 26144984184_edda58e5f1_h.jpg
    26144984184_edda58e5f1_h.jpg
    40.9 KB · Views: 33
  • 26683953681_765943f866_h.jpg
    26683953681_765943f866_h.jpg
    39 KB · Views: 32
  • 26144986724_c30b051ba9_h.jpg
    26144986724_c30b051ba9_h.jpg
    48.4 KB · Views: 32
  • 26144984234_00430428f9_h.jpg
    26144984234_00430428f9_h.jpg
    41.2 KB · Views: 33
  • 26657521652_8233f4c786_b.jpg
    26657521652_8233f4c786_b.jpg
    40.8 KB · Views: 32
  • 26144984184_edda58e5f1_h.jpg
    26144984184_edda58e5f1_h.jpg
    40.9 KB · Views: 33
  • 26683953681_765943f866_h.jpg
    26683953681_765943f866_h.jpg
    39 KB · Views: 33
  • 26144986724_c30b051ba9_h.jpg
    26144986724_c30b051ba9_h.jpg
    48.4 KB · Views: 32
  • 26657521652_8233f4c786_b.jpg
    26657521652_8233f4c786_b.jpg
    40.8 KB · Views: 32
  • 26144984234_00430428f9_h.jpg
    26144984234_00430428f9_h.jpg
    41.2 KB · Views: 32
  • 26144984184_edda58e5f1_h.jpg
    26144984184_edda58e5f1_h.jpg
    40.9 KB · Views: 33
  • 26683953681_765943f866_h.jpg
    26683953681_765943f866_h.jpg
    39 KB · Views: 33
  • 26144986724_c30b051ba9_h.jpg
    26144986724_c30b051ba9_h.jpg
    48.4 KB · Views: 33
  • 26657521652_8233f4c786_b.jpg
    26657521652_8233f4c786_b.jpg
    40.8 KB · Views: 32
  • 26144984234_00430428f9_h.jpg
    26144984234_00430428f9_h.jpg
    41.2 KB · Views: 32
  • 26144984184_edda58e5f1_h.jpg
    26144984184_edda58e5f1_h.jpg
    40.9 KB · Views: 32
  • 26144986724_c30b051ba9_h.jpg
    26144986724_c30b051ba9_h.jpg
    48.4 KB · Views: 33
  • 26683953681_765943f866_h.jpg
    26683953681_765943f866_h.jpg
    39 KB · Views: 33
  • 26657521652_8233f4c786_b.jpg
    26657521652_8233f4c786_b.jpg
    40.8 KB · Views: 33
  • 26144984234_00430428f9_h.jpg
    26144984234_00430428f9_h.jpg
    41.2 KB · Views: 33
  • 26144984184_edda58e5f1_h.jpg
    26144984184_edda58e5f1_h.jpg
    40.9 KB · Views: 33
  • 26683953681_765943f866_h.jpg
    26683953681_765943f866_h.jpg
    39 KB · Views: 33
  • 26657521652_8233f4c786_b.jpg
    26657521652_8233f4c786_b.jpg
    40.8 KB · Views: 33
  • 26144986724_c30b051ba9_h.jpg
    26144986724_c30b051ba9_h.jpg
    48.4 KB · Views: 33
Last edited:
Really looking good. Looking forward to seeing it in action. Mike
 
That thing is sexy. You'll post a video won't you?

P.S. Put the heat sink on it. If for no other reason than to look awesome.
 
OK! Heat sink it is! I was hoping someone would say that...
Yes I will get video once the table is done.
FYI I solved the motor mount issue by having it mounted on the face only. The base looks like it is in contact with the aluminum base plate but it is actually a few mm above it.
I am also thinking about a dedicated light. I envision a flexible gooseneck coming off the electrical box with a (World Market Martini Shaker) LED light head attached to it. There would be two adjacent toggles on the panel. Nice!
In case you missed it in my other thread:
26683960381_da3f060d92_h.jpg

Robert
 

Attachments

  • 26683960381_da3f060d92_h.jpg
    26683960381_da3f060d92_h.jpg
    49 KB · Views: 32
  • 26683960381_da3f060d92_h.jpg
    26683960381_da3f060d92_h.jpg
    49 KB · Views: 32
  • 26683960381_da3f060d92_h.jpg
    26683960381_da3f060d92_h.jpg
    49 KB · Views: 32
  • 26683960381_da3f060d92_h.jpg
    26683960381_da3f060d92_h.jpg
    49 KB · Views: 32
  • 26683960381_da3f060d92_h.jpg
    26683960381_da3f060d92_h.jpg
    49 KB · Views: 32
Last edited:
Here is a mock up of the table. I would love to hear some comments and ideas on how to make and attach a miter gauge without cutting table slots.
So far it is 7 x 8 with a cutout of 2.25 x 1.5"
View attachment 214667

R
View attachment 214667
 
Last edited:
Crickets out there!
OK let me float an idea mocked up: There would be some type of clamp at the table edge that holds the miter fence to the table. I don't like the aesthetics of the table but I think it would be functional.
Thoughts?
Robert
 
Last edited by a moderator:
I like the Idea. I would move it over to where the other edge is aligned with the edge of the belt. Also a clamp could be fashioned to attach with a thumb screw where it clamps the bottom edge of the table through the movable piece. That is if you make it rounded like you have there.
 
Thanks Ken. Why the other edge? I think I picked this edge unintentionally because I am left handed! The clamp and thumbscrew was exactly what I had in mind.
Hey Mark! Chime in here before I start cuttin' stuff ;)
Robert
 
Last edited:
Back
Top