2017 POTD Thread Archive

No pictures, it probably didn't happen, or rather it happened so fast I couldn't get any pictures taken.

For a couple of years, I've been plagued by the cross feed on my lathe (Atlas/Clausing MK2) allowing the tool to dig into the work and lifting on the right side. Today a Made a Steel gib to replace the ridiculous plastic one that Clausing is still offering.
Take a piece of 1/8 flat ground O1 3/8 wide, 4 3/16 long, put a 30º chamfer on opposite long edges, put three flats in the same place as they are in the plastic one (at a 30º angle to the surface,) and replace the useless plastic one. I suppose you could use any steel but I use what's handy.
I can't lift the side with with a lever.

Dunno what took me so long.
 
For a couple of years, I've been plagued by the cross feed on my lathe (Atlas/Clausing MK2) allowing the tool to dig into the work and lifting on the right side. Today a Made a Steel gib to replace the ridiculous plastic one that Clausing is still offering.

That sounds wierd. Is it possible that under tool stress the gib was intended to be on the
unstressed side of the dovetail?
Nonetheless, getting a stiffer tool support is a big win: congratulations on finding the way!
 
Finished my mill stand and now I have storage under the mill instead of wasted space.

The steel frame all welded and painted, with the hockey puck feet installed. I welded nuts to the underside of the table so I didn't have to fiddle with trying to reach under the table to hold the nuts while tightening the bolts from the top side.
View attachment 249948
I realized after painting it, that I need to be able to access the underside of the mill to adjust the Y backlash so I had to cut a hole in the top. Great I'm going to mess up the paint and it's going to stink up the shop. I used the plasma cutter and was amazed at how well it cut, without burning the paint.
View attachment 249949
Got the drawer boxes done.
View attachment 249950
Then the drawer cabinet with the slides mounted.
View attachment 249951
Drawers installed, drawer faces installed and ready to move into its final home. The drawer faces were made with some cottonwood I milled years ago and had sitting in the shop for some future projects. I guess this was one of them.
View attachment 249952
I used the tractor to pick up the mill and set it on the stand, then picked up both together and moved them into place. All levelled and ready to use. No more milling tools spread all over the shop. Yoooohhhhhoooo.
View attachment 249953
I was worried that my measurements for the bolt hole spacing might be off and I wouldn't be able to bolt the mill to the nuts I welded to the underside of the cross members, but all went well. Now to fill the drawers.

Nice work on the mill stand, looks well built and I like the metal / wood combination. Well done.
 
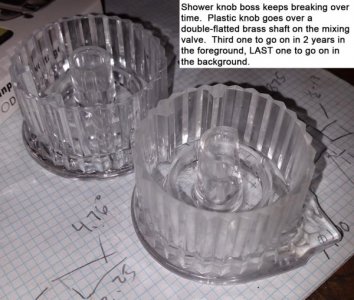
Quick POTD to hopefully fix an annoying problem in our house. I don't understand how and why it happens, but the shower knob in our upstairs bathroom gets continually broken during use. The ONLY person using it is our son. So, cheap plastic know or a gorilla in a man suit taking showers? The problem is the knob has a boss that slips onto the valve shaft which has two flats. I don't know if he's over-cranking the knob at the end of travel or not, but the boss blows out a side.

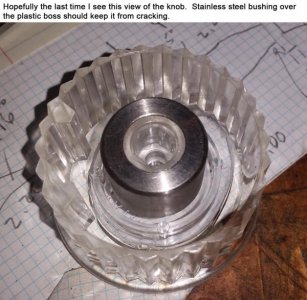
Idea was to sleeve the plastic boss with a piece of stainless. That way the outside of the boss is heavily reinforced and won't deflect/crack if it's over-turned on the valve stem. At least that's the theory . . . Measured the diameter of the new know at the top and bottom, measured the height and did the trig for the taper for draft on the boss.

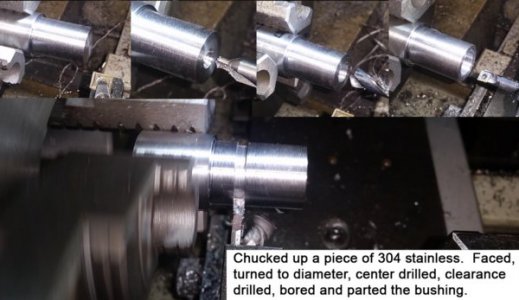
Chucked up some 304 stainless and turned to diameter. Faced, center drilled, clearance hole drilled and bored the hole. Checked the diameter with the knob when I was getting close, then parted it off. Didn't show the operations, but filed a little chamfer on the knob end so it cleared the radius at the base of the boss.

Fingers crossed that the solution holds. Our son is away at college most of the time, so hopefully things hold up.

Bruce

20171216_155030.jpg
20171216_163930.jpg
20171216_164952.jpg
 
Just finished grinding up threading tools for cutting 10 pitch Acme thread in brass nut for my 14" Rockwell lathe. Waiting for bronze bar I bought from one of our members here.

https://www.ebay.com/itm/932-SAE-66...582140?hash=item4b1bf4e7bc:g:qJAAAOSwi8VZWpOs


View attachment 249039View attachment 249040
I am a little curious just why the radius on the right side of the cutter? My understanding of Acme is they all have the same angles cut then the point adjusted to the Number of pitch cutting. Curious!
 
Quick POTD to hopefully fix an annoying problem in our house. I don't understand how and why it happens, but the shower knob in our upstairs bathroom gets continually broken during use. The ONLY person using it is our son. So, cheap plastic know or a gorilla in a man suit taking showers? The problem is the knob has a boss that slips onto the valve shaft which has two flats. I don't know if he's over-cranking the knob at the end of travel or not, but the boss blows out a side.

Idea was to sleeve the plastic boss with a piece of stainless. That way the outside of the boss is heavily reinforced and won't deflect/crack if it's over-turned on the valve stem. At least that's the theory . . . Measured the diameter of the new know at the top and bottom, measured the height and did the trig for the taper for draft on the boss.

Chucked up some 304 stainless and turned to diameter. Faced, center drilled, clearance hole drilled and bored the hole. Checked the diameter with the knob when I was getting close, then parted it off. Didn't show the operations, but filed a little chamfer on the knob end so it cleared the radius at the base of the boss.

Fingers crossed that the solution holds. Our son is away at college most of the time, so hopefully things hold up.

Bruce

View attachment 250258
View attachment 250259
View attachment 250260
very nice fix for the young hulk
 
F
I'm still playing around with the little horizontal milling machine I picked up in the summer. When I got it, it was running different drive pulleys other than what should have been on the machine. The previous owner, or a previous owner, had already purchased two new reproduction pulleys of the proper sizes but hadn't installed them. When I decided to put them on I could see why.

The larger of the two, in this case a proper Zamak casting of the Atlas part, had such a brutal shimmy in it that I immediately took it off again. Hmmm, what to do? Well I'll just true it up a bit on the lathe and see if it'll come around. Nothing to lose, eh.

View attachment 249679

Yeah ok, that worked not so good and even worse when the thing slowly disintegrated and eventually fell completely apart. Like, one side of a sheave just came off while I was turning it. Guess it's on to Plan B -- make completely new pulley from scratch.

View attachment 249680

Long story short, my Atlas 618 clears three-and-a-bit inches over the ways and the largest sheave is 4-1/2 inches in diameter. Not a lot of room to get in front for turning, and I figured the only way to do it would be in two pieces. This actually worked ok. I turned a shallow boss on one part and a shallow relief on the other, just like mounting a chuck to a back plate. Four machine screws hold the two sides together nicely. I got a lot of chatter though when I was doing the bottoms of the grooves, my setup was just too whippy with everything extended to the max.

View attachment 249682

The story really should end here, but after I had faithfully reproduced my brand new aluminum pulley to all my nice specifications, it didn't mesh up quite as nice as I might have liked with the small pulley. Dang! Guess the only thing to do is make a new one of those too!

So I did. It went a lot smoother, partly because of the smaller diameters and also because I could make it from a single blank. Here's the blank being faced. If I'm not mistaken, my cutter is patterned off a Mikey-style square tool I ground a few years ago. They cut real nice.

View attachment 249683

Here's one of my setups for cutting the grooves. I ran straight in to depth with a parting tool first, then switched to a slim taper for working the angled cheeks. I think I had to use four different tool block configurations in order to get the various setups from the appropriate directions.

View attachment 249684

In the end though, both parts worked out just fine. The fit like a glove, the belt runs smooth and true, and they're not shaking themselves to bits in the process.

View attachment 249685

Thanks for looking!

-frank
rank
Making pulleys has become something I have a little bit of experience with and the enjoyment when they run smooth as silk. Beautiful job and nice write up.
Very nice.
Nelson
 
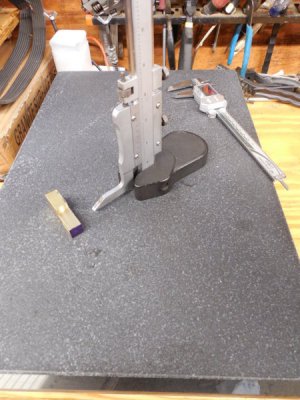
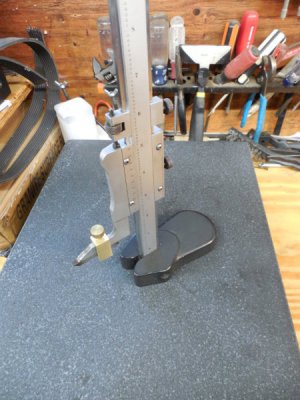
I have an old Starrett 255 height gage that I want to start using more for small projects. When I was looking through the Starrett catalog, I noticed that they still manufacture the gage and also provide an auxiliary scriber that clamps onto the bottom of the main scriber. My eyes sorta bugged out a little when I seen how much these height gages are new.

http://www.starrett.com/metrology/p...ools/height-gages/Vernier-Height-Gages/255-12

Heck, even just the factory scriber and clamp are quite a bit more than I paid for the whole unit, so I just used a HSS toolbit for the scriber and milled some brass for a clamp.

255_clamp_1.jpg

And after a bit of milling and filing of the brass piece the gage is ready for some work on a Chinese tombstone.

255_clamp_2.jpg

Obviously with the auxiliary scriber you can't get down to zero anymore, but you don't lose much and for this aspect my setup is better than factory as the scriber isn't as tall. It's easy to remove as well, and since both scribers are beveled the height reading remains the same.
 
Quick POTD to hopefully fix an annoying problem in our house. snip

I'm guessing that there was some draft angle on the stem of the knob. True?

Did you use an adhesive to attach your bushing?

Great fix. I hope the pipes in the wall hold up. You gotta stop feeding that kid so well. :grin:
 
Back
Top