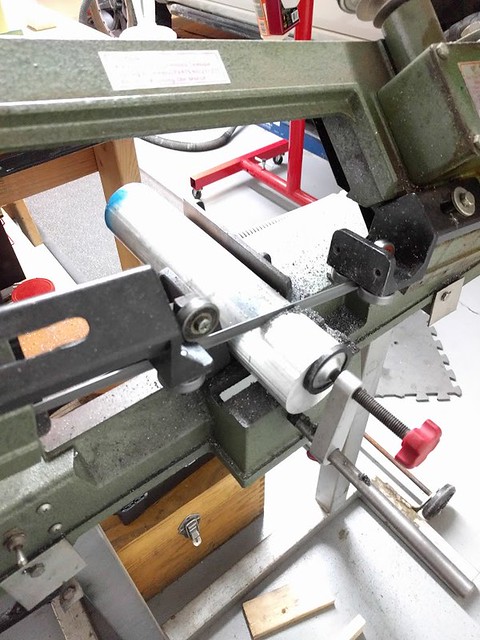
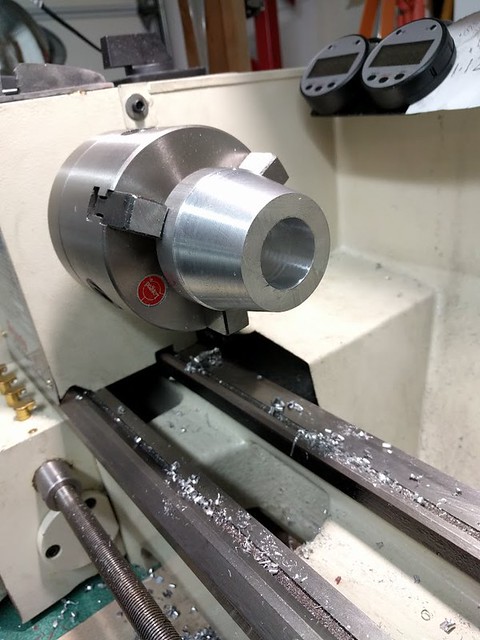
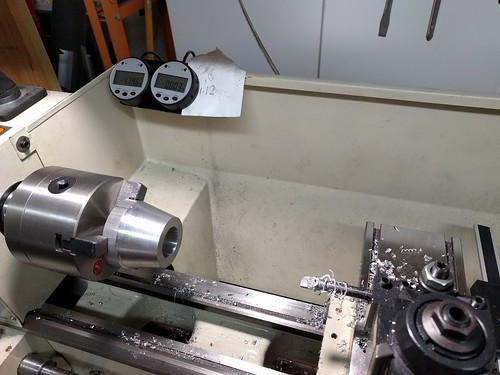
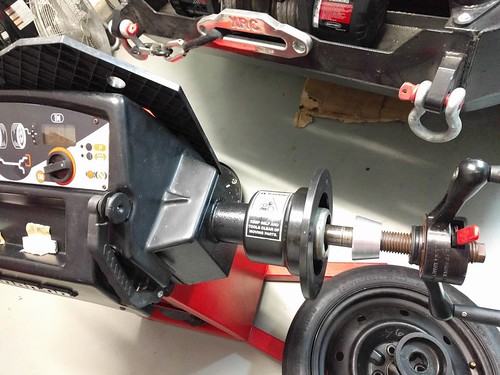
2018 POTD Thread Archive

4 bolt compound slide mount for my 9x20 lathe. More info and pics in my RF30 CNC conversion thread:

40435934840_be86384994.jpg


27372729777_dd21fff26c.jpg


40435932910_c89de311cd.jpg
[/url]

Comparison old vs. new:
42243556611_91a6fb8a0f.jpg


41342249815_a2f39ab35c.jpg
 
I bought an assortment of that type of heat shrink a few decades back. It was a collection of different sizes up to 1/2" in 4" lengths. It worked OK but as I recall, it was fairly expensive and not easily found.
The stuff I got was from Harbor Freight. $5.69 for an assortment. https://www.harborfreight.com/42-piece-marine-heat-shrink-tubing-67598.html
I haven't personally tried this but I would expect that you could accomplish the same effect by applying a dab of hot melt glue to the joint before sliding the heat shrink over the joint. This can easily be done by applying a coating with a glue stick immediately after soldering the joint.

Thanks for the reminder John. I just threw a glue stick in my emergency tool kit.
And thank YOU for a great idea! Sounds like it should work very well. And saves having to buy two kinds of heat shrink, running out of the one you need, etc.
 
Used the blower motor today, with the exhaust pipe attached from yesterday (https://www.hobby-machinist.com/thr...you-make-in-your-shop-today.67833/post-585683), and...I guess the motor vibrations worked all 3 bolts out, even used lockwashers. And the previous job, I sucked up a few rocks (it has excellent suction), and they damaged the blower housing, and today's stuff made it worse, a pretty significant hole is in the housing (similar to what happened with my zero turn blower housing).

So, I had to cut work short, bought some nuts and bolts, and proceeded to repair both problems.

The exhaust pipe just bolted directly onto the heat shield around the muffler, which is just thin sheetmetal with some threads in it. I decided to try using a full bolt/washer/parts/washer/lockwasher/nut setup this time, and to do it, I had to take the heat shield off the muffler. Normally, this would be straightforward, but 2 of the screws they used had stripped the threads in the muffler, and wouldn't readily unscrew. One I could get out by trying to separate the muffler and heat shield while unscrewing it, but the other one wouldn't budge. I tried prying it, pulling on it with visegrips (couldn't really do this, because the head was slightly recessed in the heat shield), and finally decided to drill it out. I broke 3 titanium-coated drill bits, while making very little progress, switched to a HSS bit and it went through the head like butter.

IMG_1187.jpg

Final result (bolt heads are on the inside for clearance, otherwise I'd reverse it to make it look better):
IMG_1188.jpg

Now, here's the damaged blower housing:
IMG_1189.jpg
IMG_1190.jpg

I'm fixing this the same way as I did my zero turn blower housing, using a strip of 14 gauge sheet metal, run it through my ring roller to get the right curve in it (much easier to do than using a homemade jig and bending it by hand/eyeball), inserting it and bolting it to the non-damaged portion of the housing. This was also easier to do because the blower housing splits in half (the zero turn I had to work it in through the output hole). Unfortunately, I forgot to take a picture of the insert before bolting everything together...
 
I have been investigating different ways of marking machine dials and have read many posts here on the forum and the web. Last week I made a holder for my stamping set that mounts on my rotary table. The results were a great improvement from what I was getting but the setup and function were time consuming and tedious.
A friend said why don't you use your CNC machine to mark them?
Well daah here is my first attempt using the 4th axis. It has 100 divisions and is 2.8" in diameter.
I probably should have used the tail post to steady the arbor but it turned out fairly well.
What do you think?


GEDC3569.JPG

Thanks
Ray
 
Once the previously posted lathe mod was done I started on the wheel cone for the newly acquired wheel balancer. The taper angle on the other cones that it came with was 12deg. However, the actual angle isn't very important as the bore diameter and the faces.

I only had alum stock in 2.5 dia, which should be good enough for home use. I started by cutting a slug off the bar stock.
41521665374_0a0963cac7_z.jpg


Turned the 12deg taper, drilled the center hole and bored it out to .01 over the measured shaft diameter, I figured once the alum cooled off it would be closer to .008 over and make for a nice slip fit.
42243555591_0c75391730_z.jpg


I parted it off, first by trying to use the parting tool but that thing sucks (kinda like the brazed carbide boring bars! anyone have suggestions for better boring bars?). Anyway, I sawzalled it off. Then flipped the part around, indicated off the bore to .001 and faced it off.

28370319808_1e6b8a4af8.jpg
Flickr

Nice and easy slip fit without any obvious play and the machine reads zero imbalance when spun without a tire. Sweet!

27372725817_7c7120ba70.jpg
 
Brazed carbide boring bars usually need to be touch up from my experience. I usually have to grind relief clearance below the cutting edge of the bar. Leave as much meat below the cutting edge for durability but grind some of the rounded part smaller. I also either have the flat of the bar level or at a slight negative depending on what and how it's cutting.
Parting it kind of depends on the tool ur using and technic. Once figured out it not bad. I have a jet 9x20 and I use a normal HSS blade that fits in the standard parting tool holder. I ground the cutting edge with aliitle hook to it making a very positive cutting edge.
 
My project for the last couple of weeks was cleaning up my tiny basement shop. First the water heater went haywire and totally filled everything with steam. Then a water pipe burst over my lathe and dropped water and soggy fiberglass insulation all over the place. People talk smack about WD-40 but it was indispensable for spraying on things before I slowly worked my way around drying, cleaning, checking, and oiling everything. I think I'm mostly done now.

Edited to add: Oh, not that it would have helped much with either emergency, but I also bought a dehumidifier.
 
Last edited:
Back
Top