

-
Welcome back Guest! Did you know you can mentor other members here at H-M? If not, please check out our Relaunch of Hobby Machinist Mentoring Program!
- Forums
- THE PROJECTS AREA
- PROJECT OF THE DAY --- WHAT DID YOU DO IN YOUR SHOP TODAY?
- Project of the Day Mega-Thread Archives
You are using an out of date browser. It may not display this or other websites correctly.
You should upgrade or use an alternative browser.
You should upgrade or use an alternative browser.
2019 POTD Thread Archive
- Thread starter GoceKU
- Start date
- Joined
- Nov 23, 2014
- Messages
- 2,606
Well, they like to eat cracked corn and he ate a lot of it. He started as a chick in April, processed him 8-9 months later. He was the largest we've raised, second place was a 65 pounder. We have one now that's 65 also. They are really gentle animals, but the Tom's can get to be a pain as the testosterone kicks in. They get to thinking they're all that which makes it easy to start the process of processing them. And No, we don't have an oven big enough for them.Where does one get a 72 lb turkey?????
Bruce
- Joined
- May 10, 2012
- Messages
- 154
Do you have an extra chair for Thanksgiving day dinner I know where you live??
Phil
Phil
- Joined
- Nov 23, 2014
- Messages
- 2,606
Hi Phil,Do you have an extra chair for Thanksgiving day dinner I know where you live??
Phil
We host Thanksgiving on Friday, let's the families get together with their spouse's side on Thursday without running to two families. We usually serve one of our birds, but it's a ROYAL pain to pluck them. We now go with store-bought birds at $0.33 per pound. No one could tell the difference as my wife has this turkey cooking thing down to a science. Stop over anytime, but bring your cold-weather boots. My shop doesn't have a heated floor like yours!
Bruce
Last edited:
- Joined
- Nov 23, 2014
- Messages
- 2,606
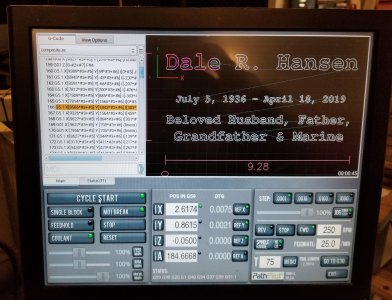
POTD was finishing up the memorial plaque for one of my mom's Christmas presents. I'd already developed the routine for the Marine Corps emblem, added the text for the rest of the plaque.
Started by tramming my two vises true to each other. Don't know if there's a preferred way to do it or not, but here's my method. I start by loose shooting the vises to the fixture plate. Then set a 350 mm (~13.75") gauge block against the fixed jaws and tighten them down using a 2" length of 1/2" diameter Delrin to hold the gauge block to the vise jaws. Then snug down the LH vise LH bolt and sweep the gauge block from left to right with a dial test indicator on the spindle. Get to the RH bolt area on the RH vise and tap the vise with a brass hammer so the number on the DTI matches the LH vise. Tighten down the RH bolt on the RH vise and sweep back to the LH side to verify tram. Then tighten down the other two bolts. The 2" Delrin rounds hold the gauge block in place and allow access to the vise hold-down bolts. Goes really quickly this way.
Ran a prototype of the complete plaque on 1/4" Plexiglas before going to the aluminum plate. A 0.050" depth of cut with the spring-loaded diamond braille did a nice job on Aluminum in one pass, so changed my PathPilot routine from three stepped passes down to 0.050" to doing it all in one shot. Took the routine run time from 27 minutes to under 13 minutes.
I prepped the aluminum plate with a dual-action sander with 220 grit paper, then went over it with a Scotch-brite pad. It gives the surface a brushed look which cuts down on reflection and helps the engraving stand out better.
Did learn a couple of things about PathPilot's engraving routine. Engraving is handled one line at a time, no carriage returns are allowed. So each line of text is typed separately. Your text inputs are font, text height, X-axis offset, text LH/RH justified or centered, and Y-axis baseline offset. PathPilot lets you combine text files so multiple lines can run in one routine, the Y-axis offset spaces them out so they're not on top of each other. I made the lowest two lines of text 0.5" tall, but could see on the preview screen that the upper of the two lines was smaller than the lower.
Finally figured out what was going on. The text height is what you get for the absolute highest vs. lowest edge of the text line. I assumed it'd be like grade school when we practiced our penmanship on lined paper; 0.5" text height would be the spacing of the base and top lines. If you write with characters that descend like "g, j, p, q, y, comma and semicolon", the text height is from the bottom of the descender to the top of the tallest character. Something I'll have to remember; if I wrote a line like "air-" on one line, and "plane" on the next line, giving them both a text height of 1.0" would result in the text being different heights because of the descender in "p". Fortunately, PathPilot gives a nice preview of the tool path which can be blown way up with a grid in place so the heights can be fiddled with so they match.
Pretty happy with the end result. Sad occasion, but I know how this story will end for all of us. I'm sure my dad would have been happy to have me learn the Tormach better and involve him even though he's no longer with us.
Thanks for looking.
Bruce
Trammed the vises to each other using a long gauge block that spans both vises. Makes for quick work getting them dead-on to each other.

PathPilot preview screen of the Eagle portion of the Marine Corps emblem

I'd definitely do some editing of the paths if I was making a bunch of these. Lines in red are where the cutter has traveled, white is "to be" cuts, and blue is the tool path. Notice the myriad of blue lines running back and forth across the Eagle's wings? Yeah, engrave a feather on one wing, then move over to the opposite wing to do the same feather. The routine could run a lot faster if the rapid moves were minimized, guess that's why CNC programmers make the big bucks! I'm guessing the routine run time could have been cut in half if the paths were optimized.

Prototype in Plexiglas turned out nice.

Final plaque, tough to get it lit properly to give it justice.

Started by tramming my two vises true to each other. Don't know if there's a preferred way to do it or not, but here's my method. I start by loose shooting the vises to the fixture plate. Then set a 350 mm (~13.75") gauge block against the fixed jaws and tighten them down using a 2" length of 1/2" diameter Delrin to hold the gauge block to the vise jaws. Then snug down the LH vise LH bolt and sweep the gauge block from left to right with a dial test indicator on the spindle. Get to the RH bolt area on the RH vise and tap the vise with a brass hammer so the number on the DTI matches the LH vise. Tighten down the RH bolt on the RH vise and sweep back to the LH side to verify tram. Then tighten down the other two bolts. The 2" Delrin rounds hold the gauge block in place and allow access to the vise hold-down bolts. Goes really quickly this way.
Ran a prototype of the complete plaque on 1/4" Plexiglas before going to the aluminum plate. A 0.050" depth of cut with the spring-loaded diamond braille did a nice job on Aluminum in one pass, so changed my PathPilot routine from three stepped passes down to 0.050" to doing it all in one shot. Took the routine run time from 27 minutes to under 13 minutes.
I prepped the aluminum plate with a dual-action sander with 220 grit paper, then went over it with a Scotch-brite pad. It gives the surface a brushed look which cuts down on reflection and helps the engraving stand out better.
Did learn a couple of things about PathPilot's engraving routine. Engraving is handled one line at a time, no carriage returns are allowed. So each line of text is typed separately. Your text inputs are font, text height, X-axis offset, text LH/RH justified or centered, and Y-axis baseline offset. PathPilot lets you combine text files so multiple lines can run in one routine, the Y-axis offset spaces them out so they're not on top of each other. I made the lowest two lines of text 0.5" tall, but could see on the preview screen that the upper of the two lines was smaller than the lower.
Finally figured out what was going on. The text height is what you get for the absolute highest vs. lowest edge of the text line. I assumed it'd be like grade school when we practiced our penmanship on lined paper; 0.5" text height would be the spacing of the base and top lines. If you write with characters that descend like "g, j, p, q, y, comma and semicolon", the text height is from the bottom of the descender to the top of the tallest character. Something I'll have to remember; if I wrote a line like "air-" on one line, and "plane" on the next line, giving them both a text height of 1.0" would result in the text being different heights because of the descender in "p". Fortunately, PathPilot gives a nice preview of the tool path which can be blown way up with a grid in place so the heights can be fiddled with so they match.
Pretty happy with the end result. Sad occasion, but I know how this story will end for all of us. I'm sure my dad would have been happy to have me learn the Tormach better and involve him even though he's no longer with us.
Thanks for looking.
Bruce
Trammed the vises to each other using a long gauge block that spans both vises. Makes for quick work getting them dead-on to each other.
PathPilot preview screen of the Eagle portion of the Marine Corps emblem
I'd definitely do some editing of the paths if I was making a bunch of these. Lines in red are where the cutter has traveled, white is "to be" cuts, and blue is the tool path. Notice the myriad of blue lines running back and forth across the Eagle's wings? Yeah, engrave a feather on one wing, then move over to the opposite wing to do the same feather. The routine could run a lot faster if the rapid moves were minimized, guess that's why CNC programmers make the big bucks! I'm guessing the routine run time could have been cut in half if the paths were optimized.
Prototype in Plexiglas turned out nice.
Final plaque, tough to get it lit properly to give it justice.
Attachments

- Joined
- Nov 23, 2014
- Messages
- 2,606
Great idea. I'll see if my mom would like a smaller plastic on which could be lit from below.Have you considered illuminating the plexiglass one from one or more edges?
Coloured led's would bring out the engraving like crazy.
Bruce
- Joined
- Jul 14, 2017
- Messages
- 2,448
Well, i've spent some considerable time and effort fixing the white elephant, i bought all new OEM o rings and for added insurance i used a thick coating of automotive engine black silicone after reinstalling the thermostat housing, i clean out the entire cooling system with water then i drain it and filled it with new G12 coolant, bleeding the air from the system was a bit harder the usual, and i found out that the cooling fan relay decided to die after a lot of searching i manage to find a spare and change it then i finished bleeding the cooling system and managed to get it out of the garage i'm itching for a new project but i still need to do a bit more work on the little niva.

