

-
Welcome back Guest! Did you know you can mentor other members here at H-M? If not, please check out our Relaunch of Hobby Machinist Mentoring Program!
- Forums
- THE PROJECTS AREA
- PROJECT OF THE DAY --- WHAT DID YOU DO IN YOUR SHOP TODAY?
- Project of the Day Mega-Thread Archives
You are using an out of date browser. It may not display this or other websites correctly.
You should upgrade or use an alternative browser.
You should upgrade or use an alternative browser.
2019 POTD Thread Archive
- Thread starter GoceKU
- Start date


I hope I stay in this home for a while. That is going to be difficult to get out! It's heavy when empty!
Yeah but it’s not in the basement so you have that going for you

I dread ever moving! The house no problem not a lot of clutter. Dam kids stuff would be the bulk of it.
The garage
2.5 cars of organized chaos. There’s stuff in every nook and cranny organized but packed up. I regret not building a four car but had to get approved by village and I was in a rush at the time. I will need a 18 wheel flat bed semi just for the garage. Don’t think about it till time comes and keep on buying till you content. - Joined
- Jul 14, 2017
- Messages
- 2,448
I've been hard at work on the Little Niva, last two days i've been welding, prepping and painting, i focused on the drivers side under wing and wing, started with the rocker panel hole. I made a patch panel from some 1,5 mm steel and welded it in, and gave it a quick coat of primer, then i clean up lower suspension pieces and spray them with anti rust acid, then i started on fixing the bump stop, i cut the bent pieces, and cut a piece of pipe to match the length from the other side, i made sure to weld them in couple passes to be strong, then i moved to the front, i cut and weld a patch panel under the headlight, this completes the welding on this side, so i sprayed a coat of high zinc primer in all rusty arias and let it to dry, today i mix some undercoating, this stuff supposedly is zinc based and stops any rust and doesn't flake off. It took me 4 hours to prep the panel, mix the undercoating and spray it. I put on about 3 coats to add more protection which is probably overkill because i already bought full cover after market plastic wheel liners.


- Joined
- Oct 18, 2016
- Messages
- 2,872
Have you ever considered a new
career in automobile manufacturing?
career in automobile manufacturing?
- Joined
- Mar 2, 2013
- Messages
- 895
Modifying tooling to fit in my mill. My taper 30 tooling does not have a drawback like most, I have indents by the drive pins that accept Allen screws to hold the tooling in.
Two face mills, one 3" one 2". A jacobs chuck holder and one for my boring head. End mills, an adapter for mt3 tooling, and a couple spares not pictured.
The setup I used to do the indents.

Two face mills, one 3" one 2". A jacobs chuck holder and one for my boring head. End mills, an adapter for mt3 tooling, and a couple spares not pictured.
The setup I used to do the indents.
- Joined
- Sep 5, 2013
- Messages
- 3,207
The gun "shoots" wooden bullets
Oh man, that suddenly brought back memories of my failed attempt to build a "firing" 50-cal machine gun when I was a kid, also using wooden bullets although more so of the hand-hewn variety rather than lathe turned. Suffice to say my effort was more project than projectile, likely due to the mismatch of the 3/8" diameter "bore" in the centre of the broomstick barrel. You know how hard it is to drill a broomstick with a (dull) auger bit and hand brace, from both ends to meet in the middle no less!

I'd like to think I'm getting better at execution, but some days......
-frank
- Joined
- Nov 19, 2014
- Messages
- 991
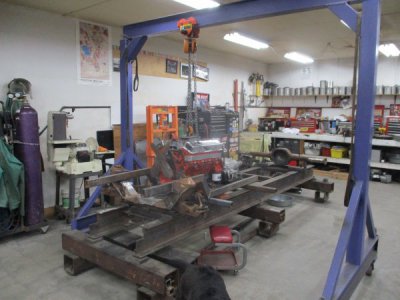
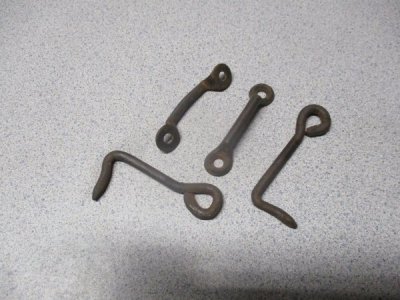
After working on other peoples race cars all winter my son and I finally get to start on his project, a Rat Rod with a 1925 Model T Doctors Coupe body, an early Ford Pinto front end. a 327 Chevy, and an 8" Ford rear end mocked up on our jig. We have almost two months until our local car show and hope to display it as a roller. The hooks and brackets are from the Model T body we just dis-assembled, the hooks look hand made and the brackets look like hot stampings.
Attachments
- Joined
- Jun 17, 2011
- Messages
- 2,062
Bruce, if I had to guess, I'd say that the spring broke on all of those guns from cranking them without any ammo in the mag. When the lower part of the spring hits the cam, the weight of the upper portion is enough to stress the bend, eventually cracking all the way through.