2021 POTD Thread Archive

Nice spider!

Does that spider thread into your spindle or is it attached with set screws?

I am thinking of making a spider, but my threads are a little stripped there.

Can I assume that the purpose of this spider is to maintain control of the stock that you run through the spindle?

It looks like you used brass tipped socket head cap screws. I have seen those on the McMaster/Carr website.
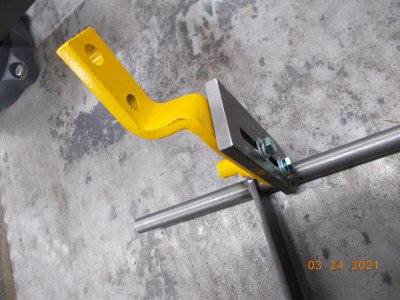
Thanks. It's attached with set screws and yes, it's designed to hold long stock concentric to the spindle bore. I actually drilled out the screws and made my own tips with some 1/4" brass rod...

There are quite a few plans on this site and mine's just a variation (due to the fact I was working with the scraps I had on hand).
 
Today i spent half my day in engine oil, after work i got straight in preparation and installation of the cylinder head, i clean the block check it, then mounted the intake and exhaust manifolds to the head with new gaskets, drop a new head gasket and install the head. Torquing the head bolts was pretty difficult, they are stretch bolts so torque+ degrees. After that come the difficult task of mounting everything else, engine mounts, fuel pipes, and lots more. Then i got to the timing side, i time the engine installed new timing belt, tension it and torque the rest of the pulleys, i also install the cover over the belt. I also need to do the oil pan gasket because i've found some wetness around it and all this work is to stop oil from leaking. No engine start today, but let's hope i have the time to get it started tomorrow.
IMG_20210321_125408.jpgIMG_20210321_183247.jpg
 
A while back I bought a 3/4" torque quench. I saw there was a handle attachment that's extra (not included) to turn it into a breaker bar. I wasn't going to spend $90 on a part I can easily make myself. Total cost was $6. Turned 1" 1045 steel so it slipped inside the tube. Turned down the other end so it would slide onto my handle which is schedule 80 pipe. Welded it up and stuck it back in the lathe to turn the handle down and knurl it. I like knurled handles.
 

Attachments

  • 20210322_174832.jpg
    20210322_174832.jpg
    3.6 MB · Views: 43
  • 20210322_174852.jpg
    20210322_174852.jpg
    3.8 MB · Views: 51
Finished a batch of Lift arms for the hydraulic lift kit to fit narrow frame Cub Cadets as well as a new rock shaft shown w/one mounted.
 

Attachments

  • DSCN8328.JPG
    DSCN8328.JPG
    1.8 MB · Views: 34
  • DSCN8329.JPG
    DSCN8329.JPG
    1.8 MB · Views: 34
  • DSCN8330.JPG
    DSCN8330.JPG
    1.9 MB · Views: 28
Finished a batch of Lift arms for the hydraulic lift kit to fit narrow frame Cub Cadets as well as a new rock shaft shown w/one mounted.

Those look very nice. It looks like you bent the yellow part and then welded the bend's inside. If so, I assume this was for reinforcement? Thanks
 
Yes, had no way of making the two 90*s that close together in that 3/8" bar stock and still incorporate the angle bend as well.
 
Another motorcycle project today: reworking a pair of 52 mm carb adapters to fit a pair of 54 mm air cleaners.

I started by turning a fixture to support the adapters in the lathe and turning down the existing flanges a bit to remove
a lip and clean up the surfaces. A pair of 6061-T6 rings were turned to an OD of a bit more than 54 mm, and an ID
about 3 thou' larger than the adapter OD. The parts were epoxied with JB weld, cleaned up and set aside for 3 days
to cure completely. The the OD's were turned to the final dimensions. The only other task was to create a "bell mouth"
like shape in the adapters, since the lip inside the air filter was .0625 high, and the wall thickness of the modified adapter
was almost .200". This created a huge step, which is disruptive to airflow into the carb. A series of angled cut were
made on the lathe in 10 degree increments, and then everything smoothed out with sandpaper and a sanding sponge. Done.

IMG_1295.jpeg

IMG_1299.jpeg
 
Last few days i've very busy at work i had to grade 2-300 pupils in few days, so my father's car had to wait. Today after work i continued. Started with removing the oil pan, had to remove the alternator and its bracket. The engine is very clean but the oil pan gasket has couple of wet spots, removing the old gasket was very difficult and could not fine a new gasket, so i bought me some kingerit and make me a new gasket. With the oil pan clean refited i assembled everything else, fill it with coolant and oil and fired it up. I did had large diesel fuel leak, o ring gone bad. Quick fix and bleeding the fuel and coolant system the engine is running better then ever, no oil leaks. at this pint i've very dirty so i had to stop, tomorrow i'll take it for a test drive and will continue with fixing the suspension.
IMG_20210323_160550.jpgIMG_20210323_185203.jpgIMG_20210323_160853.jpg
 
I finished the first stage of a stand for my new Tormach 770M cnc mill. Ultimately this is going to be a full enclosure but for now I need to get the machine up and running on its first job. With the exception of the round bar for the leveling feet, all of the steel was given to me for this over the last few years. So thus far total build cost is ~$8
IMG_1948.JPG
 
Back
Top