An Electronic Lead Screw controller using a Teensy 4.1

I am glad to find someone who has a KA-200 scale in hand and can probably answer my question.

I am in the process of adding a DRO to my South Bend 10K lathe and this scale is the only 1um glass scale small enough to use on the cross slide. In reviewing available information I find this statement in the SINO Linear Scale Installation Guide ---- "The cable on the KA-200 reading head is factory installed on the right side. Installation on the left side is available if requested." Every photo on line shows the cable on the right side and this statement leads me to believe that the scale can only be installed with the back side against the machine it's installed on. My installation will require the cable to be on the left side so I emailed the sellers on eBay and AliExpress to ask if they could provide same. They responded that I can just install it with the front side against the machine but I am reluctant to take the risk so I emailed SINO with the question of where can I get one with the cable on the left but have not received any response after a week.

So I am hoping you can answer the question -- "Is there something about the KA-200 that would prevent it being installed the other way around with the cable exiting to the left?"

Thank You for your time!
As a new poster, you may not know that you can post your own thread in an appropriate place. I think you'd get a lot more visibility if you posted it in a more general area as opposed to my thread on my home made electronic lead screw.

That being said, I can't think of any reason why one couldn't flip the installation of the whole DRO scale. Worst case, you'd have to come up with a spacer or holder for the read head, but you have to do that anyways. For the most part there's no rules when you fab your own stuff, but it's your responsibility to get it to fit... Good luck with your endeavors, hope to see your work in a thread of your own.
 
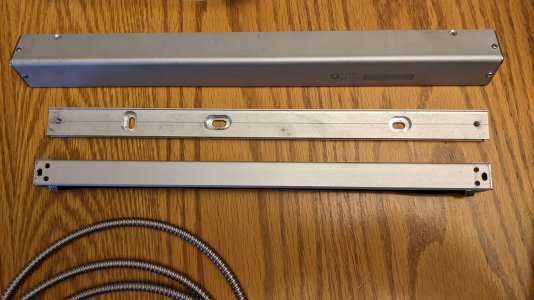
@SeattleJack - Happy to follow this conversation in a dedicated thread if you'd like. As @WobblyHand mentioned i think the scales could be flipped easily from end to end to allow the cable to be on either side of the read head. The KA-200 is nice as you mount a back plate and the scales mounts to the back plate along with the cover.

PXL_20230927_230241814.jpg

You might not hear back from them right away as i think it's a national holiday over there currently.
 
The other day I had a motor stall when threading a metric inside thread 0.7mm pitch in a carbon fiber tube. Took me a while to figure out what happened. I don't like the fact that there's no feedback to either the controller or the operator, so I will make some modifications. I was doing a right hand thread with a left hand tool with the lathe in reverse. Basically the Joe Pie method, which takes all the drama out of inside threading.

That being said, the error was simply reset by power cycling the stepper motor driver. But I think I'll be adding some feedback of some sort. Maybe I'll use a bigger gear ratio as well. Hmm, need to dust off the cobwebs in my head and go through my notes. Currently using the same number of cogs on both pulleys.

What caused the stall? I inadvertently moved the tool further than the thread groove and started threading outwards. It tried to cut and the closed loop stepper stalled. I noticed something odd, perhaps the wrong sound, and killed the lathe power. Retracted the tool and tried threading and saw the lead screw wasn't moving. I've never stalled before, even when threading steel at 4 TPI, so it doesn't happen often.

Think I will add an input to the controller. It will be the error (fault) output of the stepper motor driver. If nothing else, I'll have an idiot light. The motor driver has the light, but I can't see it because it's in a box along with the power supply.
 
Does your stepper controller have an alarm output? Mine does and i've thought of wiring up an LED to it. I've not had too many stalling issues after i first changed the gear ratios of the pulleys and also i was using gear oil in the gearbox but after carefully reading the manual it calls for a ISO 68 (hydraulic oil) which reduced the drag on the system. I suppose the other thing i did was got some time on with the ELS so i knew what the lathe could handle without stalling which counts for something. I do like the idea of it stalling the stepper instead of crashing the lathe but i will admit it sometimes takes a few seconds to figure out what's going on.

You added code for the gearing i did on my lathe vs yours - LS_TPI8 or LS_TPI12 so i think some of the work has already been done for changing the stepper gearing. I do believe when we had discussed that you had mentioned that you couldn't do a 48:96 gear for either room or availability.

The ELS does great and i don't regret one bit the time and resources spent to get it. Would love to be able to thread to a stop but i haven't really looked at that code in months as work and family commitments took over.
My driver has an alarm output but I haven't tried wiring it up. As I recall the diagram was ambiguous and or wrong. I'll have to look at it and play with it.

I don't even remember what gears I have on the drive pulley, but that's easy enough to determine. Changing gear ratios in SW is easy, getting the right pulley takes longer.

I posted about this stall primarily because it was my first one in anger. I've had my ELS in full operation for over a year. I don't actually have to fix anything, but I will end up doing it because it annoys me not to have any indication.
 
IMO, threading / turning to a stop is virtually an essential feature. It increases the usability, not to mention the safety, of an ELS by a huge amount. For one thing, the main reason threading operations take so long is the spindle speed must be reduced to the point where one is secure in knowing one can stop the spindle before something unwanted - even catastrophic - happens. With a reliable stop feature, the lathe can be run once again at speeds and feeds concomitant with the material and tool specifications. The sphincter factor is also vastly reduced, which is saying something. OF course, this is much more of an issue for rookie operators, but even with my somewhat more advanced years of experience, I still am a bit anxious when threading, especially since my lathe does not have a threading dial. OF course, even if it did, it would make no difference when doing a hybrid operation, and most of mine are, since my lathe is metric, but most of the single-point threading I do is imperial.

Certainly you should do whatever you feel is best for your own system, but I know the number one criticism I have of my lathe, other than the lousy tail stock, is the lack of a stop feature on my ELS.
If I recall, the reason I didn't initially implement this, was it required me to interface with my VFD on my lathe, and I didn't want to deal with it for multiple reasons. Some of those reasons in retrospect weren't valid.

I still want to do this thread to a stop, but I need to carve out time to pull this off. I know the spindle angle, at least with reference to the "power on" angle. I know the carriage Z, and I know X via the integrated DRO's. I don't know the compound position, nor it's angle, but I suppose one could work around that. I can infer the stepper angle, from its initial angle, by counting pulses both positive and negative assuming the stepper hasn't error-ed out.

So this is a round tuit. I will get to it, but I don't know when. Maybe in the winter.

In the interim, for those sphincter threading jobs, I am using a left hand tool, reversing the spindle, and threading away from the chuck. I have done this before, so I can keep doing it. I borrowed a left hand tool to thread a back plate for my ER40 chuck. The thread was 1-1/8 x 8. I didn't have the confidence to thread that conventionally. With the left hand tool it was easy.

Today, I just bought a Micro100 left hand carbide threading tool so I can do an M8x1 internal thread. At least with the back plate I could see what I was doing. With a 7mm hole and an 8mm thread, and no auto-stop or brake on my lathe, I am not willing to risk a right hand Micro100 bar. If you look at them wrong (just joking) they will break. They are really nice and work well, but don't tolerate getting smacked. So a left hand tool will work for me. I know I can flip the RH tool over and adjust the height, but I'd rather just add the LH tool to my arsenal. Got a decent deal on it on eBay, so can't complain.

Although my chuck is threaded, my lathe has features on the spindle to clamp the back plate to the spindle. Despite my "reverse" threading, I have never had my chuck come loose. Yours may be different.
 
If I recall, the reason I didn't initially implement this, was it required me to interface with my VFD on my lathe
I don't see why. There is no reason to stop the spindle or even slow it down. The spindle can keep going at a constant rate throughout the operation. Indeed, to my eye it is preferable. The only advantage, if it is one, to stopping the spindle along with the lead screw is the thread will continue all the way to the shoulder, rather than stopping 1/2 thread width away. I can't think of any realistic situation where that would make a difference. Even some sort of measuring device - like a micrometer - should be able to deal with the thread stopping 1/2 thread width short of the stop. In many cases, it may be preferable as a chip catcher, allowing small bits of dirt, grit, or swarf to automatically clear from the threads.
, and I didn't want to deal with it for multiple reasons. Some of those reasons in retrospect weren't valid.
We live and learn.
I still want to do this thread to a stop, but I need to carve out time to pull this off. I know the spindle angle, at least with reference to the "power on" angle.
Well, the important number is the position of the spindle when the last pulse is sent to the stepper / servo motor, and capturing that is trivial. The "power on" angle, by which I take it you mean when the lead screw is started is of course directly related. but the last pulse value is already right there in the spindle position register. Unless you want things to get much more complicated, the half nut must remain engaged, although if the thread is hybrid (metric thread with imperial lead screw or vice-versa}, then this is true anyway. As long as this is the case, the controller knows the position of the carriage and can easily calculate the required angle for the spindle at the new carriage position. One must in any case withdraw the tool - probably using the cross feed - before using the controller to drive the lead screw back to the starting position. Doing this programmatically is pretty slick, but doing it manually by pressing and holding a button on the controller is perfectly acceptable. At that point, the cross slide gets moved back in to the zero position, the compound is advanced by a few thousandths, and a button gets pressed on the controller. The controller waits for the spindle to come around to the calculated position, and then starts sending pulses to the lead screw motor again. The spindle can keep turning the entire time. 'No reason not to.

I know the carriage Z, and I know X via the integrated DRO's. I don't know the compound position, nor it's angle, but I suppose one could work around that. I can infer the stepper angle, from its initial angle, by counting pulses both positive and negative assuming the stepper hasn't error-ed out.
Well, in threading, one usually sets the cross slide to zero, withdraws it, and then returns to zero on every pass, and handles the advancement of the tool at the correct angle to be done by the compound. It's not mandatory, but otherwise the calculations get really, really tricky. Not only that, but while the process gets somewhat more automatic with the ELS, it also gets far, far more complex. It's much easier just to ignore the X value and assume it will be managed by the operator. An ELS is not really a CNC, and IMO trying to mange the X coordinate with the ELS is pushing the problems too much into the realm of CNC. Again, if you want to do this, I certainly have no cause to try to stop you, but IMO the marginal gain is not worth the time and effort, or especially the development headaches.

In the interim, for those sphincter threading jobs, I am using a left hand tool, reversing the spindle, and threading away from the chuck.
There is nothing wrong with doing it that way, although it gets trickier with an internal thread to a shoulder. Even with an ELS stop, there is nothing wrong with inverse threading. With the ELS, however, there is no reason to reverse the spindle. With a geared threading system, unless one can disengage the half nut, there is no choice, but the ELS is not hard-linked to the spindle rotation. The controller can very happily drive the carriage any way it wants, reversing the carriage direction at will. I definitely suggest letting the electronics do the work, and leave the spindle drive motor alone. KISS, I say.
Although my chuck is threaded, my lathe has features on the spindle to clamp the back plate to the spindle. Despite my "reverse" threading, I have never had my chuck come loose. Yours may be different.

Well, mine is not, but given the fact for you, it is just one more reason not to reverse the motor, or even stop it. Stopping the motorwhen reversing at high speed can shift the chuck position. Some motors also have diffferent speed and torque profiles when running in reverse.

Of course, turning to a shoulder is even easier. It works just the same way, except it doesn't matter at all what the spindle position is.
 
Last edited:
After a bit of a hiatus, I have come back to looking at this again. First main hurdle was to basically figure out how it works again. Funny how your mind is flushed after dealing with life's issues...

I previously had created a new branch for my code using git. So I can play without screwing up the main branch - which is perfectly functional. The repository is up to date.

Looking through the code, found that I used a proxy for the stepper motor being enabled, rather than using the control signal itself. Pondering over this, it was a dumb decision that I thought would have no consequence. So I spent the morning changing the code to the more direct method. During testing, found a couple of places that I had missed, but it seems the dependency is removed now. This allows the encoder to be active at all times (if desired). Technically, I know the position of the spindle and stepper at all times. The stepper has no external encoder for me to read, unfortunately, but it does have an alarm bit, which I have yet to wire up.

Next, I enabled reading the new Spcl Fcn button on the main menu. This allowed me to create a new menu/display for the special functions themselves. I now have three ugly buttons in the wrong place, with crazy colors. Each button is active, meaning if I press the screen and the touch is within the button, a flag is set "this_button_is_touched". Lastly, I implemented stub routines to go the the function indicated by the button. This was driven by the state machine. At the moment, all that happens is a return to the main screen, and a serial debug message to the console confirming everything is as expected.

This has all been tested at my bench board, which is an exact duplicate of what is at my lathe. There was some advantage to making all those PCB's. Anyways, managed to start development again. Was worried I wouldn't ever get back to it.

I think I will start with feed to stop, simply because it is far easier, but it allows me to get my feet wet again. With something like this, I need to think about a supervisory function - something that guards against say a DRO failure. If the DRO fails to update and we are feeding, bad things could follow. This is not the only thing that could go bad, but at least it starts the process of thinking about issues as this.

Perhaps one could test DRO change (specifically Z) with steps of the stepper. If the change is not within a valid window trigger a fault and kill the stepper movement. I'll have to think of something like that this afternoon. It's actually not that easy since we don't know if the half nut is engaged or not. There's no sensor or switch on that half nut.
 
Back
Top