-
Welcome back Guest! Did you know you can mentor other members here at H-M? If not, please check out our Relaunch of Hobby Machinist Mentoring Program!
You are using an out of date browser. It may not display this or other websites correctly.
You should upgrade or use an alternative browser.
You should upgrade or use an alternative browser.
An Electronic Lead Screw controller using a Teensy 4.1
- Thread starter WobblyHand
- Start date
- Joined
- Dec 18, 2019
- Messages
- 6,449
Making a clamp turned out being a bigger PIA than I wanted. The dimensions are small and I'm not that good of a machinist. I didn't come up with a design that looked ok - and I could make. Due to a system update issue, FreeCAD was inop a day, adding to the frustration. Couldn't open the app, or view any of my CAD files. That all got resolved this morning.
So, I stripped off the steel wire (which was on there really tightly) and butted the flange and connector together and used some self fusing rubber tape. The rubber is stretchy and went into the narrower diameter parts with ease. In a day or two all of the rubber will fuse together and form a solid seal. Good enough for now. If I have to revisit it, then I will make a real clamp.
While I was in the shop, fooling around with tape, I clamped a 123 block to my saddle and sandwiched a second 123 block between the first one and the cross slide. I set the cross slide to zero. Then I removed the 123 block and turned the cross slide until it firmly touched the clamped 123 block. The X DRO measured 2.0000", or the length of the 123 block. (I had previously measured it.) The basic calibration factor I used seems to be fine. I suppose I should do this test with a DTI, for confirmation, but things seem pretty close.
The only disappointment is, I am missing about 3/16" of outwards travel on the scale. I'm not quite sure how that happened. Seemed to have made a mistake along the way, I guess. First time I've done anything like fitting DRO's, so I am grateful it is at least close.
Still, it's worlds better being able to measure to the 1um or 0.00004" than what I had before which was 0.001". Whether it matters in practice, we shall see. The DRO scale won't replace a micrometer - that's for sure.
- Joined
- Dec 18, 2019
- Messages
- 6,449
Z axis from Ditron arrived, 7 days after placing the order. The order was a custom length too! Very nice. Just tested it and it seems to work ok. I ordered and received a 1 um scale. This scale is quite hefty compared to my other tries. I will make it work. Quite surprised it came in so quickly. Today, I was wondering when it might arrive and checked, and it said today! Sure enough, they were right. So it's back down in the shop for me to ponder a way to mount this.
- Joined
- Dec 18, 2019
- Messages
- 6,449
Updated code to support diameter reduction dials on the X axis. Also support some gearing ratios from the stepper to the lead screw, for increasing the torque.
Still fooling around with the Z scale. At least it is the right length. I will need to move the lathe to get access to the back side. Can't quite get in there to do what I need to do. This is tougher than one would think due to the tight shop and crappy floor. If I had another foot of space, I could get in there, but that stone basement wall doesn't look like it wants to move. Looking forward to the Z being installed, but not the re-leveling of the lathe. The things we do...
Still fooling around with the Z scale. At least it is the right length. I will need to move the lathe to get access to the back side. Can't quite get in there to do what I need to do. This is tougher than one would think due to the tight shop and crappy floor. If I had another foot of space, I could get in there, but that stone basement wall doesn't look like it wants to move.
 Looking forward to the Z being installed, but not the re-leveling of the lathe. The things we do...
- Joined
- Dec 18, 2019
- Messages
- 6,449
Still fooling around trying to fit up a bracket. The mounting surface on the back of the saddle is tilted, roughly 4 degrees. Think it is a casting draft angle to get the cast iron out of the mold. This tilts my bracket and consequently the read head too much. Basically it is off by a 2 mm or so, due to the tilt. I will print a bracket that has the extra 2mm and the tilt built into the surface. It looks like this.
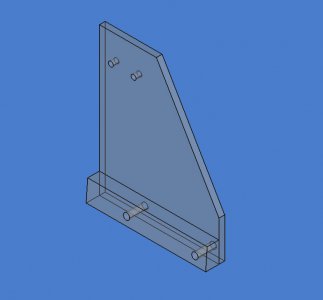
This is my third iteration. I can't get behind the lathe to measure things very well, so it's been pseudo measure/approximate and refine the design with each try. Second iteration was ok, except for the tilt of the head. Hoping the third try is the one... Printed in draft mode, 0.3mm layers, adaptive cubic 20% fill, and 4 perimeters in black PETG. Black filament photographs terribly, but doesn't stick out on a machine, like red does... Should be about a 2 hour print time. Have about 10 more minutes to go!

This is my third iteration. I can't get behind the lathe to measure things very well, so it's been pseudo measure/approximate and refine the design with each try. Second iteration was ok, except for the tilt of the head. Hoping the third try is the one... Printed in draft mode, 0.3mm layers, adaptive cubic 20% fill, and 4 perimeters in black PETG. Black filament photographs terribly, but doesn't stick out on a machine, like red does... Should be about a 2 hour print time. Have about 10 more minutes to go!
- Joined
- Dec 18, 2019
- Messages
- 6,449
Well, embarrassed to say, it took five iterations of that bracket. Put in some reinforcing ribs in the large expanse to avoid twisting, and had to make some height adjustments to avoid the rear saddle adjustments. The 5mm thickness was insufficient to avoid flexing. The small angle at the bottom tends to push the read head flush against the lathe, which is what I want.
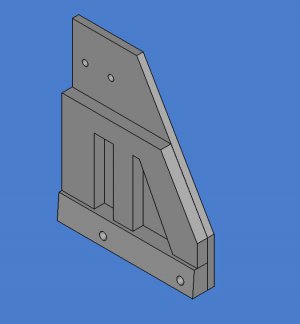
Just drilled the holes in the lathe to mount up the scale. Rather I reused one hole, because of the difficulty of getting to that location, and drilled one hole where I had better access. DRO reads to the point the saddle hits the headstock and about 21.5" back. It could be an inch longer, but I was afraid of hitting the backsplash. Still need to fit up the back splash, but I need to extend the mounting tabs by the head stock.
Used a dial indicator to make the scale level with respect to the cross slide, it is within 0.001". I was surprised at the fact I got it so level with only a couple of tries. So the 1um Ditron glass scale is installed. Now to cut off the DB-9 and install a GX12-4 connector to match up with my ELS controller. Before I do that, I will open up the connector and check that the wire colors match the factory documentation!
- Joined
- Dec 18, 2019
- Messages
- 6,449
Got the connector the first try, which is gratifying. Taped it up and everything works.  Next week I will tackle the sheet metal for the back splash. I will see if I can spot weld on some longer tabs at the head stock end. Plan is to use some sort of spacer at the rear. Not sure if I can butt spot weld the tabs on, but that is what I am going to try.
- Joined
- Dec 18, 2019
- Messages
- 6,449
After reflection, that idea sounds like trouble. Instead I have cut two pieces of 1-1/4" x 1/8" stock to roughly 7" and 7-7/16" long. These dimensions are 1" longer than the original sheet metal dimensions. Then I will mill a slotted hole near the end. The bars will be spot welded to the sheet metal in various places. On one of the bars I may have to mill a relief for the folded sheet metal along the top edge. Overall this will be a lot stronger solution. For the back support, I will simply make a 1" spacer.
Right now the metal is sitting in rust remover. This piece of scrap has been around a long time.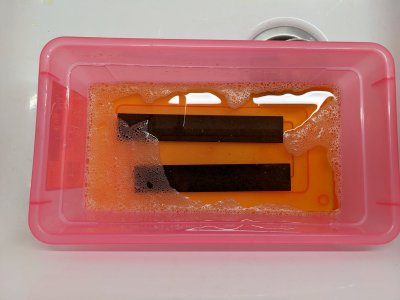
I'll make the spacer now, while it's derusting.
Right now the metal is sitting in rust remover. This piece of scrap has been around a long time.

I'll make the spacer now, while it's derusting.
- Joined
- Dec 18, 2019
- Messages
- 6,449
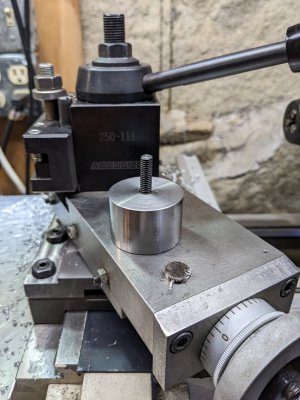
Made the spacer from some 1.5" diameter 1045 rod. Cut to about 1.1" and faced to around an inch. Drilled a 1/4" hole in it. Scrounging for a 35 mm M6 bolt yielded nothing. Looking some more in the materials area revealed some 6mm threaded rod. So I cut off a piece to about 45mm and cleaned up the ends in the lathe. So the spacer and stud are done. This will space the back splash out 1" from the ways. Having a stud in the hole is kind of nice, because you can rest the back splash on the stud while you are messing with the other end.

- Joined
- Dec 18, 2019
- Messages
- 6,449
There was an hour where it wasn't raining, or looking like it was raining, so I mowed the lawn for the first time this season. Grass was high in some areas.
While I was in the garage, I found the spot welder. Not sure if this spot welder is any good. But I do know that I tried it on rusty scrap material, and nothing happened. The transformer hummed louder when I pressed the momentary switch, so maybe it is trying to work. There was no weld whatsoever with the sample I tried. It's only a 115V spot welder, so it's not that powerful, or my materials were too thick.
Think I will take the metal strips out of the "tank" and simply wire wheel them until they are shiny. Need to do that for the weld to be successful, pretty much for any process. I really should have done that in the beginning. Have to also wire wheel the back splash on both sides of the joint. I haven't found any scrap of the same dimensions to practice on yet, which is a bit concerning. Usually like to practice on something similar. Think I will try to find something that is sort of close.

