The ones I have are high end hole saws, they look very similar to the annular cutter. I used it in the lathe so it was quite rigid. They do not appear to be properly relieved for thick curved PVC. Probably be fine on thin material. I'll have to try a real annular cutter sometime.
-
Welcome back Guest! Did you know you can mentor other members here at H-M? If not, please check out our Relaunch of Hobby Machinist Mentoring Program!
You are using an out of date browser. It may not display this or other websites correctly.
You should upgrade or use an alternative browser.
You should upgrade or use an alternative browser.
An Electronic Lead Screw controller using a Teensy 4.1
- Thread starter WobblyHand
- Start date
- Joined
- Dec 18, 2019
- Messages
- 6,469
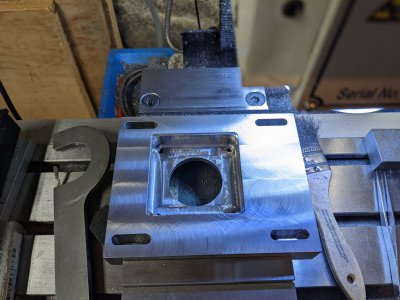
Well despite the awful hole saw, made some additional progress. Hogged out most of the hole in the back for the stepper. In a bit of foresight, or perhaps a little CYA, I lightly milled out the outline of the pocket with a 1/4" end mill just 1mm deep. This acted as a visual outline to follow. Then I switched to a radiused 1/2" end mill and proceeded to excavate the hole. Eventually the hole was deep enough that the threaded holes were exposed, per the plan in my head. Hogged the pocket to a depth of 15mm. I need to go to 16mm.
I switched to a 1/4" end mill to do the rest and set things up to start at the corner of the pocket - according to the DRO. Something looked funny. The Y axis looked ok, the X was off. Then I moved the table to 0.000. Hmm, that's not right! The work piece had shifted to the right in the vise by over 3mm! Decided to quit for the day. Since I made that initial outline, as a guide, the actual milling isn't far off. But I had a giant X offset, due to the aggressive hacking out material.

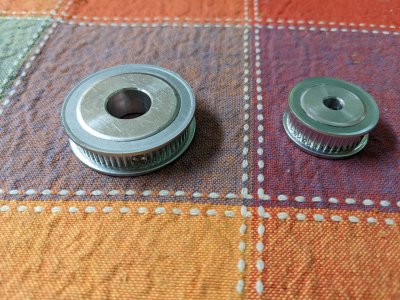
Strangely enough, my 2M pulleys arrived today. They are cute little things. They arrived early. Thought I had ordered two of each, apparently not. The 14mm 60T is a good fit to a 14mm shaft. I will have to cut a key way in the 14mm bores, so they don't rotate. My lathe has keys on those shafts. Plan to cut the key ways on the lathe.

I switched to a 1/4" end mill to do the rest and set things up to start at the corner of the pocket - according to the DRO. Something looked funny. The Y axis looked ok, the X was off. Then I moved the table to 0.000. Hmm, that's not right! The work piece had shifted to the right in the vise by over 3mm! Decided to quit for the day. Since I made that initial outline, as a guide, the actual milling isn't far off. But I had a giant X offset, due to the aggressive hacking out material.

Strangely enough, my 2M pulleys arrived today. They are cute little things. They arrived early. Thought I had ordered two of each, apparently not. The 14mm 60T is a good fit to a 14mm shaft. I will have to cut a key way in the 14mm bores, so they don't rotate. My lathe has keys on those shafts. Plan to cut the key ways on the lathe.

- Joined
- Dec 18, 2019
- Messages
- 6,469
Wouldn't you know it. I do have a 1.25" annular cutter! Should have used it! It has a 3/4 shank that has a hole through it, probably to help eject the slug. Oh, well, I'll use it next time I have to make a hole like that.
The Morse hole saws have some of the cheesiest paint on them. The cutting oil attached the paint and bubbled it. I will have to strip the paint because it is tacky and horrid to touch.
The Morse hole saws have some of the cheesiest paint on them. The cutting oil attached the paint and bubbled it. I will have to strip the paint because it is tacky and horrid to touch.
- Joined
- Dec 18, 2019
- Messages
- 6,469
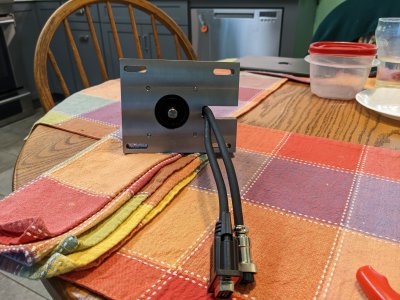
Well got through the last of the adapter plate for the stepper motor. Cut out the big u slot for the cord. Came out ok. Actually, I'm really pleased with this. I literally sweated over this one. Was worried about ruining it, or breaking a carbide end mill. To counteract any walking of the piece in the vise, I used a stop against the piece. Then I removed about 16mm out of 20mm thickness, using a 1/2" end mill, a few millimeters at a time. Decided not to break through into the pocket, to give a little extra strength to the piece. Then used a 1/4" end mill to get to final dimensions of the slot (except for that extra bit I added), leaving the 4mm thick bridge at the edge of the piece. Was worried the piece might get a little floppy on me. Once the bulk of the slot was formed, I cut the bridge and trimmed the ends to the correct width.
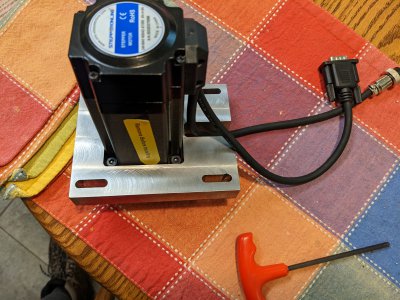
Here is the motor installed in the bracket. The bracket is approximately 4" x 5" x 13/16" (100.3 x 127 x 20). It is pretty hefty still.


I'm so happy that the screws lined up. You have to finagle them a little to start, but they go in correctly. Quite a few ways to go wrong. Almost did, but pulled it off. Hot diggity Haven't made anything like this before. Would have been impossible without machines. Quite enabling to have a shop!
Think I will take a break for a couple of hours. My wife needs IT support for something... Need a rest from machining.
Here is the motor installed in the bracket. The bracket is approximately 4" x 5" x 13/16" (100.3 x 127 x 20). It is pretty hefty still.


I'm so happy that the screws lined up. You have to finagle them a little to start, but they go in correctly. Quite a few ways to go wrong. Almost did, but pulled it off. Hot diggity
 Haven't made anything like this before. Would have been impossible without machines. Quite enabling to have a shop!
Think I will take a break for a couple of hours. My wife needs IT support for something... Need a rest from machining.
- Joined
- Dec 18, 2019
- Messages
- 6,469
Ran into a snag on the pulleys. Tried to broach a timing pulley on the lathe but, the chuck couldn't hold it by the steel edges. Pulley kept popping out of the jaws. Might have to spring for a small broaching kit. Would be good to know if I could broach a 14mm bore aluminum pulley with a 5mm broach using a 3 ton arbor press. Don't want to buy the kit, if my 3 ton isn't up to the task. I have to broach two pulleys. The import broaching kit is about $230, so I'd rather not buy it if it won't work for me. Domestic kits are 4-5X the price. (Rather spend the $$ on other stuff!) If my 3T is good enough for this sort of thing, guess I will get the kit.
- Joined
- Feb 1, 2015
- Messages
- 9,633
Wrap a strip of aluminum or copper around the pulley cogs to bring the diameter above that of the edges. 1/16" should do it.Ran into a snag on the pulleys. Tried to broach a timing pulley on the lathe but, the chuck couldn't hold it by the steel edges. Pulley kept popping out of the jaws. Might have to spring for a small broaching kit. Would be good to know if I could broach a 14mm bore aluminum pulley with a 5mm broach using a 3 ton arbor press. Don't want to buy the kit, if my 3 ton isn't up to the task. I have to broach two pulleys. The import broaching kit is about $230, so I'd rather not buy it if it won't work for me. Domestic kits are 4-5X the price. (Rather spend the $$ on other stuff!) If my 3T is good enough for this sort of thing, guess I will get the kit.
- Joined
- Dec 18, 2019
- Messages
- 6,469
That's a great idea! Thanks for the suggestion.Wrap a strip of aluminum or copper around the pulley cogs to bring the diameter above that of the edges. 1/16" should do it.
Think I will get the broach kit anyways, my 3 ton arbor press has enough reach for the broaches to fit. Not going to lie, I find broaching on the lathe to be terrible, especially on steel. Find it difficult to get it set up correctly and the proper width. Might be trading one set of woes for another, but think I will buy the broach set.
I have a bit of programming to do still while I wait for the broaches. Seems that I left out the control to reverse! Also need to work on stepper acceleration. And think about incorporating DRO data. Lots to think about.

