Another 10" Logan Project + A Question

MORE PROGRESS:


I've sorted the problem I had with the front gib so the carriage is installed and the gibs adjusted up. When I slide the carriage along the ways, the effort required doesn't change much as it gets
close to the headstock: more evidence that my ways aren't too badly worn. I'm also enjoying the completely slop-free cross feed now that the new shaft and nut are installed.

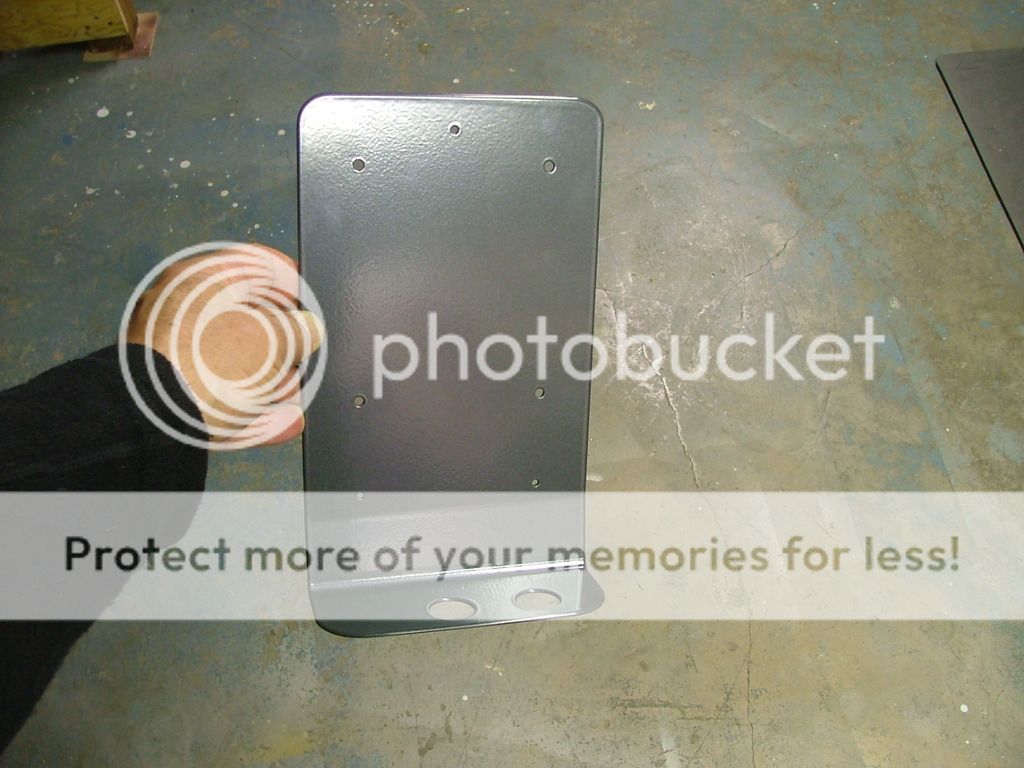
Also installed the belt guard. When the eBay sourced bench stand arrived, it didn't have one of the holes required for mounting the belt guard so it was mounted in place, marked and removed for
drilling. With a jobber length drill, there wasn't enough room in my bench style DP with the table all the way down. A screw machine length drill did the job (just). Might need to give some thought
to a bigger drill press at some point!

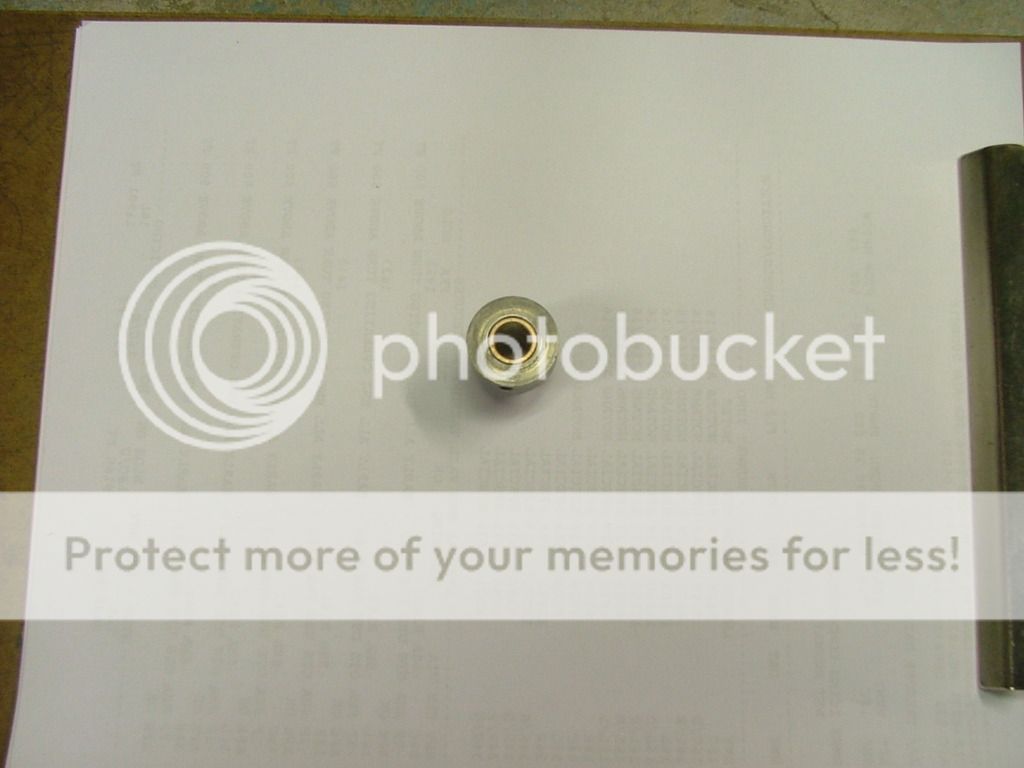
Went ahead and pressed a new bronze bushing in for the compound: the old one was badly worn. The steel bush that it presses into is an inch long, but the original bushing was only .5"
in length. To give it more support, I bought a part .750 long. Popped the bushing into the freezer, and, when my wife wasn't looking, heated the steel part up in the toaster oven before pressing them together. The bushing is McMaster Carr part number 6391K176.


All that was left on the carriage was to was to re-assemble the compound and add the QCTP.

 
Last edited:
APRON ASSEMBLY:

The pile of parts on the workbench is shrinking as the number of bits on the lathe increases. Assembled the apron this evening after cleaning up the parts and pressing new bushings
into the idler shift gear and the bracket that supports the miter gear. The lower half nut showed more wear than the upper, so they were reversed. The assembly that supports them, which
is riveted together, was loose, so I peened the rivets before assembling them. The only difficulty experienced was assembling the miter gear bracket. Secured with a bolt that passes
through the apron, the bracketed miter gear engages the the LA-188 miter gear. Aligning them was difficult. As many times as I tried, I couldn't adjust them properly. Each time I
tried to tighten the bolt, the bracket would rotate, jamming the gears. It also seemed as though it needed a shim between the bracket and the back side of the apron, even though it didn't
have one when it came apart. (The new bushing may have changed the clearance.). The problem was solved when I remembered a trick for keeping a tool post from rotating: a piece of brown
paper bag between the parts. After slipping a piece between the apron and the bracket, it adjusted up perfectly on the first try!

This pic shows the location of the brown paper "shim".


And the result:

 
Last edited:
JUST ABOUT THERE:


The change gear/lead screw assembly was next in line for the solvent tank. I optimistically figured I'd clean it all up and have it on the lathe in one night: naturally, it didn't work out that way. Taking it
apart showed that several pieces were missing and a bent bolt needed replacement. A trip to the hardware store and another call to Logan solved those problems and it went together this afternoon. My
stack of change gears is almost complete: only one gear is missing, so I'll keep an eye out on eBay for a replacement. Also sourced a used Mitsubishi VFD off eBay as well: I went with a larger capacity unit
so that it can be used in the future with a bigger motor if needed. This one is good for 5 amps, while the motor on the Logan is rated at 1.7.


All that's left is to finish up assembly of the drive box and wire it up. Looking forward to making some chips with this thing, instead of just working on it!
 
Last edited:
Looking very nice. What gear(s) are you looking for? I have a couple extras that I did not let go with my old lathe.
 
Looking very nice. What gear(s) are you looking for? I have a couple extras that I did not let go with my old lathe.

The only one missing is a 36 tooth change gear. If you happen to have one in good shape that you'll let go, please PM me.
 
Last edited:
I just went out and checked, I only have a 48, 56, & 72 that were extras.
 
So, yours is an 11 inch? Looks like it was built in 1967.
Not sure its 11" dont think they made the in the small diameter headstock. Most 11" models I know of have the 2 1/4 -8 thread , and 5 c collets fit them also. Oh I have one of the jacob headstock chucks with the 1 1/2" -8 threads. Pretty sure its a 20 n size so 1" is the largest dia. I now have taps and dies for both . Ill be making adaptors for the two sizes to fit my logan. Should make it easier then single pointing to a corner or under cut.
Nice job on your lathe she,ll be like brand new. If I ever get my butt in gear I really should do mine . Shes done tons of work and deserves whole new life for another fifty years. I really like the paint job and color. It fits so much better then blue like a 64 buick. Nice job be proud you deserve it.
 
Hmmm... The list of of lathes at http://www.lathe.com/models.htm indicates that a Model 1937 is an 11" lathe with the large spindle bore. And you're right, the 10's and 9's had the 1 1/2-8 threads.


Thanks for the comments. This lathe turned out to be a lot more work (and $$$) than I anticipated, and if I had known I probably would have held out for a different machine. But, in this area
they don't come up all that often and I wanted a Logan, so it's all good.
 
Last edited:
Bent up and painted a simple backsplash from sheet steel to keep some of the oil and chips off the floor. It's held with screws to the rim of the chip pan at the bottom, and
rubber mounted at the top.


Also made a bracket for the VFD to mount to the foundation wall next to the breaker box. The holes at the bottom are for standard electrical fittings:
a strain relief for the power cord on the input side, and flex conduit for the wires to the lathe.
DSCF7178_zps0qdl68vu.jpg
 
Last edited:
Back
Top