ARC-170's Craftsman 101.07403 lathe restoration thread

45. BOLTING THE LATHE BENCH TO THE FLOOR
I will get enough shims to make big enough ones that will fit under the brackets and bench legs. Thanks!

47. TAILSTOCK ALIGNMENT
c. Will this steady rest work with my lathe:
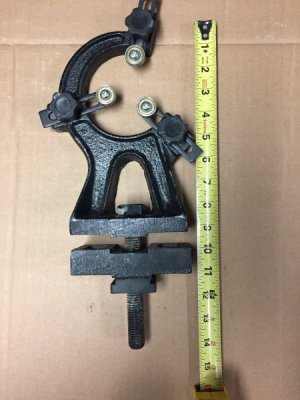
steady rest pic 1.jpg
There is about 2 3/4" between the gap in the ways, the ways are 1 1/2" wide each and the overall outside width of the ways is 5 3/4". I have flat ways.

d. I don't have any type of face plate. I'll put it on the list. I have a non-tapered center and a live center that fits in the tail stock. I also have 2 lathe dogs.

e. I may try all the methods I've researched and see how they compare.
 
The steady rest appears to be about the right height. But you will need to add a block that will just fit between your ways and somehow lock it to the bottom of the base of the steady rest casting. And the clamp block may be too long to fit below the ways. The clamp block from Atlas is the same as the clamp under the tailstock. I have seen them on eBay pretty cheap..
 
45. BOLTING THE LATHE BENCH TO THE FLOOR
Got the shim pieces. I also got some flat bar to use as "X" bracing on the back.

47 c. STEADY REST FOR TAILSTOCK ALIGNMENT
The steady rest appears to be about the right height. But you will need to add a block that will just fit between your ways and somehow lock it to the bottom of the base of the steady rest casting. And the clamp block may be too long to fit below the ways. The clamp block from Atlas is the same as the clamp under the tailstock. I have seen them on eBay pretty cheap..

I bought the tailstock pictured. It will work just fine, but I need to make a clamp for it. The bolt it came with was an M18-2.5 about 140mm long. This is too long; it will hit the cross-members on the bed. A 3/4-10 x 2" long Grade 8 bolt will fit. I just need to mill a block the right size with a tapped hole in it. I'm trying to borrow a tap and drill for this hole. Stay tuned.
 
Hello all! It's been awhile. I was busy with work (school started). Here's the latest:

45. LEVELING THE LATHE
Lathe is bolted to the workbench (with a sheet metal tray I made between the lathe and the table top) and the workbench is bolted to the floor. The machinist's level came in handy. I had a hard time getting it "calibrated". Sounds easy, but it practice it was VERY sensitive.
I can still flex the lathe a little, though, by pushing hard on the table top. I figured I'm not good enough yet for that to matter, but we'll see how much it makes a difference.
What do I gotta do to get this thing bolted tight with NO flex? Probably get a different table, right?

46. HEADSTOCK ALIGNMENT
I needed to learn more about sharpening bits so I'd have some sharp bits to cut with while I did this, so I got another grinder on CL and have been attempting to grind bits. In the meantime, I found a whole bunch of carbide cutters and decided to use those for now.
I chucked up a 0.75" diameter steel (not sure of type) rod in the 3-jaw chuck and was able to turn within 0.002" over 5", with the smaller end at the tailstock end. I took VERY light cuts. Not great, but I can flex the table by pushing on it and move the part in the chuck 0.001" or so.
This would mean the right front of the lathe is a little low, correct? I only have 3 bolts holding the lathe down. There is one bolt on the tailstock side, so I guess I could shim under the lathe bed foot.
It would be nice to have leveling feet.

47. STEADY REST: TAILSTOCK ALIGNMENT
c. I made a clamp block. I borrowed the tap and drill for the hole. It barely fit in my mill! :). The only issue I still have is the steady rest is just a tad too wide for the space between the carriage. I may shave it down.

f. I need to get a bigger lathe dog in order to make the rod for the alignment. Or a smaller rod, but I think a bigger rod would be more accurate.
 
47. TAILSTOCK ALIGNMENT
f. I got a bigger lathe dog and a 1" aluminum rod.

g. I had to move the tailstock 0.004" in the fore/aft direction (the up/down was on the money!) and it's now within 0.001" over 7.5". I can move it about 0.001-0.002" when I tighten the tailstock nut. I made sure to tighten the screws on the tailstock, so I'm not sure where the slight movement comes from. I pushed down on the table to see if I could move the needle on the dial indicator and it didn't budge.

h. I made a cut on the rod at the head stock and then moved the compound down without touching anything. The rod was smaller at the tailstock end by 0.0015".

48. MOTOR QUESTION
The motor I have (probably not OEM) works just fine. However, when I shut it off, it will sometime not go back on. I have to wait to hear a little click and "whir", then it will work fine. The length of time between when I shut off the machine and when I hear the "click-whir" varies greatly and doesn't seem to be dependent on how long or short the lathe is running. Anyone know what this is?

CONCLUSION
I think I'm "done". I need to make some projects and see how the lathe performs, then make any adjustments.

Thanks to all for your help and support. I hope this thread serves as a resource for anyone else restoring a similar lathe. I found the process fun, infuriating, interesting and a learning experience.
 
48. The click that you hear is the centrifugal switch closing. The switch, of course, disconnects power from the Start capacitor and winding after the motor starts and gets up to about 1/2 to 3/4 speed. It should normally close again before the motor totally stops. Although you will probably need to remove the motor from the lathe in order to do so, I'm afraid that you need to remove the end bell where the wiring goes in and investigate why. The most common cause is lack of lubrication. But another common cause is that one of the wires that runs near the switch is touching part of the switch and causing it to hang open. The motor isn't going to start with the switch open (same symptom as a bad start capacitor).
 
I have the motor off to mount the DRO brackets for the long axis. I'm awaiting a tap wrench I ordered. I thought I'd look at the motor issue while I waited.

48A. What needs to be lubricated?

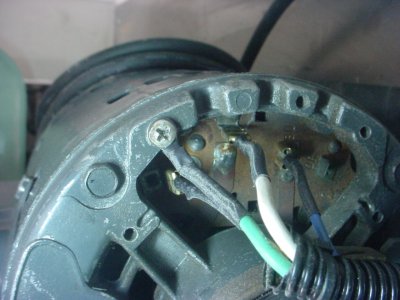
48B. The wires all look fine to me (see photo). Are there any other wires? There is a bell housing on the side (noy shown in the picture) that looks like it has a capacitor in it. Would that be the issue?
DSC00061.JPG
 
There will be two bearings or bushings. If they can be lubricated, there will be an obvious place to do it, and SAE 20 ND will be appropriate. If there is no obvious place to inject the oil, then the bearings will be sealed ball bearings and the only option will be to replace them.

If the motor is not wired to be reversible, then the three wire will be all that there are.

From what you have written earlier, when the centrifugal switch works properly, the motor starts and runs OK. The problem would seem to be that it tends to stick in the open position, so that the motor will not start properly. Most likely, lubricating the switch will correct that problem. The Start capacitor would from what you have written earlier would not appear to be a part of the problem. Lubricating the Start switch will require disconnecting the three wires and removal of the end bearing carrier visible in the photograph. Part of the centrifugal switch will be on the armature shaft and part of it will be on the bearing carrier.
 
Is there anything special I need to know or do before I take this apart? Is it pretty straight-forward: just remove some screws, check the part, lube, re-assemble? I just want to make sure I don't need any special tools or to know any special methods before I take this apart. For example, does it need to be torqued back on or is "tight" good enough? Will there be any stored charge I need to be concerned about?
 
Back
Top