

-
Welcome back Guest! Did you know you can mentor other members here at H-M? If not, please check out our Relaunch of Hobby Machinist Mentoring Program!
You are using an out of date browser. It may not display this or other websites correctly.
You should upgrade or use an alternative browser.
You should upgrade or use an alternative browser.
Carriage stop project off to a rough start
- Thread starter Janderso
- Start date
- Joined
- Mar 26, 2018
- Messages
- 8,407
Good advice. This is a stout part and thinking about the clamping system, I'll make it as robust as I canIf I build another it
will have TWO large clamps to hold it in place.
- Joined
- Dec 20, 2012
- Messages
- 9,422
You will find that the accuracy of the angles of your stop are critical to its function as a stop. The more accurate they are, the better the surface contact will be between the stop and the geometry of the way. The better the surface contact, the less clamping force needed to lock it down. The plate used underneath to lock the stop to the way should be milled flat and the ledge that spaces it apart from the body of the stop should be high enough to deal with any bow in the plate when the locking bolt is tightened. If you get all of this right, a single bolt is enough to lock any carriage stop ... but two is better.
- Joined
- Jul 29, 2014
- Messages
- 2,737
I hope nobody is trying to use these clamps to stop a carriage under power feed?
The Takisawa has a nice feature where you can set up a trip point and stop the power feed...then move the carriage by hand a tenth of inch or so to contact the stop point. I made a similar stop for the cross slide that's very helpful while threading.
The Takisawa has a nice feature where you can set up a trip point and stop the power feed...then move the carriage by hand a tenth of inch or so to contact the stop point. I made a similar stop for the cross slide that's very helpful while threading.
- Joined
- Oct 11, 2016
- Messages
- 3,857
A good friend of mine rebuilt a Colchester lathe made in England, and it was exactly 50 degrees (per side) It makes it very hard to make parts that fit the veeway, as an end mill makes a 45 degree angle on each side.
- Joined
- Mar 26, 2018
- Messages
- 8,407
I’ll be making the bottom plate soon.You will find that the accuracy of the angles of your stop are critical to its function as a stop. The more accurate they are, the better the surface contact will be between the stop and the geometry of the way. The better the surface contact, the less clamping force needed to lock it down. The plate used underneath to lock the stop to the way should be milled flat and the ledge that spaces it apart from the body of the stop should be high enough to deal with any bow in the plate when the locking bolt is tightened. If you get all of this right, a single bolt is enough to lock any carriage stop ... but two is better.
I have some ideas on how to get a solid fit.
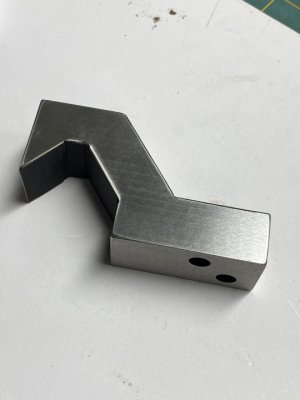
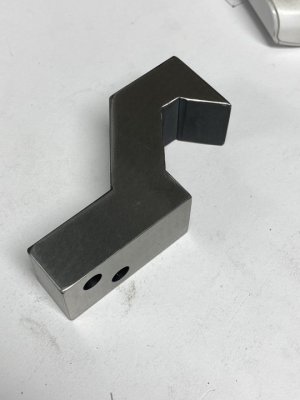
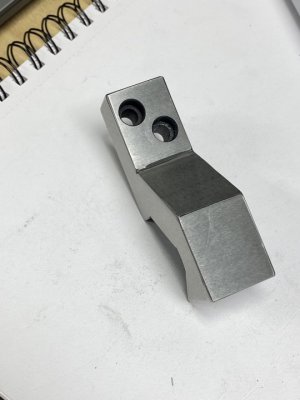
I used my new kiln today to heat treat this A2 part. I was able to maintain a good soak at 1,700 degrees for over an hour, then I put it on a brick in the shade outside with a temperature in the mid 50’s. A file just skated off.
Then I spent some time with the Brown and Sharpe Micromaster
This piece is done.
Attachments
Depends on the lathe. My Summit has an adjustable clutch type kick out on the carriage, and when its hits the desired resistance( like hitting the carriage stop ) it disengages the power feed. Doesn't work with the half nut engaged, of course, but works for the power feed.I hope nobody is trying to use these clamps to stop a carriage under power feed?
The Takisawa has a nice feature where you can set up a trip point and stop the power feed...then move the carriage by hand a tenth of inch or so to contact the stop point. I made a similar stop for the cross slide that's very helpful while threading.