- Joined
- Mar 9, 2018
- Messages
- 465
Welp, I expected to have a new post ready by now with my pistons and rings finished. But instead I added another chunk of stock to my 'learning opportunities' pile.
The pistons are finish (teaser photo below) but I intend to write a more detailed post on making those only after I finish the rings.

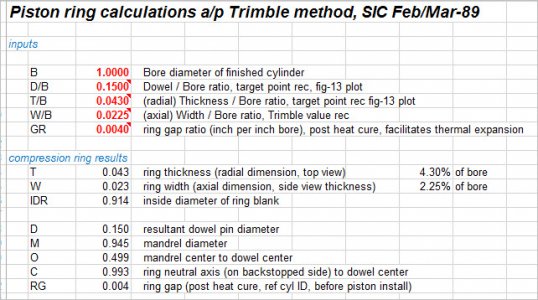
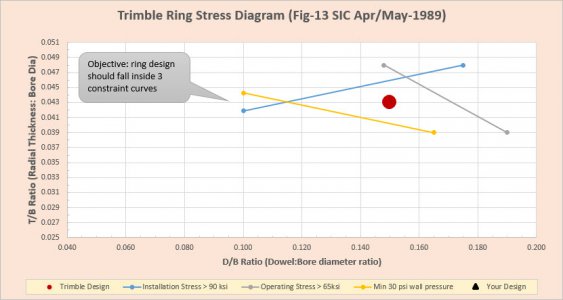
The cast iron rings is where I got hung up this time. The drawings have a nice detailed instruction inset on exactly how to make the rings. Basically goes like this:
(1) rough turn and bore a cast iron tube about 3" or so long;
(2) slot it full length;
(3) clamp the slot closed on the lathe;
(4) finish turn and bore;
(5) slip a 'parting cap' onto the end;
(6) part off one of the rings to the correct length; and
(7) repeat steps 5 and 6 until you've got enough rings.

Well, when I made my parting cap, I made it a couple thousandths undersized on accident so it wouldn't fit over the finished OD of the cast iron tube. I thought: **what the heck, what could go wrong?** and tried to part off the first ring anyway, without using the parting cap.
I found out exactly what could go wrong. See, I reckoned the main purpose of the parting cap was to catch the ring as the parting operation was finishing up. I failed to recognize the importance of keeping the ring gap closed each time the slit comes around and snags on the parting tool. Combine that with brittle cast iron, and the results oughtn't be all that surprising.

Anyway, I'm currently in the process of re-making the rings. If all goes well, I should be posting again in the next couple days describing the piston and ring construction.
The pistons are finish (teaser photo below) but I intend to write a more detailed post on making those only after I finish the rings.
The cast iron rings is where I got hung up this time. The drawings have a nice detailed instruction inset on exactly how to make the rings. Basically goes like this:
(1) rough turn and bore a cast iron tube about 3" or so long;
(2) slot it full length;
(3) clamp the slot closed on the lathe;
(4) finish turn and bore;
(5) slip a 'parting cap' onto the end;
(6) part off one of the rings to the correct length; and
(7) repeat steps 5 and 6 until you've got enough rings.
Well, when I made my parting cap, I made it a couple thousandths undersized on accident so it wouldn't fit over the finished OD of the cast iron tube. I thought: **what the heck, what could go wrong?** and tried to part off the first ring anyway, without using the parting cap.
I found out exactly what could go wrong. See, I reckoned the main purpose of the parting cap was to catch the ring as the parting operation was finishing up. I failed to recognize the importance of keeping the ring gap closed each time the slit comes around and snags on the parting tool. Combine that with brittle cast iron, and the results oughtn't be all that surprising.
Anyway, I'm currently in the process of re-making the rings. If all goes well, I should be posting again in the next couple days describing the piston and ring construction.
Last edited: