G0704 CNC AC Servo Rebuild (Picture Heavy)

I have always had the climb-cut-on-X-chatter- while-roughing issue.

I'm not sure if I have noticed it before or if I always just thought it was a limitation of machine rigidity. I've never been thrilled about the ballnut mounts, so I may remake them and repack the X screw while I am at it like I did on the Z. Now that I have all this power on the axis motors, I don't mind the screws being pretty tight. I know this will exacerbate wear, but I just can't imagine I'm going to wear the screws out with the way I use them.

Not sure, but I plan to take it apart soon to diagnose.

Let me know what you find!

The part looks good! You can also play with the Horizontal Area toolpath for finishing floors. Many times you can select the entire solid and it will do what is possible with the selected tool, then maybe unselect the features you need more control over and address those in a different OP. I don't use it much, but it sure is handy sometimes.

OK I',m all ears for tips here. I normally do a dynamic roughing, dynamic rest machining, followed by a multipass contour to get the walls looking nice. Unfortunately I have yet to come up with a good way to finish the floor. I'll play around with that toolpath. I feel like I have "mastered" (as much as a hobbyist could I guess) only 3-4 toolpaths and the rest are just a mystery to me. I know what the rest are supposed to do, but I can never get them to look how I want.

Here is an old video. The chatter is heavier when moving in X+. It has always done this to some degree, but did progressively get worse.

Mine sounded very similar, although perhaps a little less bad, granted I was cutting plastic. IS there a downside to cutting conventional when CNC'ing, particularly the home hobbyist?

As you suspect, chatter is likely one of the following:
Ballscrew nut to saddle
Ballscrew housing bearing
Ballscrew bearing housing to table
Y-axis gib loose(ish). That's the easiest to check & fix.

Time to tear it down again! Maybe I'll make new ball nut mounts ahead of time so I can swap everything out at once.

In addition, you're using the TTS which likes to chatter with long gauge lengths. Crank down on the drawbar until your PDB just barely releases, stick that roughing end mill in a shortie setscrew holder instead of the collet and go to town.

Yeah, not ideal. I only have the ER20 chucks. The genuine Tormach ones used to be pretty cheap, but now I cry when I see the price. I paid $18 each for my chucks, including shipping. That being said, the Tekniks collets I've been buying are pricey and get me up to the original cost of the tormach stuff. Any tips on how to hold drills in something other than a collet chuck? The drill chucks are so long and chew up a lot of my Z travel.

Hog the plastic with a 1/2" corncob once you double-check your backlash suspects. With that spindle motor you should be making chunks.

It should, but I haven't yet gotten confident enough to really put it to work. I get in the mentality that slow and safe is good and then I never push the machine hard.

And 3 hours to program? That's fast for someone who doesn't do it for a living. Seriously.

Thanks. I pick up software pretty quickly, but I get stuck on the speeds and feeds. I know how to calculate them, but I don't always have a good feel for how hard to run the machine.

Nice job on the part. Learn from the 'oops' and have another go at it.

Will do! I have a pile of other edits which should just make everything run better.
 
OK I',m all ears for tips here. I normally do a dynamic roughing, dynamic rest machining, followed by a multipass contour to get the walls looking nice. Unfortunately I have yet to come up with a good way to finish the floor. I'll play around with that toolpath. I feel like I have "mastered" (as much as a hobbyist could I guess) only 3-4 toolpaths and the rest are just a mystery to me. I know what the rest are supposed to do, but I can never get them to look how I want.

Horizontal Area isn't any better than what you did, but as you know starting a new path and going through the menus, again and again, can be daunting. Pretty sure it is only there for complicated parts so you do not have to visually locate every flat area yourself.

I would probably go Dynamic OptiRough (I like the selection method and level of control that it offers), Horizontal area, Contours, helical bore. One good trick (if you do not already know) is to put a negative radial finish allowance for your contour toolpath to face surfaces. Contour is a lot easier to deal with, so I use that a LOT. Again, not a better strategy ... just being 2 parts German I have a fundamental need for efficiency. Even if it takes me twice as long ... haha.
 
Any tips on how to hold drills in something other than a collet chuck?
Collet chuck is the ticket for drills - no side load to put on the TTS. And as you build up your drill collection, try to find the 'good' ones which use a standard shank size. I like YG-1 for the cost-quality. The TTS just doesn't like long gauge length and heavy side loads. Actually... no taper likes that, even the CATxx and HSK stuff. That's why the Big40 and Bigxx stuff was developed.

You can pick up two or three stubby side-lock holders and just leave your roughers in them. I've got a 1/2" 4FL (HSS) and a 3/8" 5FL (carbide) that just live in the same holders. Virtually all my roughing in any material is done with those two tools.

I know how to calculate them, but I don't always have a good feel for how hard to run the machine.
HSM Advisor. Even if you can calculate the F&S, the horsepower requirements displayed for you is very helpful along with the spindle motor power curve. You can set up a cut and the be like me: "Crap. I don't actually have 3 horsepower at 8kRPM"
 
Collet chuck is the ticket for drills - no side load to put on the TTS. And as you build up your drill collection, try to find the 'good' ones which use a standard shank size. I like YG-1 for the cost-quality. The TTS just doesn't like long gauge length and heavy side loads.

Which YG-1 drills do you like. I'm a big fan of some of their other tools, particularly their ALU-Power endmills.

HSM Advisor. Even if you can calculate the F&S, the horsepower requirements displayed for you is very helpful along with the spindle motor power curve. You can set up a cut and the be like me: "Crap. I don't actually have 3 horsepower at 8kRPM"

I may have to buy that. I like that it has a CHook to drop it into Mastercam.
 
Spent 3 hours today redoing and tweaking my Mastercam code. Hope to run the part again tomorrow. Here are my changes.

Front:
  • Drill all holes deeper to remove lip after second OP
  • Spot drill deeper to try to keep drills centered
  • Changed all dynamic tool paths to conventional, 45% engagement, 5000rpm, 80ipm. Max depth of cut is 0.75", should be throwing some plastic. Tool is good for up to 0.0075 chipload (I'm at .0045) so there is room to push it much harder.
  • More finish passes with the ball endmill to get a better floor finish
  • All holes will be reamed to get more on size (drills were cutting way undersized)
  • Shallower ramp with endmills, hope this will help break the really stringy plastic chips. Other option is a super aggressive ramp
Rear:
  • All heavy cuts to be conventional
  • Use a dynamic toolpath to face the rear of the part and remove a majority of the material.
  • Reduce stepover on taper cutter, remove unnecessary air cutting
  • Avoid the helix bore toolpath, use circle mill instead. Chips getting wrapped around cutter
  • Fix Chamfer tool offset which crashed the machine.
In addition, I remeasured all 24 tools so the height offsets were spot on in the control. Some of them were a bit off which left scallops on the floor of the part.
 
Which YG-1 drills do you like.
My favorite is the Multi-1 powder metal stub length. Cuts everything, lasts forever. Can run higher F&S and it's way less fragile than carbide. Reasonable cost and the shanks are all standard sizes (1/8, 3/16, 1/4, etc).

Otherwise, all the YG-1 drills I've purchased have been excellent. I prefer stub length whenever I can get away with it, as well as parabolic flutes. I've stopped peck drilling for holes under 5D as long as I can get coolant in the right spot.

I may have to buy that.
The Android app is also very useful, as are the reference tables for screws and related Machinery Handbook type stuff.
 
Spot drill deeper to try to keep drills centered
Double-check your spot drill angle. If it's too far off from the drill that follows it won't center properly as the drill cutting edges don't engage at exactly the same time and gets pushed over a bit. Try a 120 spot for a 118 drill, 140 spot for 135 drills and so forth.

Or use stub length drills and skip the spotting.

All holes will be reamed to get more on size (drills were cutting way undersized)
Might want to run a test in the material with this first and make sure your reamer is sharp sharp sharp. I think you'll find that some plastics spring back quite a bit with just about all hole-making tools, reamers included. If you find the reamer is still producing an undersize hole, boring it or circular interpolation should improve things.

If you haven't already done so, get an air blast going on the part to keep it cold. Should make chips better instead of getting soft and just moving out of the way of the drill & reamer.
 
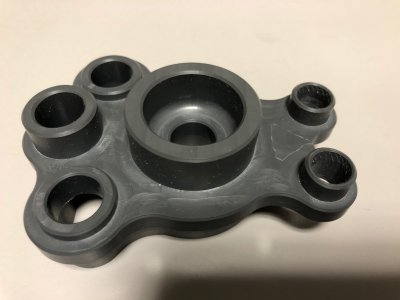
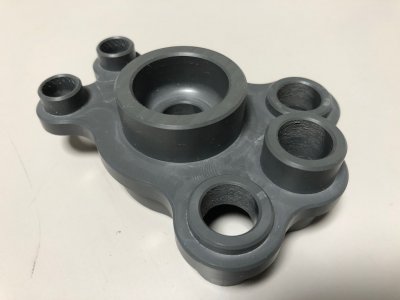
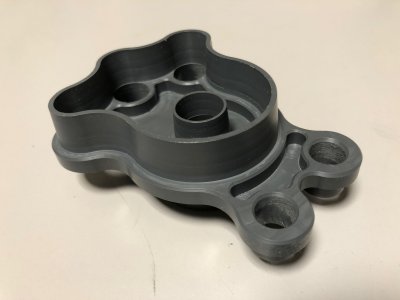
OK so I ran a second copy of this part with the modified program discussed above and it turned out a lot better. Still have some edits to do, but all in all it is close. This is just a for-fun part, but I want to get it perfect.

The roughing passes were completed at 45% engagement (3/8" 3F endmill), 5000rpm, 60ipm , 0.75" DOC. This equates to 7.5in^3/min material removal rate (on a G0704 :oops:). I was able to get it up to 70ipm (8.8in^3/min) but it started chattering even when cutting conventional. I can likely improve this by repacking the ballnuts and tightening the gibs, but at some point soon I will be coming up on the limitations of rigidity on this machine and the TTS tooling. The roughing only accounted for about 30% of the cycle time, so I probably won't be trying to optimize further. There were chips hitting the floor 8' away from the machine. Insane.

During one of these cuts I got a position error fault on my X axis. I realized I still had all the motor torque limited at 50% (should be 250%) from when I was getting runaway motion. I returned these to their full values and adjusted the position error tolerance to 0.005". No issues since.

My adaptive facing passes for the little islands on the part are still causing a full tool burial. This is probably fine, but I am slowing the machine down in anticipation of this. I will reprogram to avoid this.

The 1/2" reamer was held in the tool holder with 10 thou of runout :( and the 3/8" reamer had 30 thou :mad:. This is due to me using some absolutely garbage ER20 collets that I got from China at $0.99 each. These need to be thrown away and some more Techniks purchased. They're quite expensive though. It also didn't help that the reamers ended up in my worst 2 collet chucks that had around .002" of runout. The 1/2 reamer left a beautiful finish but only cleaned up 1/2 of the hole (Top pic) the other side was still rough from the 1/2 drill (bottom pic). The 3/8" reamer chattered so badly from the runout that it ruined the hole. I could probably drill these holes smaller, mount the reamers better, and get a great hole finish, but I think I am just going to do a helical bore on these with an endmill and call it a day.

It is interesting that even with a stub length 1/2" drill and spot drilling, it is walking significantly off center.

1.jpg

6.jpg

There is a triangle patch of material that has poor finish between the large center bore and the smaller holes. This is left over from the helical entry of the roughing operation. I need to add 5 thou of stock to leave on the floors during roughing and later come back with a different cutter to get a better floor finish.

Remeasuring all the height offsets of my tools really helped get a great floor finish all around the part. There is no noticeable scallop between passes of different cutters.

The back side turned out great and the features are lined up within a thou. This can be dialed in even closer by adjusting the work offset of the soft jaws.

4.jpg

I am finding that my accuracy is severely limited by the backlash in the X and Y axes. I can read a tenths indicator running true on a bore, but there is this window of uncertainty of where I am really at due to the several thou of backlash on each axis. My next project will be to repack the ballscrews, tighten up the end supports, and scrape in the new gibs to get a better fit on the ways. I hope this will improve my accuracy.

Finally I need to rethink how I am doing finishing on the part. It is just taking forever and I have to baby sit it with coolant in a bottle or the chips weld to the walls and mess it up. Perhaps some sort of semi finish to rough it in a bit closer then only use one pass to get the finish?

I can also tell that some true flood coolant and a basic enclosure would do a lot towards making better parts and requiring less attention from me.

The power drawbar has been the biggest time saver and has just worked perfectly since installation. Very happy with this design.
 
Last edited:
I can also tell that some true flood coolant
A dual nozzle air blast/mister will work wonders and is a cheaper/easier first step before going full rain shower. Build a pressurized coolant delivery mister (tons of internet plans) and hook up the solenoid valve to an output pin. Map pin to M7 macro and you're in business. I use two nozzles, usually oriented at 45 degrees when looking down at the part (2 & 8 o'clock) so the part is never completely obscuring the point of cut.

Perhaps some sort of semi finish to rough it in a bit closer then only use one pass to get the finish?
If your part geometry can handle it, a bullnose with a small 0.005-0.0015 corner radius will help with floor and inside corner finishing. I don't know if you're using a sharp corner end mill, but I've found on my smallish, slightly flexible mill that vibration will leave tool marks that you can't feel but can certainly see. The corner radius helps blend & smooth everything a bit.
 
A dual nozzle air blast/mister will work wonders and is a cheaper/easier first step before going full rain shower. Build a pressurized coolant delivery mister (tons of internet plans) and hook up the solenoid valve to an output pin. Map pin to M7 macro and you're in business. I use two nozzles, usually oriented at 45 degrees when looking down at the part (2 & 8 o'clock) so the part is never completely obscuring the point of cut.

My panel is pre-wired with (2) 120VAC outputs to energize a flood and mist coolant system (I actually have a mister that needs new Loc-lines and nozzles) so all I need is the solenoid. I've avoided it due to noise and the compressor, but with the new ultra quiet compressor, I don't mind it. Might be time to get it set up.

Really need an enclosure though. I would love a fancy folded sheet metal one, but I don't have sufficient experience designing, have access to sheet metal equipment or welders, and I don't want to spend a $1000 on an enclosure.

I might throw something more simple together with some plastic sheeting and wood framing. Get me going at least.

If your part geometry can handle it, a bullnose with a small 0.005-0.0015 corner radius will help with floor and inside corner finishing. I don't know if you're using a sharp corner end mill, but I've found on my smallish, slightly flexible mill that vibration will leave tool marks that you can't feel but can certainly see. The corner radius helps blend & smooth everything a bit.

That's a good idea. I think I might have a few in my big box of tools.
 
Back
Top