

-
Welcome back Guest! Did you know you can mentor other members here at H-M? If not, please check out our Relaunch of Hobby Machinist Mentoring Program!
You are using an out of date browser. It may not display this or other websites correctly.
You should upgrade or use an alternative browser.
You should upgrade or use an alternative browser.
Group Project: Rotary Broach-- Building complete, all shipped out!
- Thread starter ErichKeane
- Start date
- Joined
- Aug 3, 2017
- Messages
- 2,437
I had tried at one point but my brazed carbide tools chipped/broke almost immediately. It was my initial plan to use the lathe for that and the cup at the end, but it didn't work :/Would it more expeditious to take down the diameter on the lathe and then grid the remaining?
Robert

- Joined
- Aug 3, 2017
- Messages
- 2,437
Yeah I'm probably stuck doing something like that at the end. I don't have a Dremel or anything so I might have pick one up.
- Joined
- Jun 26, 2018
- Messages
- 1,733
The blanks are HSS....correct? That's crazy! Now I guess I se why finished cutters are so damn expensive. Seems like if (they) had a CNC rotary table mounted to a grinder they could knock these things out, but obviously there isn't a whole lot you can do to as a hobbyist.
- Joined
- Aug 3, 2017
- Messages
- 2,437
Yep, pretty much! Most hobbiests seem to use O1 which even hardened is way softer, but they tend to wear when broaching steel.The blanks are HSS....correct? That's crazy! Now I guess I se why finished cutters are so damn expensive. Seems like if (they) had a CNC rotary table mounted to a grinder they could knock these things out, but obviously there isn't a whole lot you can do to as a hobbyist.
I realized that I have a 2nd 5C collet set that I could probably set up to rough 2 cutters at a time, so perhaps ill try that!
I think I am running out of coolant for the grinder, so I gotta buy another bucket soon too.
- Joined
- Jan 2, 2014
- Messages
- 8,853
A few thoughts from an interested observer......
1) O1 might be the way to go; certainly easier to cut, but then you need a hardening step too. It really depends on the expected life of the tool. How many holes would a hobbyist broach? For me it would be a small number. But this might vary widely by user.
2) I wonder if you could do some roughing to get it down in size some other way, saving the expensive surface grinder wheels for finishing.
What comes to my mind:
i) bench-top belt sander with the belts recommended by @mikey in that huge "sharpening HSS lathe tools" thread.
It could still be held in the hex collet block, although you may have to come up with a new fence arrangement, as with the collet block flat on the standard square table you'd be grinding 90 deg to that face. It would still produce a hex, but the flat faces on the part would be at the corners of the collet block. The way you're holding the collet block the surface grinder produces the flats on the part in the same plain as the collet block.
If you have a belt sander where the fence can be set accurately to 60 degrees then this should work.
ii) very crude, but even an angle grinder could be used to remove the bulk of the HSS material
Great thread, I am routing for you!
-brino
EDIT: wait there is an easier way to align the roughing cuts on a belt sander with the finish cuts on the surface grinder..... just hold the collet block by the flats instead of the points in the SG vise.
- Joined
- Jun 26, 2018
- Messages
- 1,733
Yeah, those bits are more of a bear than I imagined. As I don't own anything accurate like a surface grinder...I will never attempt this at home, I will be buying mine ready made if and when I find myself in need..
- Joined
- Aug 3, 2017
- Messages
- 2,437
So, a lot of progress today! First, I decided to get the broaches assembled! There was a little bit of repair to each component necessary, but nothing too bad.
I started with the spindle. The tail was a little oversized, so a little bit of time with a file and some Emory paper made the bearings fit:


Next I looked at the body parts. The bearing fit in nicely, though some deburr process seemed to make a couple of the threaded holes not really work. The 10-32 were the worst (3 of them wouldn't start), but the 1/4-28 had a pair as well. A few minutes cleaning up with a tap made short work of all of these however.

And here is a little layout of how the assembly works. Spindle, thrust bearing/washers, body, bearing, cir-clip.

A little bit of the tapping repair")

Spindle and thrust bearing in the bodies:

Then bearings:

Then cir-clip/snap ring or whatever these are called

Next, to the backing plate. 3 of the 4 were fine, but all 4 holes in the other had some weird "step" inside that prevents the bolt from getting through the hole. I used a drill to finish these holes, no problem
And here is the group picture all bolted together!

Next, I got back to my bits. I opted to work on the 1/4" square to try my new strategy of first hand grinding. I marked out the ends with blue and a height guage which got me rough measurements. I ended up getting down to .325 manually;

Then a bit of back and forth on the surface grinder got them just right!
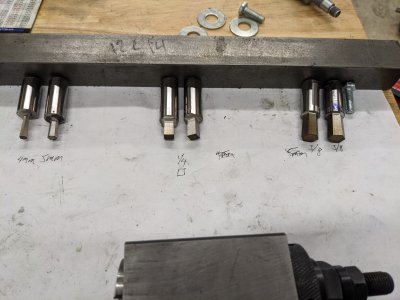
And a picture of all the bits so far!
I have a 4 and 5mm ground, 2 3/8, and 2 1/4 square. I still have to grind the cup end in them, but 6 of 11 at least precision ground (plus the one screw up last week!).
I started with the spindle. The tail was a little oversized, so a little bit of time with a file and some Emory paper made the bearings fit:
Next I looked at the body parts. The bearing fit in nicely, though some deburr process seemed to make a couple of the threaded holes not really work. The 10-32 were the worst (3 of them wouldn't start), but the 1/4-28 had a pair as well. A few minutes cleaning up with a tap made short work of all of these however.
And here is a little layout of how the assembly works. Spindle, thrust bearing/washers, body, bearing, cir-clip.
A little bit of the tapping repair
Spindle and thrust bearing in the bodies:
Then bearings:
Then cir-clip/snap ring or whatever these are called
Next, to the backing plate. 3 of the 4 were fine, but all 4 holes in the other had some weird "step" inside that prevents the bolt from getting through the hole. I used a drill to finish these holes, no problem
And here is the group picture all bolted together!
Next, I got back to my bits. I opted to work on the 1/4" square to try my new strategy of first hand grinding. I marked out the ends with blue and a height guage which got me rough measurements. I ended up getting down to .325 manually;
Then a bit of back and forth on the surface grinder got them just right!
And a picture of all the bits so far!
I have a 4 and 5mm ground, 2 3/8, and 2 1/4 square. I still have to grind the cup end in them, but 6 of 11 at least precision ground (plus the one screw up last week!).
Attachments
- Joined
- Jun 26, 2018
- Messages
- 1,733
I bet I know the step on the one backing plate...it was the 1st one I drilled and my setup was questionable for the survival of my vice. The bit broke through, but not by a lot. I chamfered the edge, but I bet it left a bit of a wall. The other 3 I learned and changed my setup.
And going back to the original thread "This Madness needs to Stop", this is one of the interesting parts. When all these parts, made by different people, with varying skills on different equipment, comes together. Is it just me? I mean, I know I take it for granted if I order a intake manifold and bolt it to my block....it fits. It's much different when it was a shapeless piece of stock in your hands. I dunno....goose pimple material.
And going back to the original thread "This Madness needs to Stop", this is one of the interesting parts. When all these parts, made by different people, with varying skills on different equipment, comes together. Is it just me? I mean, I know I take it for granted if I order a intake manifold and bolt it to my block....it fits. It's much different when it was a shapeless piece of stock in your hands. I dunno....goose pimple material.