I Must Have Done Something...

Yikes, now I see what you mean. When it happened were there only the usual two T bolts holding the angle plate? You mentioned four 3/8ths bolts now holding the angle plate to the new cross slide may we see where they are located please? Its not too late for me to change my set up.
 
Last edited:
Bummer.

Something else I'd been considering was getting a blank cross slide, i.e., a flat piece of cast iron and then making a table with various mounting points.

Hhmmm...
 
I would like to know a few more details about the set up that broke the cross slide before drawing any conclusions on my own set up. However, there is also the possibility of clamping my angle plate to the cross slide. With a plate the same width and length as the cross slide, it would be easy to rig a clamp on each corner to hold it to the cross slide with relatively little stress.
 
Bummer.

Something else I'd been considering was getting a blank cross slide, i.e., a flat piece of cast iron and then making a table with various mounting points.

Hhmmm...

I would like to know a few more details about the set up that broke the cross slide before drawing any conclusions on my own set up. However, there is also the possibility of clamping my angle plate to the cross slide. With a plate the same width and length as the cross slide, it would be easy to rig a clamp on each corner to hold it to the cross slide with relatively little stress.

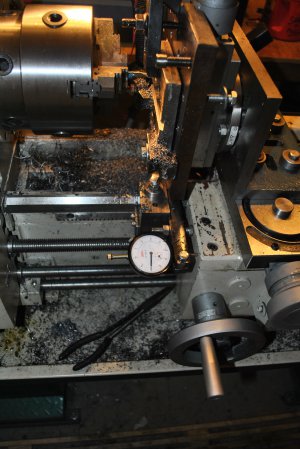
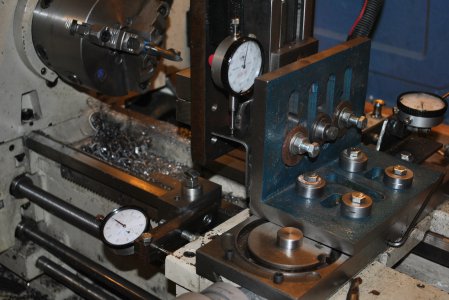
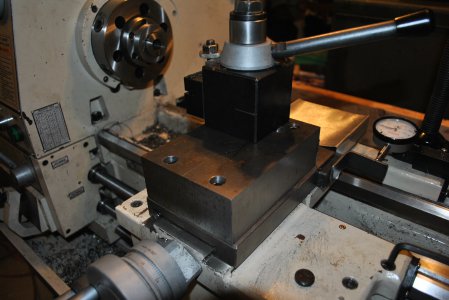
I originally had a piece of angle iron about 5/8 thick by 11 inches long with 8 inch legs. I secured it with 2 bolts tapped into the X-slide at the back end and the 2 compound hold down bolts at the handwheel end. It worked great for a while and then the finish started going downhill with sort of a herringbone pattern. I couldn't figure out what was wrong as the finish kept getting worse and then eventually developed into a chatter. When I was swapping out the milling attachment I noticed a crack in the cast iron at the bottom of that groove. It went 270 degrees around the hole. A new X-slide was backordered so I turned the old X-slide backwards and re-attached everything with tapped holes just so I could keep working while I waited for the new slide to come in. It worked so well I again used tapped holes when I finally got the new slide. I also used a ground angle plate instead of the original angle iron piece. Much stiffer and more accurate. While I was at it I eliminated the need for the compound by using tapped holes to mount a big block of junkyard steel and put my QCTP on top of that. Much more rigid. My machine always parted well but this thing parts like a demon now. I put some pix below to help with hole location but your mileage may vary. In general, space holes as wide as you can but avoid cutting into gibs and ways.

PS: You may notice in the shot with the toolblock the X-slide in on backwards. I have a piece of aluminum flashing covering over the gaping compound hole to stop swarf from getting into the slide.

DSC_0332.JPG DSC_0318.JPG DSC_0825.JPG
 
Thank you so much, it is clear now except for the 8'' legs you had on the original angle iron. You might just have saved my X slide for me.
Would you mind explaining what the 8'' legs were doing on the original set up?
My angle iron is not ground like it should be. Do you think there is any merit to bedding my angle iron to the compound with epoxy-steel (not glued just bedded) when using the four new mounting points?
By "legs" I mean the size of the angle iron. I didn't add anything to it. The angle iron was 11" long, 8" tall, and 8" wide. It was very similar to what you're using now. As far as bedding to the x-slide, don't forget you want to be able to take it off and put it back on without a big production. The ground angle plate is right on every time (within .001) and wasn't expensive. About $50, I think. Please keep in mind, I'm no machinist. I'm a tinkerer just like you trying to think outside the box to make up for not having a milling machine.
 
The epoxy bedding approach is often used to bed an action in the stock of a target rifle. It provides a 'stress free' joint, held together by two evenly torqued screws, that is very stable and solid.

A ground plate may be flat, and the compound surface also, but both have tolerances. With cast iron you have to be extra careful about not stressing it (as you already know). To get a stress free fit they need to be lapped.

An alternative is epoxy bedding which would also provide a stress free mating surface on the plate. A very thin layer of epoxy would be permanently stuck to the plate only. This is accomplished by using a release agent on the surface of the compound so that the two parts can be separated after the epoxy has set without any epoxy being left on the compound. After that it would not be any more involved to install the plate on and off than before.

From one tinkerer to another, I have no milling work ahead to do. This is just an exercise for me. I sure am enjoying the exchange of ideas. I have already learned a lot about milling and hungry to know more.

Cheers everybody, Mike
 
Yeah, I know about epoxy bedding and mold release. I bought my lathe to do gunsmithing. My last project was a 40 cal smokeless muzzle loader based on a Savage 111 action. I did everything myself. All machining, action bedding and even the rust blueing. It shoots great. BTW, CDCO has the angle plate I used. It's ground to .001 tolerance and cost $39.oo. Hardly worth messing around with epoxies and plates.
 
Thanks for the heads up on CDCO. But even if I had a $200 angle plate I would want to bed it to the x-slide anyway. The problem being the unknown surface quality of the x-slide on a budget lathe. I also like to imagine that the layer of epoxy would somehow dampen vibrations transmitted through the joint. Results have been excellent milling with the angle iron I already have so it is just a question of mounting it differently.
Any pics of your muzzle loader? What bullets do you use?
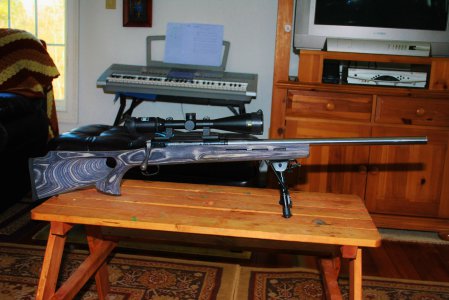
I have been using 200 gr XTP, Harvester Blue Sabot, and 62 gr RL-7. Groups an inch @ 100yds and develops 2550 FPS. I've got a custom mold on order. 300 gr cast, 40 cal. I'm attaching a pic of the gun and a pic of the exit wound of an XTP on 3 phone books. For some reason I can't find the pix of the gun after bluing, only in the white. If I can't figure out how I filed them I'll take more.
Ed

DSC_1007.JPG DSC_0600.JPG
 
Back
Top