[How-To] In Need of Mentoring on Arthur R. Warner Co. Precision Threading Tool

Shiseiji

Avid destroyer of many materials.
H-M Lifetime Diamond Member
Joined
Sep 14, 2014
Messages
438
I like the concept of the tool, but can't find a single picture of it in use. I think simply managed to miss setting the tool holder at 60 degrees, but that's my best guess.
TIA for any assistance.
Ron

IMG_20210503_180541_828.jpg

Ron
 
I dunno' but it looks to me like the insert is placed in the holder upside down. Normally, relief angles go underneath so they can provide the clearance necessary to cut.
 
I like the concept of the tool, but can't find a single picture of it in use. I think simply managed to miss setting the tool holder at 60 degrees, but that's my best guess.
TIA for any assistance.
Ron

View attachment 364739

Ron
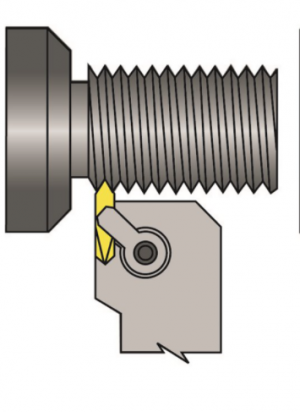
Yep, "Operator headspace and timing." Just ignorant. Tool at 90. I'm sure that explains how I managed to knock off two tips before I started to get a clue something was amiss.

Mikey, I know why you would think that, fortunately they idiot proofed that part as only one side has a counter sunk hole.

Ron

Thanks again everyone.
 
Should work much better when correctly oriented; carbide threading inserts are expensive and quite un necessary for threading soft steel, a much more forgiving and long lived tool is the ones made by Aloris, the angle is pre ground on its vertical plane to the 60 degree angle, and is only sharpened at the top, they are adjustable in the holder for helix angle, they come in 3 sizes so far as point width for varying thread pitches, and also in several sizes for acme threads. Also, of course, there is grinding your own HSS threading tools from blank tool bits, but the Aloris tools are the most convenient to sharpen and use.
 
Others have got it right. Rotate the entire tool shank in the tool post (90 degrees CCW when looking at the lathe front on). That insert should have a flat face pointing straight up with a 60 degree V going into the work (tool holder should be perfectly perpendicular to the work). The relieved facets should be under the cutting face.

1620086266586.png
 
As far as your tool holder at 60 degrees goes, wrong mentality. Tool holder is perpendicular to the work (see image above).

The Compound Slide may be set at 60 degrees so the cut is advanced on one side of the cut only, OR you can ignore the compound angle and thread straight in with the Cross Slide. Up to you, lots of people on either side of the aisle for that discussion.
 
Yep, "Operator headspace and timing." Just ignorant. Tool at 90. I'm sure that explains how I managed to knock off two tips before I started to get a clue something was amiss.

Mikey, I know why you would think that, fortunately they idiot proofed that part as only one side has a counter sunk hole.

Ron

Thanks again everyone.
don't worry, I spent ages trying to do a RH internal thread away from the chuck with a right hand threading tool. I just couldn't get a full depth thread and eventually knocked the tip off a nice solid carbide threading bar. Once I pulled my head out of my a$$ I realised I was basically threading backwards, using the underside of the tool as the cutting edge. I was actually amazed it cut a thread at all!
 
Yep, "Operator headspace and timing." Just ignorant. Tool at 90. I'm sure that explains how I managed to knock off two tips before I started to get a clue something was amiss.

Mikey, I know why you would think that, fortunately they idiot proofed that part as only one side has a counter sunk hole.

Ron

Thanks again everyone.

Yeah, the guys are right, had to turn the tool 90 deg to the left. Should have looked at a pic of that tool from ARW.
 
Back
Top