[How-To] In Need of Mentoring on Arthur R. Warner Co. Precision Threading Tool

Arggg 2nd attempt to post.
1. Martin W. Was spot on. Slap forehead.
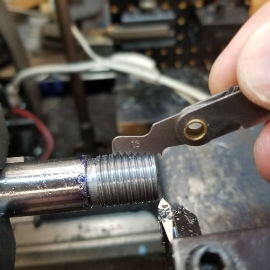
2. Mattthmuppet2, these are HHS, still expensive but are supposed to be easy to sharpen putting the flat on a stone/ diamond.
3. ARW has zero, 0, none, nada pictures on their site.
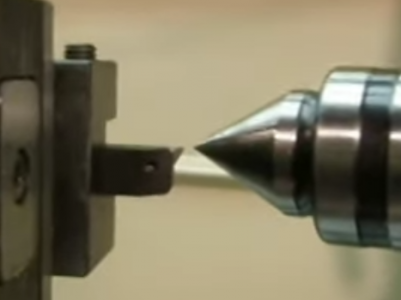
4. Only took 4 emails with the A R Warner tool company to figure out that the proper tool orentation is shown in an 8 year old video at marker 2:34 for :30 seconds while describing proper tool height. Got that only after I sent them a picture and was told to look at the video. They told me: "There is a wealth of information on our hobbyist page." Not a single picture of the tool in a tool holder, no links to any forum with postings of their tool in use, just to people saying what a great tool it is. Guess their hobbiest tool is only meant for hobbiest's who already know what they can't be bothered to show.
5. At least there is now one posting here on the tool. Hope it will help others.

Have very limited shop time as injury limits me to ~ :45 of standing. Will report when able on how using the tool in.the proper orentation works.

So again, thanks very much!

Ron
 

Attachments

  • 1620129993532blob.png
    1620129993532blob.png
    193.9 KB · Views: 7
Should work much better when correctly oriented; carbide threading inserts are expensive and quite un necessary for threading soft steel, a much more forgiving and long lived tool is the ones made by Aloris, the angle is pre ground on its vertical plane to the 60 degree angle, and is only sharpened at the top, they are adjustable in the holder for helix angle, they come in 3 sizes so far as point width for varying thread pitches, and also in several sizes for acme threads. Also, of course, there is grinding your own HSS threading tools from blank tool bits, but the Aloris tools are the most convenient to sharpen and use.
Thanks John. These are HHS inserts, the idea is to have the best of both. But the hobby operator is expected to already know the tool orentation in the holder is with the screw parallel to the bed, shaft pointing at the tailstock.
 
Others have got it right. Rotate the entire tool shank in the tool post (90 degrees CCW when looking at the lathe front on). That insert should have a flat face pointing straight up with a 60 degree V going into the work (tool holder should be perfectly perpendicular to the work). The relieved facets should be under the cutting face.

View attachment 364748
Thanks. Their tool holder secures the cutter flat rather than at 90 as the one shown. So to get the tool cutting as shown, the holder has to be rotated 90 so the inverted vee is to the work.
 
Thanks. Their tool holder secures the cutter flat rather than at 90 as the one shown. So to get the tool cutting as shown, the holder has to be rotated 90 so the inverted vee is to the work.
I think we are trying to say the same thing. It would help if you could post another picture of your modified setup so we can make sure it looks right.

No shame in getting this stuff wrong on the first try. It is all a hobby and we have all made the same mistakes. I am personally guilty of threading at 30 degrees into the cut rather than 60 when I started. Seen about a dozen other people make the same mistake too!
 
As far as your tool holder at 60 degrees goes, wrong mentality. Tool holder is perpendicular to the work (see image above).

The Compound Slide may be set at 60 degrees so the cut is advanced on one side of the cut only, OR you can ignore the compound angle and thread straight in with the Cross Slide. Up to you, lots of people on either side of the aisle for that discussion.
You are not kidding there. The thread on Mr. Pie' YouTube is quite the read. I think of the plunge/compound at 90 as the "English" method only because I first read of it in the Workshop Practice Series #3 by Martin Cleeve. It was described in that thread, and I elaborated on it as it wasn't real clear.
 
You are not kidding there. The thread on Mr. Pie' YouTube is quite the read. I think of the plunge/compound at 90 as the "English" method only because I first read of it in the Workshop Practice Series #3 by Martin Cleeve. It was described in that thread, and I elaborated on it as it wasn't real clear.
The 60 vs. 90 degree debate is centered around cutting on only one side of the threading tool vs cutting on both. Personally I've found little improvement in threading with the compound and prefer the ease of direct diameter reading on the cross slide.
 
I think the point many miss is the suggestion that every couple of cuts the compound be moved ~.0005 toward the headstock to reduce the tool cutting on the right, same as an angled cut at 59.5 degrees. I don't have enough experience with either to offer an opinion on quality, but when analyzed they are both doing the same basic thing and the English method is much easier to set up.
 
I will as soon as able. I've now had 6 emails with the company. The last one stated "stand up threading is common in the industry and we tend to assume it's understood". While admitting my question isn't uncommon. With "stand up threading" Google gave me aot of pictures of pipe threading tools. Also suggested that I should go take a class. Anything but post a single picture to their hobbiest page. Mentioned asking for help here and two responders have over 14,000 postings between them. Told them rather than point their customers all over the internet a simple drawing would do. I could do a simple drawing in effing PowerPoint and post it to a web page Whatever. Their customer service rep chooses to not really listen.
 
The terms I've heard for threading tools are "On-Edge", "Laydown", and "Notch".

On-Edge are typically similar to the TNMA inserts held in MTVOR holders. This is what you have.

1620144527278.png

Laydown inserts are typically similar to the 16ER inserts held in SERxxxx holders
1620144693846.png
"Notch" (my term for it) inserts come in different varieties, but many are designed to work with grooving tool systems like the Kennametal Top Notch or Kaiser Thinbit Groove-N-Turn.

1620144769346.png

1620144900252.png
 
Snuck out to the shop for a quick trial. Yes the interesting thing about this cutter is that the screw goes into what is the side the cutter not the top. Could not find a single image illustrating this type of tool holder and cutter.
d2a197db44009d9e81b4db063fcb8f6b.jpg
58e4cae6badb613a12314680424f66d5.jpg
 
Back
Top