Mike's SCARA Robot

I joined the "All About Circuits" forum and posted my questions regarding designing a demultiplexer for the encoder commutation channels.


I will be interested what people have to share and teach me, but for the time being I am going to start investigating the self-sense commutation or "wake and shake". Perhaps tomorrow I will remove the belt from the Z axis motor and start trying to run it with my servo drives.

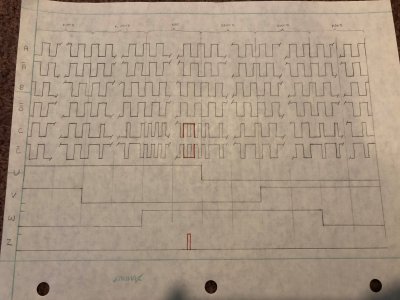
Here is a timing diagram I drew up for the entire encoder cycle of patterns based on the oscilloscope images I have taken (areas of repetitious patterns are hidden with breaks).

image052.jpg
 
Here is a timing diagram I drew up for the entire encoder cycle of patterns based on the oscilloscope images I have taken (areas of repetitious patterns are hidden with breaks).

It looks like this would fit nicely in an FPGA, probably even a CPLD. What are the voltage levels?

It’s been a LONG time since I did K maps and such, but only a few years since my last VHDL/Verilog so I’m sure I could figure it out. I’m not familiar with servo controls, though, so I’d have to rely on you for that.

Wow! I would really appreciate any help that you could give. I know next to nothing about FPGAs other than what they are and what they do. I'll shoot you a PM with a couple more details. The input voltage is 5VDC driven by an AM26C31 line driver. The output is 5V differential and I'd probably use that same line driver on the output.

Thanks so much for reaching out,

-Mike
 
Made a bunch more progress this weekend. Disclaimer, no I do not yet have any motors running, but I am getting mighty close. Troubleshooting a few more errors.

I started off by building the motor power cable assembly. I had a big spool of 14 AWG shielded servo cable from building the CNC. Bought a 150m servo cable from ebay for $30. Don't know how they managed to ship it for less than that...

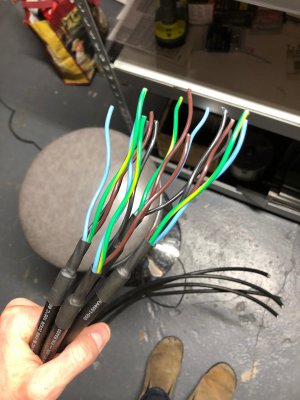
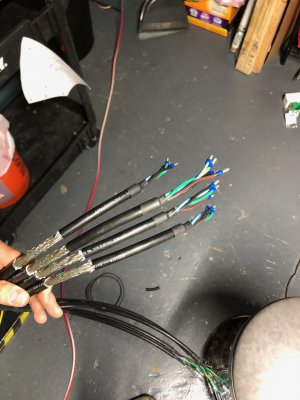
I stripped back the four cables and fanned out the conductors.
image053.jpg

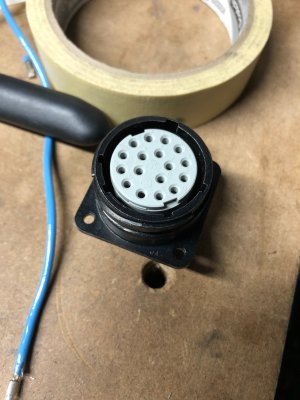
Here is the circular power connector that mates to the robot power cable. It is a lightweight aluminum body and is powder-coated. The grey insert accepts stamped copper pins that are sold separately.

image054.jpg

Each pin was crimped in place and then soldered for a better connection (I had a close, but not exact match for the crimper). The connector shell had enough room for heat shrink to be added which I liked for the strain relief. The grounds do not have wires to go all the way to the motors (the robot combines them internally) so I have to join them all together with the combined ground coming from the robot. I opted to do this with a stack of ring lugs.

image055.jpg

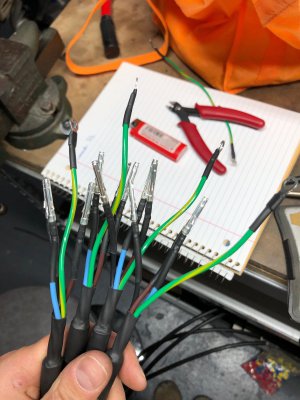
The other end of the cables were stripped and ferruled to land on the drives. The exposed shields will be clamped to the motor power clamps I have coming in the mail.

image056.jpg

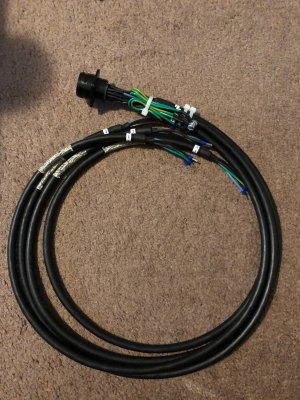
Here is the finished cable assembly. You can see the combined ground ring lug stack behind the zipties.

image057.jpg

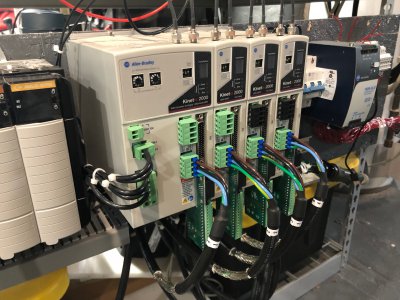
The drives are starting to come together! The cable clamp arms will help reduce emitted noise and secure those motor leads better.

image060.jpg

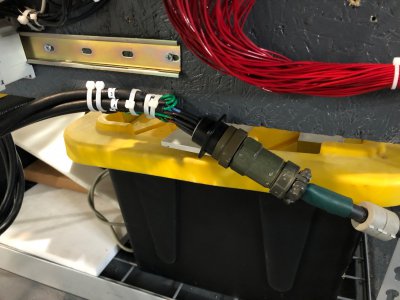
And finally, the union between the robot power cable (green connector on the right) and the new cable I built (black on the left).

image061.jpg
 
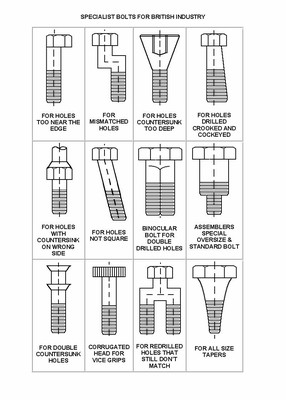
Went to Home Depot to find a 12mm hex bit to remove the robot from the aluminum chunks it was mounted to. They didn't have any that big so I bought a small pipe wrench. Reminded me of the corrugated head screw this picture...

1590499696433.png

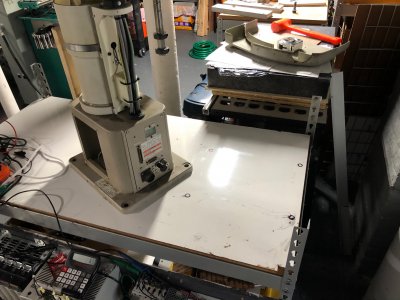
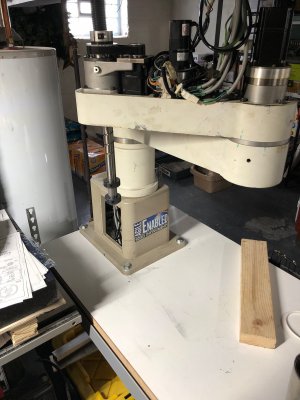
With some persuasion, I got the original M12x1 bolts broken loose and the aluminum pads removed. They're an inch thick so I can make something nice from them! The table was marked out and drilled for four 1/2-13 bolts and got the robot bolted down. The robot was very easy to slide on the slick table surface with the aluminum blocks removed.

image058.jpg

image059.jpg

I did a bunch more wiring to connect the motor brake on the Z axis and the contactor enable to the drives. It is a touch messy but I can clean it up later. The contactor enable allows the drives to control their input power, only turning it on when they are ready. It also allows them to disconnect from the line if there is a voltage spike.

image064.jpg

I also got the rest of the Custom Motor Files made and imported to the PLC programming software. So far so good!

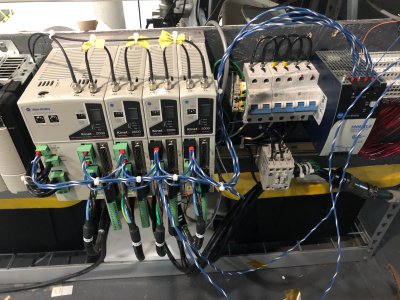
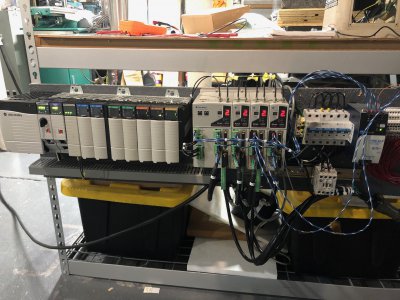
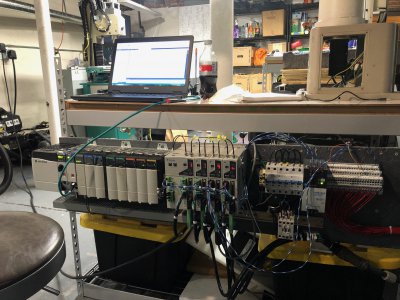
And here is the full control board with the PLC rack. The PLC accepted the program download and the drives accepted the configuration. There are a lot of firmware checks that happen behind the scenes that could have rejected my setup, but it looks like everything is happy so far. I also found some special SERCOS (fiber optic network) IDN parameters that I can message to the drives to configure them to do the self-sense commutation. That really reinforced my belief that these drives are capable of it.

image065.jpg

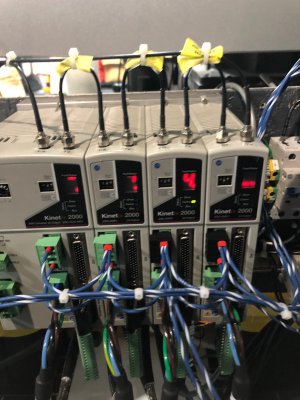
The 3rd drive (Z axis) shows a Phase 4 indicating the configuration was fully accepted and the drive is ready to run. The other drives are inhibited from running since I don't want to accidentally run a motor that is hooked to a gearbox and cause the robot to crash. The Z axis motor has its belt removed for this testing. It was the easiest to get access to.

image066.jpg

image068.jpg

I tried to start the motor and was hit with a ton of errors. First one was that I forgot to disable the drive from checking for a hardware enable input signal. After I fixed that, I couldn't start the drives because the DC bus was down at 15VDC (should be at 325VDC). Turns out I accidentally wired the AC input with 2 conductors of L1 and the control power with two conductors of L2. After switching them such that each power input had an L1 and an L2, the drive had plenty of DC bus voltage. Finally I tried to start it again and it immediately faulted with an E07 - Motor feedback loss. I have not solved this just yet.

E07 is normally caused by bad wiring to the encoder or bad noise. I am omitting some wires which might normally be there so I think I need to try to figure out how to trick the drive into ignoring these. Might try tying them all to ground.

The fact that the drive is letting me get this far is really encouraging. Hoping to get a break through soon.

In parallel I am still looking into the signal de-multiplexer. Having the hall effect signals available for input into the drive would be tremendously helpful and would eliminate the need for moving the arm at power-on to detect the commutation angle. It would provide a more quiet, cooler running, and better controlled motor as well.

-Mike
 
Spent a little more time investigating the E07 error that I get when trying to run the motor. I am guessing the drive doesn't check if it likes the feedback until you try to close the servo loop.

Here is what the manual says about the fault. Not a ton of info, but OK.

1590670695852.png

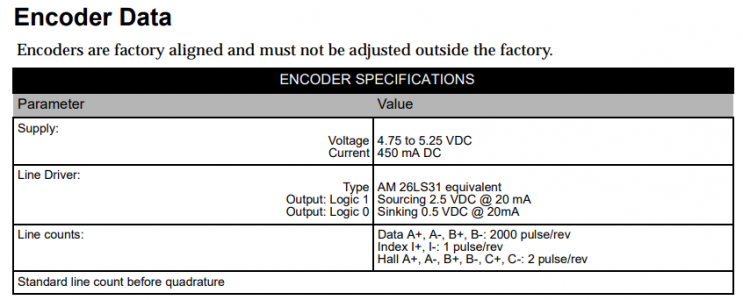
The manual also has a couple more excerpts that state the acceptable signal levels on the feedback. Note that I am using the TTL incremental column.
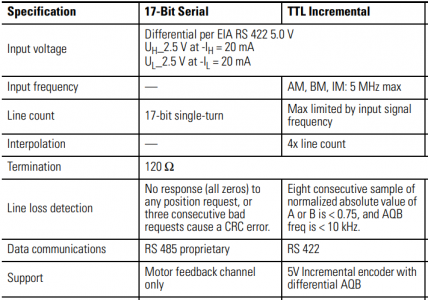
1590670773383.png

Specifically the On and Off-State voltages are important. +/- 1V to +/- 7V is acceptable according to this document with -7/+12VDC common mode voltage.
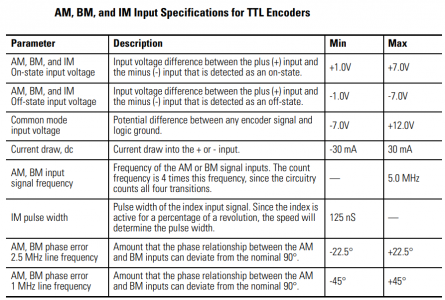
1590670809091.png

In this scope trace, the positive differential signal is compared to encoder DC COM to identify common mode voltages. It appears the A channel has about -0.2VDC and the B channel has -1.5VDC. These are within the specifications for -7/+12VDC.
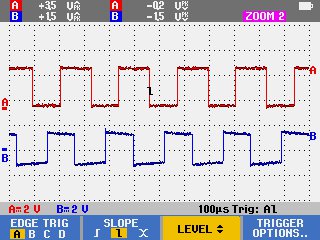
IMAGE034.jpg

In this second scope trace, the scope is setup to read across the differential signals. The A and B channels show a peak to peak voltage of 6.5VDC which corresponds to a differential amplitude of +/- 3.2VDC which is nicely within the allowable range of +/- 1VDC to +/- 7VDC. Signals are pretty clean too, especially given the number of connectors and unshielded wire segments in the circuit (no motor power applied yet...).
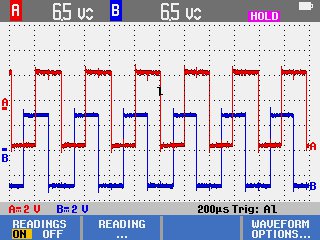
IMAGE036.jpg

The point of all of this is that the A and B incremental channels look fine. However, the drive is not recording any counts coming into it. I need to play with it some more to try to identify what is going on and why the drive is not reading the signals even though I was able to confirm they fall within the boundaries.

The second issue is the signals that I do not have. These are: Z (index +), Z* (index -), TS (Thermostat), S1 (Hall Commutation Signal 1), S2 (Hall Commutation Signal 2), and S3 (Hall Commutation Signal 3).

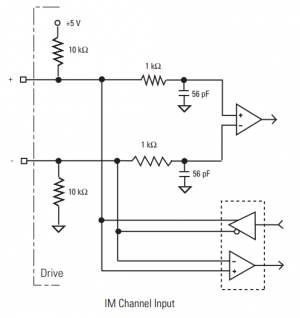
The Z (index) input circuitry according to the manual looks like this. Note the weak pull up and pull down resistors on the input channels. This suggests to me that the input will be biased to 5VDC (differential) if disconnected which is a valid high state. I have also tried tying the + input to 0V and the - to +5V to drive the circuit into a -5VDC (differential) voltage which is a valid low state. Neither of these have prevented the E07.
1590672267581.png

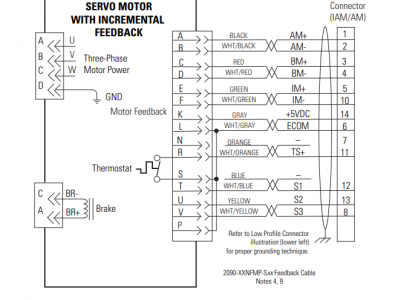
The Thermostat should be disabled from a selection I made in the CMF file, but just in case I tried grounding it out too. The thermostat is shown between pins 11 and 6. I believe it to be normally closed. I tried leaving this open and tried tying it to DC COM. Neither changed the E07. My motors do not have integral thermostats.

If this were the issue, I'd expect to get an E04 - Motor Overtemp Fault.
1590672471935.png

Here are input diagrams from another drive (Ultra 3000), but I'd expect similar or identical circuitry on the Kinetix 2000.
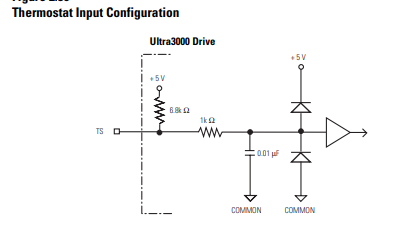
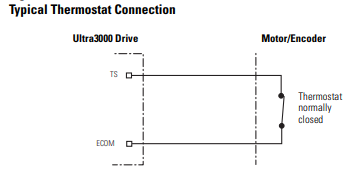
1590677319364.png

1590677353023.png

Finally we come to the hall effect inputs. These should be disabled by my selection of Incremental AQB feedback w/o Halls in the CMF file, however this configuration is not used on any Allen Bradley motor. It is supported in the drive firmware from everything I have found, but there is no documentation on how to use this feature. I can't find any input specifications or wiring diagrams either. I tried leaving them floating and tying them to DC COM, but that did not help the E07 either.

Here is an input diagram from another drive (Ultra 3000), but I'd expect similar or identical circuitry on the Kinetix 2000.
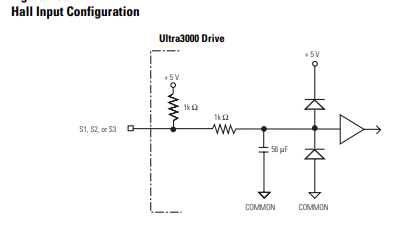
1590677261706.png

If this were the issue, I'd expect to get an E11 - MotFeedbackFault, Illegal Hall State.

As a recap: Whenever I MSO (command to turn servo on) or run the Command & Feedback hookup test (checks drive output and feedback wiring), the drive immediately faults with an E07. In the Quick View pane (notification window in Studio 5000 PLC programming software), the axis lists a Drive Fault of “MotFeedbackFault, FeedbackFault, ManufacturerSpecificFault”.

I tried the following wiring methods to try to trick the drive to accept the signals.
• Wired only A, A*, B, B*, 5V, COM
• Wired A, A*, B, B*, 5V, COM + tied Z* to 5V
• Wired A, A*, B, B*, 5V, COM + tied Z, Thermostat to COM + tied Z* to 5V
• Wired A, A*, B, B*, 5V, COM + tied Z, S1, S2, S3, Thermostat to COM + tied Z* to 5V

So far I cannot enable the motor without a fault.

One final thing to note is this table from the manual describing the encoder power supply inside the drive. All 4 encoders have their power connections tied in parallel internal to the robot. I do not think it is wise to try to parallel the power outputs from the different drives, so 1 drive will end up powering all 4 encoders. This might require more power than the supply can deliver and force me to purchase a small 5V external supply.
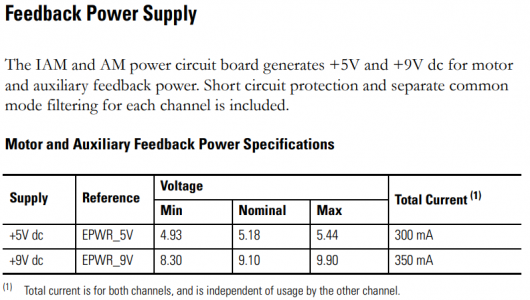
1590672767215.png
 
Last edited:
Mike,

I do not think it is wise to try to parallel the power outputs from the different drives

Agreed, not wise!

Can you measure the current draw on the four parallel encoders to see if it's anywhere near the supply limit?
Alternately, can you measure any droop in the output voltage? (although the current measurement is more useful....)

-brino
 
Mike,


Agreed, not wise!

Can you measure the current draw on the four parallel encoders to see if it's anywhere near the supply limit?
Alternately, can you measure any droop in the output voltage? (although the current measurement is more useful....)

-brino


I did a quick measurement last night on voltage droop. I can check current next. Measured at the drive terminals, the voltage is 5.10VDC. With only 1 encoder powered on (Z axis), the voltage is 4.88VDC at the encoder terminals. With all encoders powered on, sharing the same power output, the voltage measured at the Z axis encoder terminals is 4.40VDC.

I think that is probably a bit too low to be acceptable. I think the difference in voltage at the drive and at the encoder is due to wiring resistance.
 
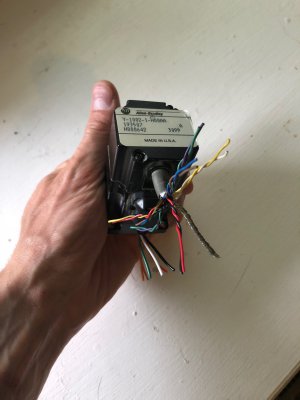
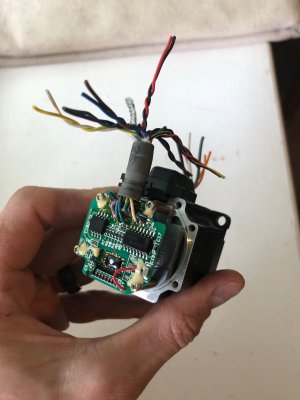
I just had a thought and wanted to add one more option for moving forward. I have a number of very old tiny servos (AB Y-series) that were thrown away with cut cables. They are the wrong winding voltage and the cables would be a pain to replace.

image072.jpg

image070.jpg

The encoder has the identical line driver to the Yaskawa encoder so I can use it as a known good reference for signal integrity and drive compatibility. I can also start removing wires one at a time to figure out what will fault the drive with an E07. The voltage signals seem to be in line with what I was scoping.

1590684182724.png

What I could also do is remove the encoder (I know it is compatible with my drive) and potentially mount it to the motors on the robot. I would only do this if the motors were physically incompatible with any of the motors on the robot in case I ever wanted to use these motors with the robot. The encoders from these motors have all 14 wires including all the commutation signals.
 
Hi all,

I have been working on the encoder dilemma quietly in the background headed in two directions. First is to try to run the servo drives using self sensing commutation. On paper they appear to be able to do this, however this is no documentation or support for the feature so progress has been slow. I still feel this is the path of least resistance to getting a running motor, however I got frustrated with it last week and set it aside.

The other path is getting the custom encoder de-multiplexer circuit to function. I have a lot of thoughts on this but let me share where I am at.

At a high level I see this circuit operating in several sequential stages.

1) Input buffering (Schmitt Triggers for noise immunity)
2) Input edge detection (Identify when inputs A or B transition states)
3) Input state memory (every input state change triggers essentially a shift register of bits to track the old input states)
4) Pattern detection (look at current and past inputs and determine which of 7 patterns are present)
5) Output generation (based on the identified pattern, switch on or off 4 outputs in particular combinations)

I have come up with a circuit to accomplish the first 3 stages. If you want to see the circuit or suggest simplifications or improvements, go here: https://www.falstad.com/circuit/

You can open the circuit in the web browser, but I like to download the offline one (link below the applet window). I have attached a circuit file below which can be opened in this applet. Alt-Click and drag allows you to pan.

Circuit Description: The circuit reads the 6 inputs (A, A*, B, B*, C, C*) which have been simplified down to 3 inputs with inverters so I can click on them to trigger the circuit. The circuit triggers on any change of A or B input detected by the logic gates at the very top of the drawing. The output of that circuit triggers the last (4th) memory block to copy the data from the 3rd memory block. Then the 3rd copies from the second, the second from the first, and finally the first from the encoder inputs. When the circuit is done with this "ripple memory" it sets the EnO bit (stands for enable out and is low when the memory is updating). Once this happens, the entire circuit ripples up from the bottom again resetting to accept new input changes. It is critical that this entire process happens faster than the encoder inputs can change state (about 1.46 us worst case). The low EnO bit would tell the next part of the circuit to ignore the outputs because they are actively changing state.

This is an asynchronous (not clocked) circuit, but the SR flip flops use a clock input as an enable. This input is high the entire time the circuit is updating and resets low once the EnO bit is set.

You can click on the H or L on the left to change the input state and trigger the circuit. Don't change another input until it is done with the whole switch/ripple/reset cycle or weird stuff happens. The change detection is NOT triggered by changes in the C input.

I have thoughts on the pattern detection part of this circuit as well as a pretty solid grasp of how to do the output logic.

-Mike
 

Attachments

  • 4 State Ripple Memory - Final.txt
    20.9 KB · Views: 4
Back
Top