Mike's SCARA Robot

"robotic Auto tool changer for my CNC mill. " Duh, misinterpreted that.
Could this arm hold a tool like a router and be used as a CNC carving unit? I was thinking if you could carve something like foam you could do awesome lost foam casting. I have seen guys do amazing stuff with that. (GM too!
)
Robert

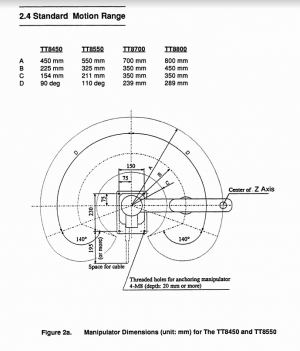
It certainly could although you'd be limited in rigidity, tool weight, and accuracy. These robots are very fast but have small payloads (22lbs max including the weight of all the fixtures, spindle motor, and cables) compared to some robots like the ones shown in your video. It actually covers an impressive ~1600 square inch work space compared to the measly 110 square inches of my G0704 mill. Now that work zone is shaped into a funny looking partial doughnut, but it still pretty large.

1588895439116.png

Robots are very repeatable (sub thousandth of an inch) but not particularly accurate due to a natural stackup of tolerances over the many linkages of the serial chain that make up the robot. Without compensation I might trust it to be within maybe 5-15 thou of the programmed location. Most robot are "taught" positions by moving it there and saving the location. These points can be adjusted as needed during operation and the programmer isn't often concerned with the absolute position of the actuator. If a robot is to perform a pre-programmed task (like CNC machining) they are often geometrically calibrated by moving in a series of specific motions and using measured positioning error to back-calculate the actual length of each link rather than the published values. There is a whole field of research on this very topic and it gets extremely complex when you get into 5, 6, 7, and greater number of axes.

So I guess yeah if you don't mind a 6" Z axis travel and you don't need to be terribly accurate, this would do nice light duty machining.
 
Last edited:
I think it could knock out foam patterns pretty fast. 15 thou would be acceptable error considering 2% shrink.
Robert
 
Quick update on the status of the robot...

Encoders are still problematic, although I have a pretty good feeling that my drives will be ok to do self-sensing commutation. I need to verify that still but there are references in the manual to it. I have a couple of feelers put out to people who might be able to point me in the right direction.

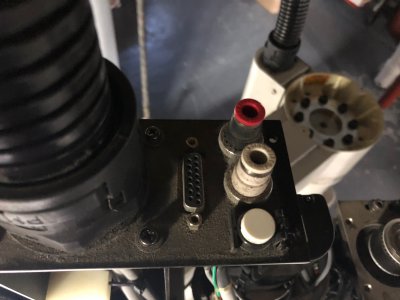
IMG_8750.jpg

Here is the user connections location on top of the robot. You get 15 pins to wire whatever you want (up to 30V 3A). There are also two 6mm air lines that you can use up to 85psi. All of that is run through the cable duct in the robot. You could also run your own wiring outside the robot but you have to take into account all the crazy positions they can get into. The white circle is the manual brake release button.

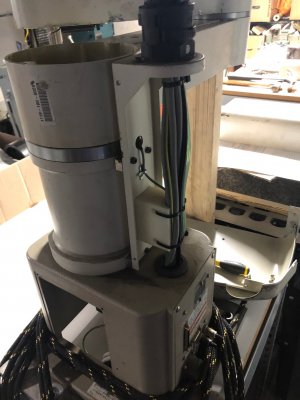
IMG_8754.jpg

I popped the covers off the base which shows the cables headed up to the head of the robot and the cable entry for the T1 optical home switch.

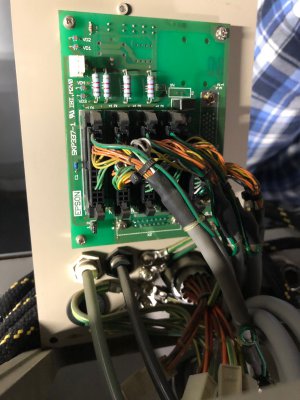
IMG_8758.jpg

Here is that circuit board. All the wires land on 4 connectors which have traces on the board going to the 68 pin connector on the right. Interestingly, this board shows "Epson" on it even though Seiko wouldn't sell the robotics business for another two years after this was built. Wonder if it was a spare part?

IMG_8765.jpg

I was able to confirm the Z axis brake and all the sensors run on 24VDC. The U axis pinion gear is not integral to the motor shaft but rather a separate component that screws on. This means the U motor could be replaced if needed.

I had a look through the motor file I need to write to run these and found a few additional motor parameters that I need that I do not have. In particular I will be most concerned about figuring out what the "Voltage Constant" is and what the units are. Haven't seen this published so I might need to measure it...
 
I think it might be useful if I gave a brief intro to servo motors and drives for those unfamiliar.

Servo Motor:

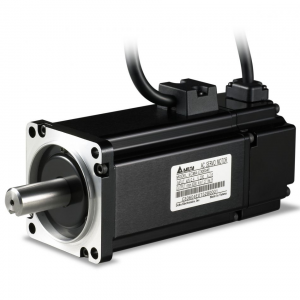
Servo motors refer to any motor which regulates position, speed, or torque based on feedback. These can be AC surface permanent magnet, AC interior permanent magnet, DC brushless, DC bushed, stepper motors, etc. The most ubiquitous is the 3 phase synchronous AC servo motor. It is a 3 phase motor with permanent magnets on the rotor (usually on the surface but sometimes buried within). The word synchronous means that the rotor will rotate at the same speed as the electromagnetic field (which is not the case with induction motors). An encoder, which is a shaft angle measuring device, is always present to provide feedback to the servo drive on the location of the motor. The servo drive will compare the motor position to the commanded position and adjust the AC output to correct for any errors in the motor's positioning. You can typically identify a servo by 2 cables exiting the motor (one for power and one for feedback), but some newer motors pack it all in one cable. Also, if it looks expensive, it is probably a servo.
1588898086851.png

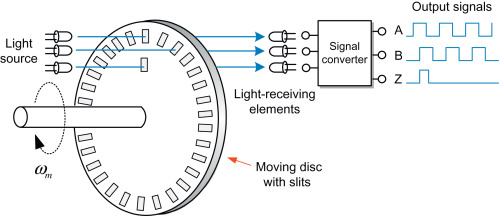
There are dozens or hundreds of kinds of encoders, but the simplest kind (also the kind on this robot) is an optical incremental encoder. This encoder reads a series of slits in a wheel using optical means. The pattern is usually etched in metal on a glass substrate. a pair of receivers provide a pair of square wave signals with a 90 degree phase offset. By looking at the rising and falling edges of the signal as well as which signal is leading the other you can count distance and direction. The drive uses this to calculate the derivative (speed), second derivative (acceleration), and often higher order terms (jerk, snap, crackle, and pop - not kidding). There is often a third slit that occurs in only one position called the "Z" or "Index" signal. It is useful for homing among other things.
1588898349351.png

Other types of encoders include magnetic, capacitive, as well as absolute variants of each. Absolute encoders know the exact position of the encoder at power on without needing to find the index mark and some can even track the position while powered off with miniature gearboxes. These are obviously more expensive and complicated, but are often the preferred choice for real industrial applications. My CNC uses absolute encoders and loads the position into Mach 4 at startup using serial communications.

Servo Drives:

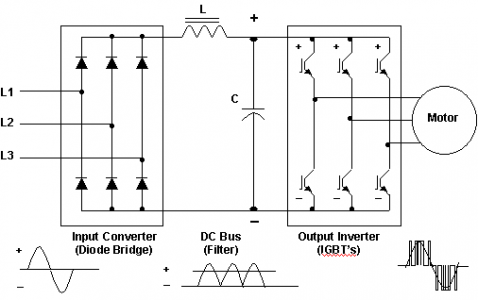
An AC servo drive is really just a very smart and fast VFD. The AC power enters the drive and is converted into a high voltage DC bus using diodes or SCRs. The DC bus is smoothed and filtered before being presented to 6 IGBT (Isolated Gate Bipolar Transistors) which rapidly switch on and off to approximate an AC voltage waveform at the outputs. The voltage is not a true sinusoid which is why inverter duty motors exist, but the current waveform is a true sinusoid. Here is a very simplified diagram of the inside of the VFD.
1588898836259.png

The real magic of a servo drive is the high speed processing that occurs to figure out the motor position, positioning error, and the required waveform at the output to achieve positioning. The control algorithm relies on a highly detailed model of the motor response, hence why all the parameters I keep talking about are so very important. If you get them wrong the motor may function very poorly or even burn up.

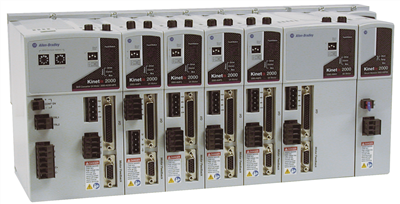
Entry level servo drives and some standalone models get their command from a pulse train like 99% of hobby CNC guys (including me) use to control their motors. Higher end models will communicate with a central controller over an ultra fast communication network like Ethernet (EthernetIP or EtherCAT) or perhaps a fiber optic network like SERCOS. The Allen Bradley Kinetix 2000 drives I plan to use for this robot will communicate with the PLC over SERCOS. The Kinetix 2000 is a low power rack mounted drive with power sharing. The picture below shows a 6 axis system with a power shunting module on the far right.
1588899142279.png

So what's so important about commutation? I don't need to worry about that with my VFD...

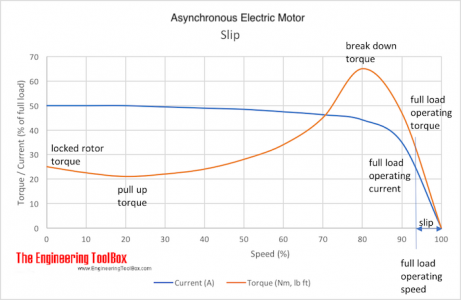
VFDs typically run asynchronous induction motors. These motors always run slower than the electromagnetic field rotation due to a phenomenon known as slip. Current (and therefore magnetism) will only be induced on the rotor when the stator's magnetic field is rotating relative to it. The closer an induction motor gets to the speed of the magnetic field, the less torque will be produced on the rotor . There is a balance point where the load of turning the motor shaft equals the the torque produced. If a load slows the rotor, the greater difference in rotor speed to magnetic field speed creates increased torque. Since the rotor is magnetized by the relative velocity only, it does not matter what position the rotor is in.
1588899545972.png

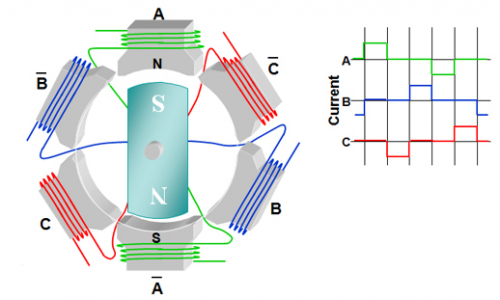
This is not true of permanent magnet AC servo motors which have rotors that are permanently magnetized by magnets glued to their surface. The drive must know the exact mechanical position of the north and south poles of the magnets so it can appropriately time the firing of the windings on the motor. This is known as commutation. If this is not done correctly the motor may not be able to move or it might burn up. Often, the encoder relays additional signals to the drive to indicate the absolute pole position. These are absent from my motors hence all my difficulty.

Some servo drives can self sense the commutation angle by locking one of the winding with DC voltage and measuring the resulting shaft angle, however this is not particularly accurate, is influenced by load placed on the motor, and causes the motor to move without being commanded to do so (up to 1/8 of a revolution).

The signals on the right are typical of trapezoidal commutation signals created by an encoder that actually provides commutation signals.
1588899823618.png

EDIT: An important thing to add is that every manufacturer goes out of their way to make sure that you can only use their motors and drives together. It is very difficult to find all the motor info from one manufacturer that another needs to run a motor. Sometimes manufacturers don't even let you try to enter the motor data from another manufacturer. Very frustrating. I would highly recommend that unless you really know what you are doing, to avoid mixing and matching servos.

Also servos can be very complicated to set up so buy from a manufacturer who can support you and provides excellent documentation. I'm helping a guy on another forum who spent a lot of money on Alibaba servos that came with manuals that had a mix of Chinese, Russian, and a little English. Trying to set them up totally made whatever money he saved not worth it at all.
 
Last edited:
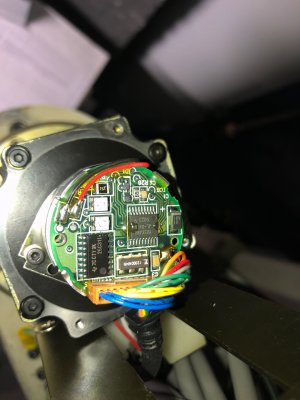
Trying to identify the parts on your encoder.....

The first one the TI 26C31I is easy enough; it is a "QUADRUPLE DIFFERENTIAL LINE DRIVERS"
datasheet available here:
http://www.datasheetcatalog.com/datasheets_pdf/A/M/2/6/AM26C31I.shtml


However the Yaskawa JL-041A looks like a custom ASIC.
Some info here:
https://www.jotrin.com/product/parts/JL_041A
and here:
https://www.kynix.com/Detail/59180/JL-041A.html

but even when I created a throw-away user login for that first site, the datasheet links only pointed to the Yaskawa home page:
https://www.yaskawa.com/?filetype=datasheet&kw=JL-041A
The second one links to alldatasheet, that basically says"no such part":
https://www.alldatasheet.com/view.jsp?Searchword=JL-041A

They do have some big catalogs on their AC servo drives:
https://www.google.com/url?client=i...FjAAegQIAxAB&usg=AOvVaw10LSLeRT0vke3ewN61tCR9

https://www.google.com/url?client=i...FjABegQIAhAB&usg=AOvVaw32daytl2hbQ6f7ecIZH6T0

-brino
 
Weekend Update!

I spent much of Friday night trying to figure out how to create a Custom Motor File (CMF) and get Studio 5000 Logix Designer (PLC programming software) to accept the file. There is a checksum included in the file to prevent people from trying to edit or create these files on their own. Long story short, I got it working, but I shouldn't share the details. Fun couple of hours playing with it and another major hurdle overcome.

There are a lot of integer constants in this CMF file that tell the software which drives this motor is allowed to be run on, what search categories it should appear in, and what type of feedback it uses. I was able to open the motion database file in Microsoft Access and read what all the integer codes related to. I was able to use this info to pick out which codes I needed to include.

I am still missing two critical pieces of motor data (winding resistance and voltage constant) for 3 of the 4 motors. I know Yaskawa has this info and I am very hopeful that they can share it with me for the missing motors. With this info, theoretically I am able to start running the motors (I doubt it will be quite that easy).

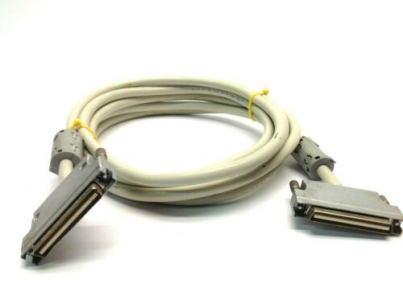
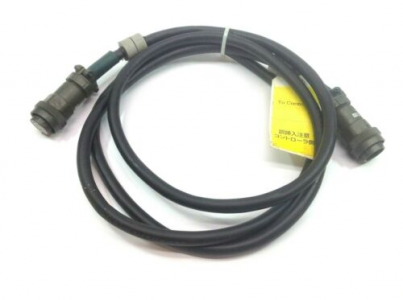
I was also able to locate a set of original cables for the robot. Got low best offers accepted on both of them so I ended up paying 1/5 of what most sets of those cables were being sold for on eBay. I'm very excited about that. I had planned on chopping on end off of each cable and landing the wires on terminal blocks, but now that I realize how hard the cables are to get, I think I will look around for the mating receptacle that would have been on the SRC320 robot controller so I can plug the cable between the robot and my new controller.

1589203997690.png

1589204015466.png

I think I am on hold until the cables arrive and Yaskawa provides motor data to me. From there I think the next step will be to try running the motors on the drives using the CMF files I have made. I expect to have some issues with this, but I am still hopeful I can get these working. I think I still have all 3 options for running the robot open to me:
  1. Run original motors with original encoders
  2. Run original motors with aftermarket commutation encoders
  3. Replace motors entirely
 
I had planned on chopping on end off of each cable and landing the wires on terminal blocks, but now that I realize how hard the cables are to get, I think I will look around for the mating receptacle that would have been on the SRC320 robot controller so I can plug the cable between the robot and my new controller.

Are those 68-pin SCSI connectors? (https://en.wikipedia.org/wiki/SCSI)
If so, I might be able to find some in the junk drawer and send them along.

-brino
 
Are those 68-pin SCSI connectors? (https://en.wikipedia.org/wiki/SCSI)
If so, I might be able to find some in the junk drawer and send them along.

-brino

Yes! They are 68 pin MDR (I think this is equivalent to SCSI?)

The controller used a Hirose Electric DX20A-68S. I've attached the data sheet and the link to the product catalog is here:


I think the connector is a female socket and has a pitch of 0.050".

Thanks so much for the offer @brino

Also thanks for the reply above regarding the encoder ICs. I hit the same dead ends that you did unfortunately!
 

Attachments

  • DX20A-68S (2).pdf
    203.9 KB · Views: 2
Did some research on the Circular power connector for the robot. I wanted to get the original which would have been installed on the rear of the SRC320 robot controller.

The connector is made by JAE electronics and is part of the JL05 connector family.

The connector on the controller end of the robot cable is JL05-6A20-29PC-A66F0.

The mating connector on the SRC320 controller is JL05-2A20-29SC-F0

The socket contacts in this connector are ST-JL05-16S-C1

The connector shell is listed on many websites but is not in stock at most. My best lead so far has been RS components but their website is not showing stock availability right now. https://americas.rsdelivers.com/pro...emale-box-mount-connector-17-contacts/6269378

Digikey has the socket contacts for sale at $0.75 each. https://www.digikey.com/product-detail/en/jae-electronics/ST-JL05-16S-C1-100/670-2343-ND/2044253

Digikey also has the MDR68 panel mount connector available for $17 if @brino doesn't have the connector in his collection (thanks!!!): https://www.digikey.com/products/en?keywords=DX20A-68S

This connector has small pins for connecting to a PCB. I don't have a great way to connect to this, so I might need to order a custom PCB that breaks these pins out to screw terminals.

EDIT: Was able to get all the parts at Mouser for the best price I was able to find. Total cost for all the parts ended up being about the same as the cables :rolleyes:. I guess the upside is that I don't have to cut the cables now.
 
Last edited:
Robot cables and mating connectors should be here today! I really hope everything fits together (I have about 95% confidence here). EDIT: Cables came in and fit perfectly. They are used and a bit dirty, but I'm super excited about finding them and getting them for the price I did.

I created a CMF file for the 400W T1 servo and successfully imported it into Studio 5000 Logix Designer. I am not sure how well this will run yet, but at least I figured out how to import it! The servo drive might also reject what I am trying to do (self-sense commutation) at a firmware level. I won't know until I power it up and download.

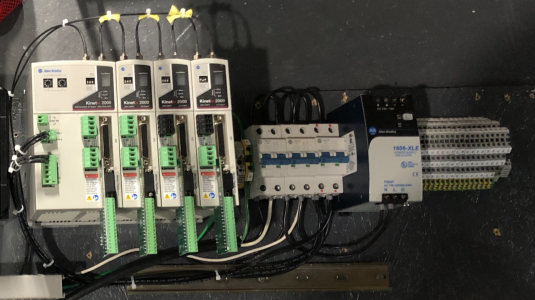
Here are the Kinetix 2000 servo drives. On top is a single channel fiber optic ring. The 4 pin connectors on the front are for the motor output and the brake, and the large connector on the bottom is for motor feedback. The plastic shell is missing off of that connector because I didn't have the correct boards for the Kinetix 2000, but I did for a Kinetix 6000 (big brother) which fit fine if you pull the plastic shell off. The left drive is much bigger than the others because it also handles converting the 240VAC to 325VDC and sharing that power across a backplane with the other drives. If one motor needs to slow down, it regenerates voltage back onto the DC bus which is available for use by any of the other drives. If the bus voltage gets too high, the first drive will shunt that power through a resistor. There is also a 44 pin I/O connector which I will need to use to hook up the optical home switches to the drive.

I have a 20A breaker for the main 240V line, a 6A for the PLC and 24V PSU to share, and 6A for the drives. 6A is a bit small for these drive's full capacity, but I won't be going anywhere near that limit. The first drive is able to convert 3kW of power for all drives to share. I have (3) 600W drives and (1) 300W drive in the rack right now.

image011.png

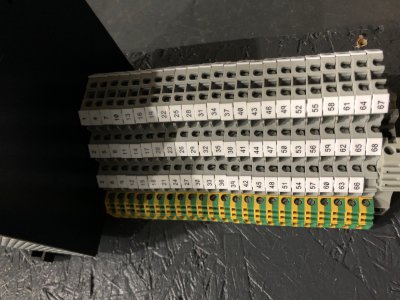
I also installed and labeled these 3 tier terminal blocks to hook up the 68 pin SCSI cable to. I figured this would be the cleanest way to have room to work on the signals. I'll machine some sort of bracket to hold the receptacles and then bring the wires from the back into these terminals. I am not looking forward to soldering flying lead wires onto that SCSI connector. I found a flying lead receptacle for sale but it was $1300!

image012.jpg

EDIT: Been looking online for the correct accessories for the Kinetix 2000 drives and they're not too expensive. If the drives end up working with these motors, I may buy the correct motor feedback + 44-pin I/O combo connector as well as mounting arms to hold and ground the power cables.
 
Last edited:
Back
Top